Changing the Look of Characters and Paragraphs with Styles
Microsoft Office Speciailist As you change the appearance of the text in your documents, you might find that you have created a look, or style, of your own. In Word, a style is a collection of character and paragraph formatting that can be saved. Then instead of applying each format individually, you can apply all of them at once by using a style.
Styles come in two varieties:
-
You use character styles to format selected characters. You can apply character styles to a single letter, a word, a paragraph, or the entire document. This type of style consists of collections of attributes. For example, a character style might specify that the selected text should be 18-point, bold, underlined, and red.
-
You use paragraph styles to format entire paragraphs. This type of style consists of indents, alignment, paragraph and line spacing, bullets or numbering, and tabs as well as character attributes to be applied to the entire paragraph. For example, a paragraph style might specify that the paragraph containing the insertion point should be centered, with a border and a hanging indent, as well as 18-point, bold, underlined, and red.
Styles are stored in templates, and Word’s default template is called the Normaltemplate. Unless you specify otherwise, the documents you create are all based on the Normal template, which contains a set of predefined styles. The most basic of these predefined styles, Normal style, is used for all regular paragraphs, formatting them as 12-point, regular Times New Roman text that is left-aligned and single-spaced, with no extra space above and below it.
All the text you type in documents based on the Normal template uses the Normal style until you apply another style. For example, you might apply the predefined Heading 1 style to text you want to serve as a document’s title. To apply another style, you can click the down arrow to the right of the Style box on the Formatting toolbar and make a selection from the drop-down list, or you can use the Styles and Formatting task pane.
| Tip | If a wavy blue line appears under a word or phrase as you type, Word detects inconsistent formatting. To remove the wavy blue line without making any change, right- click the word or phrase, and then click Ignore Once to bypass that instance of the inconsistency, or Ignore All to bypass that and all upcoming instances of the inconsistency. To turn off the formatting options, click Options on the Tools menu, click the Edit tab, clear the “Keep track of formatting” check box, clear the “Mark formatting inconsistencies” check box, and click OK. |
When Word’s predefined styles don’t meet your needs, you can create new ones in several ways:
-
You can modify an existing style. You can redefine the style for just this document or for all documents based on this template. The formatting of any text to which you have already applied the style will be updated to reflect the new definition.
-
You can create a style by example. You can format text the way you want it and then create a style that reflects the look of the text.
-
You can define a style from scratch. You can click New Style in the Style and Formatting task pane and then use the New Style dialog box to specify the character formatting and paragraph formatting for the style.
Tip If you want to define a style for a bulleted or numbered list, click Bullets and Numbering on the Format menu. Then click the List Styles tab, click Add, define the style, and click OK.
In this exercise, you will apply, modify, and delete a style using the Styles and Formatting task pane.
| USE | the FormatStyle document in the practice file folder for this topic. This practice file is located in the My Documents\Microsoft Press\Word 2003 SBS\ChangingText\ChangingStyle folder and can also be accessed by clicking Start/All Programs/Microsoft Press/Word 2003 Step by Step. |
| OPEN | the FormatStyle document. |
-
If necessary, change the Zoom setting to 100%, and then select the Why Compost? paragraph.
-
On the Format menu, click Styles and Formatting.
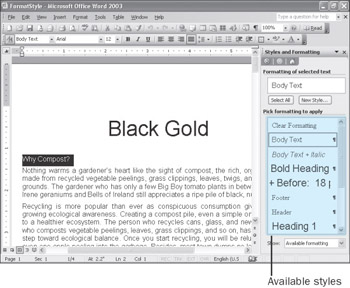
The Styles and Formatting task pane appears.
-
In the Styles and Formatting task pane, point to the Formatting of selected text box.
A ScreenTip appears, listing the formatting of the style applied to the selected text. In this case, the style is Body Text.
-
Scroll down the Pick formatting to apply list, and click the Heading 2 style.
The selected text changes to reflect the formatting assigned to the Heading 2 style.
-
Scroll down the document, and select the What Is a Compost Pile? paragraph. Then scroll until you can see How Do You Make a Compost Pile?, hold down the[CONTROL] key, and select that paragraph. Then add the Hot or Cold? and Compost and Soil paragraphs to the selection.
-
In the Styles and Formatting task pane, click the Heading 2 style to apply the style to the selected paragraphs.
-
Scroll to the top of the document, click anywhere in the Why Compost? paragraph, and in the Styles and Formatting task pane, click Select All.
Word selects all the text formatted with the style of the selected text, which is Heading 2.
-
In the Styles and Formatting task pane, click New Style.
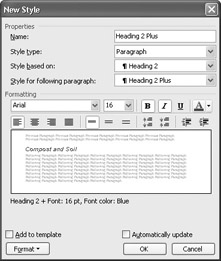
The New Style dialog box appears.
-
In the Name text box, type Heading 2 Plus to create a new style of that name.
-
In the Formatting area, click the down arrow to the right of the Font Size box, and click 16. Then click the down arrow to the right of the Font Color box, and click the Blue box in the sixth column of the second row.
-
Click OK to close the New Style dialog box.
The Heading 2 Plus style appears in the Styles and Formatting task pane.
-
In the Styles and Formatting task pane, click the Heading 2 Plus style.
Word applies the new style to all the selected paragraphs. A ScreenTip tells you the main characteristics of this style.

-
In the Styles and Formatting task pane, point to the Heading 2 Plus style, click the down arrow that appears to its right, and click Modify.
The Modify Style dialog box appears.

Italic
-
In the Formatting area, click the Italic button to deselect that attribute, and click OK.
The Heading 2 Plus style is updated, along with all text to which the style is applied.
-
In the Styles and Formatting task pane, click the Heading 2 style.
The selected text changes to reflect that style.
-
In the Styles and Formatting task pane, point to the Heading 2 Plus style, click the down arrow that appears to its right, and click Delete.
A message asks whether you want to delete the style.
-
Click Yes to delete the Heading 2 Plus style.
-
At the bottom of the Styles and Formatting task pane, click the down arrow to the right of the Show text box, and then click Formatting in use.
The task pane now lists only the styles actually used in the document.
-
Close the Styles and Formatting task pane.

Save
-
On the Standard toolbar, click the Save button.
Word saves your changes to the document.
CLOSE the FormatStyle document, and if you are not continuing to the next chapter, quit Word.
EAN: 2147483647
Pages: 156