Lesson 1: Managing the Windows 95 File System
Managing files and data is a critical function of any operating system. Compared with previous operating systems, Windows 95 has a much-improved file management system. It provides two useful tools for file management: My Computer and Windows Explorer. This lesson explores these components.
After this lesson, you will be able to:Estimated lesson time: 30 minutes
- Find and manage files.
- Manage the Recycle Bin.
- Perform basic disk and file maintenance.
- Identify and implement various troubleshooting techniques.
File Management Improvements
The Microsoft Windows 95 file system is better and faster than the Windows 3.x file system. The following table summarizes the significant improvements.
| Feature | Improvement |
|---|---|
| 32-bit VFAT | Disk access is provided by the 32-bit VFAT (virtual file allocation table). This virtual device works in protected mode, requiring no time-consuming mode changes every time the system needs to write to the disk. |
| Long filenames | Filenames can now be as long as 255 characters (including the path). Long filenames in Windows 95 are implemented without creating incompatibilities with 16-bit applications. |
| Demand paging | This is an advanced algorithm for paging memory to the swap file. It is faster than a permanent swap file in Windows 3.x and dynamic (adjusts according to the load on the system). |
| VCACHE | This 32-bit cache driver replaces SMARTDrive (a 16-bit real mode driver). |
| CD-ROM support | Windows 95 uses a protected mode 32-bit file system to speed up CD performance, CDFS (CD-ROM File System). |
| IDE and SCSI support | Windows 95 has its own EIDE and SCSI drivers so it no longer relies on third-party drivers. |
| Port drivers | These 32-bit drivers communicate directly with specific disk devices, thus allowing a floppy disk to be formatted in the background. |
Managing Files with Explorer
Windows 95 offers two methods of locating and organizing files: My Computer and Windows Explorer. The latter is an advanced version of the Windows 3.x File Manager; Explorer is the better choice for computer professionals. There are three simple ways to open Windows Explorer:
- From the Start menu, select Programs and then select Windows Explorer.
- Right-click the Start button and select Explore.
- Right-click My Computer and select Explorer.
For the most part, Explorer works just like File Manager. Explorer looks similar to File Manager, although it lacks the drive icons (disk drives and networks in the Folder window). Unlike File Manager, which featured multiple windows for different folders, Explorer is not a Multiple Document Interface.
Windows 98 Explorer
The Windows 98 and Windows 95 OSR2 operating systems feature improved versions of Explorer. When using these systems, you will find somewhat different menus and dialog boxes than those presented in this course; however, they contain all the information covered here and more.
By default, Windows 95 hides the Explorer toolbar. To open it, select Toolbar from the View menu. This will display several tool icons. (See Figure 17.1.) These tools provide several ways of viewing information.
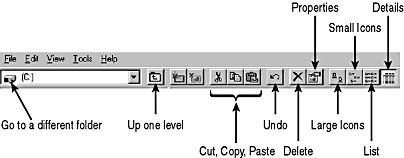
Figure 17.1 Windows Explorer toolbar
Displaying File Extensions
By default, Windows 95 does not display registered file extensions. A registered file extension is one that Explorer can "understand"—in other words, an extension that Explorer can associate with an executable program (the source of the file). So, for instance, you will not see extensions such as .EXE, .DOC, .JPG, and so forth. Any file extension that Explorer does not recognize is considered text and is displayed. With this system, Windows 95 allows users to open any file (with a registered file extension) by simply double-clicking its icon in Explorer. (See Figure 17.2.) If you try to rename a file and forget to add an extension, or if you delete the existing extension, Windows will warn you of a potential problem.
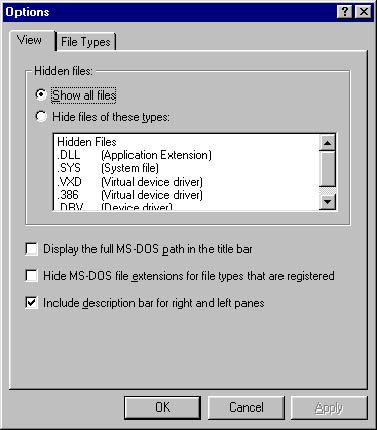
Figure 17.2 Displaying file extensions
To display all registered file extensions in the Contents window of Explorer, select Options from the View menu and remove the check from the Hide MS-DOS File Extensions box. Check Show All Files.
From this dialog box, you can also:
- Show all files, including hidden files.
- Select which files to hide.
- Display the full MS-DOS path.
- Enable or disable the description bar (displays the full path and filename of the selected file or folder).
The File Types tab of this dialog box allows you to review and edit the registered file types.
Sorting Files and Folders
The objects in the Contents window can be viewed in one of several formats. You can use the View menu on the menu bar or the View icon on the toolbar to change the view (Large Icon, Small Icon, List, or Details). When you use the List or either of the icon views, all files are displayed alphabetically by folders, then by files. However, when using the Details view, you have several options for sorting the information. By selecting Arrange Icons from the View menu, you can arrange the information in the Contents window in useful order, as shown in the following table:
| By Name | Alphabetically. The default setting. |
| By Type | In ascending alphabetical order by file type with folders first. |
| By Size | In ascending numerical order by file size with folders first. |
| By Date | In ascending order by the last modified date with folders first. |
| Auto Arrange | When activated, this command sorts the objects automatically if moved or if a new one is added. This works only in icon views. |
NOTE
Clicking the Column heading of the Contents window also arranges the contents according to that column.
Moving Objects Within Explorer
One of Explorer's most useful functions is the ability to move and copy files from one location to another. Explorer uses two methods to accomplish these tasks.
Drag-and-Drop
Drag-and-drop simply means visually moving an object from one location to another. Most users know how to do this instinctively: select an object by left-clicking and holding the mouse button, move the object to a new location (the destination folder must be highlighted), and release the mouse. If you hold down the CTRL key while dragging, the object will be copied instead of moved (you'll see a small plus sign attached to the mouse pointer icon during copy operations).
Here are a few rules for drag-and-drop:
- When the source and destination folder are on the same disk, drag-and-drop moves an object. To copy the object instead, hold down the CTRL key.
- When the source and destination folders are on different disks, the object is copied. To move the object, hold down the SHIFT key.
- When the object is an executable file (.EXE), a shortcut will be created in the destination folder.
Cut, Copy, and Paste
Any file or folder (including its contents) can be cut, copied, or pasted from any folder or drive to another.
NOTE
To cut, copy, or paste an object, you must first select it.
There are four methods to accomplish this:
- Use the icons on the toolbar.
- Select the object to be cut or copied, and right-click it. Choose Cut from the pop-up menu, then choose the destination location, right-click, and select Paste from the menu.
- Use the key commands: CTRL+X (Cut); CTRL+C (Copy); or CTRL+V (Paste).
- Use Cut, Copy, and Paste from the Edit menu.
NOTE
In addition to using Explorer, you can also manipulate files using My Computer. The methods for moving, copying, and pasting are very similar.
Properties
The Properties command is probably the most important command of all. It is found throughout the Windows 95 environment and especially in Explorer. Any time you need to know more about an object, right-click the icon and choose Properties. It is usually found at the bottom of the shortcut menu. It can also be found as a command button at the bottom of a dialog box or at the bottom of the File menu in Windows. By selecting this option, you will be directed to dialog box(es) that provide the details of the object and often allow you to make changes.
NOTE
You should always look for "Properties" when you are working with applications or objects. Often this is the key to configuring that object to work for you.
Searching
In today's multigigabyte world, finding a file is like looking for that proverbial needle in a haystack. To overcome this problem, Windows 95 has a new and intuitive Find feature. (See Figure 17.3.) Finding a file has never been easier:
- To search a particular folder, highlight the folder and, from the Tools menu, select Find, and then select Files or Folders.
- To search the entire desktop (all drives in the computer), click on any part of the Explorer window and press F3. The default selection searches the C drive, however, you can select any drive or My Computer to search the entire computer.
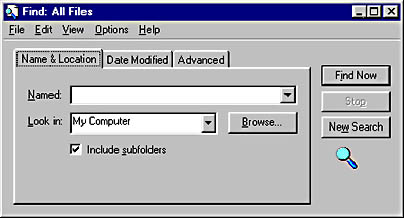
Figure 17.3 Find dialog box options
There are three methods of searching. You can search by Name and Location, Date Modified, or Advanced.
Search by Name and Location
This tab will let you search for files or folders by name. It will also let you specify the drive or folder in which to search.
Here are a few helpful hints to limit your search:
- If the filename contains a space (more than one word), enclose the name in quotation marks.
- When searching for multiple files, separate each name with a space, comma, or semicolon.
- Remember that file searches are not case-sensitive.
- Remember that all MS-DOS wildcards work with Find. (See Chapter 15, "Software: MS-DOS and Windows 3.x," for more about MS-DOS wildcards.)
Search by Date
If you don't know the name of the file, but know approximately when it was created or last modified, use this tab. There are three methods for searching with this tab. You can search:
- Between any two dates.
- During the previous x months.
- During the previous x days.
Using Advanced Search
The advanced search tab provides some additional search techniques. You can search:
- By type of file (requires a registered file extension).
- By size of file.
- For any file containing a specific word or phrase.
The Windows Taskbar
The Windows 95 taskbar provides a single location in the interface for important information. By default, it sits at the bottom of the screen, but it can be moved by the user. By clicking and dragging any portion of the taskbar that is not a button, you can move it to the top, bottom, left, or right of the screen. It is comprised of three sections.
- The notification area (also called the system tray) contains the clock (if you point your mouse at the time, the date will pop up) and any icons representing applications that are running in the background (printer, scanner, antivirus program).
- The Start Button opens programs.
- Each Open program is displayed on the taskbar as a button (between the notification area and the Start Button) that contains the program name and icon.
NOTE
The more open programs there are, the smaller each button appears.
The Recycle Bin
In the early days of the computer, accidental deletion of files was a common occurrence. When a file was deleted, MS-DOS did not delete the contents—it changed the first letter of the filename to a lowercase Greek letter, sigma, and changed all the file's FAT entries to 0 (the clusters could now be used by another file). Later versions of MS-DOS included an UNDELETE command, which could restore a file (provided no other file had used the clusters). However, unless the file was recovered immediately after being deleted, the chances of recovery were slim.
Windows 95 has overcome this problem by creating the Recycle Bin, which is a hidden folder that holds deleted files. The files stay safe and out of sight in this folder until they are removed from the Recycle Bin. You can restore any file by opening the Recycle Bin, selecting the file, and selecting Restore from the File menu. The Recycle Bin is a great tool, but it is not perfect. Here are some things to be aware of:
- Emptying the Recycle Bin permanently deletes the files.
- Floppy disk and network drive deletions are permanent.
- The Recycle Bin can be bypassed by holding down the SHIFT key while deleting. This permanently deletes a file.
- The Properties dialog box (right-click on the Recycle Bin icon) allows you to customize Recycle Bin activities. You can configure a Recycle Bin independently for each drive, select to remove files immediately when deleted, or set the maximum size of the Recycle Bin.
Managing Disks
In addition to managing files, a computer technician must be proficient in managing disks. Windows 95 provides several tools to make this job easier.
Disk Maintenance
Windows Explorer is as helpful in managing disks as it is in managing files. By right-clicking a disk's icon (see Figure 17.4), you can access a full menu of disk-management options.
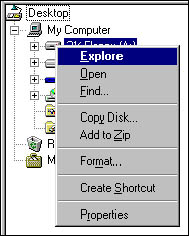
Figure 17.4 Disk management options
The two most common disk-management tools are Format and Copy.
Formatting a Floppy Disk
Follow these steps to format a floppy disk:
- Insert a disk into the floppy disk drive.
- From Explorer, right-click the drive containing the disk and select Format. Do not highlight the drive first—Windows 95 will not let you format if the drive is highlighted first.
- Use the Capacity drop-down list to select the correct drive size.
- In the Format group, choose from Quick (removes files but does not check for bad sectors), Full (removes files and checks for bad sectors), or Copy System Files Only (makes a bootable disk but does not delete any data).
- Select any other options: Label (to add a label of less than 11 characters), No Label (to delete an existing label), Display Summary When Finished (to display a summary of the results of the formatting process), or Copy System Files (to add system files after formatting is complete).
- Select Start and the formatting process will begin.
Copying a Floppy Disk
Follow these steps to copy a floppy disk:
- Insert the disk to be copied in the floppy disk drive (this is the source disk).
- From the Disk Management menu, select Copy Disk.
- From the Copy menu, highlight the disk to be copied (source).
- From the Copy menu, highlight the disk to be copied to (destination).
- Click Start to begin the process.
- When all the data is copied from the source disk into memory, you will be prompted to insert the destination disk.
- If the destination disk is unformatted, Windows 95 will format it first.
- When the copy process is finished, select Close.
Viewing Disk Properties
By selecting Properties from the Disk Management menu, you will be able to see statistics about the drive. Figure 17.5 shows the Disk Properties dialog box.
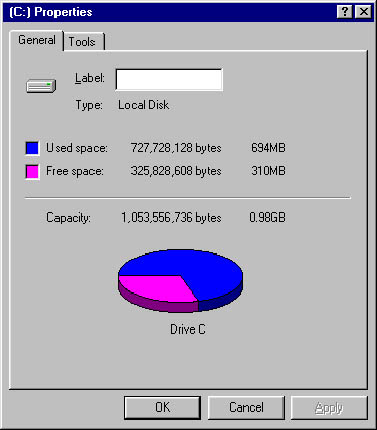
Figure 17.5 Disk Properties dialog box
By selecting the Tools tab, you can perform basic maintenance on the selected drive. You can check the:
- Error-checking status: This tells you when ScanDisk was last run and allows you to run ScanDisk.
- Backup status: This tells you when the disk was last backed up and allows you to backup.
NOTE
Backup hardware (tape or disk drive) must be installed before a ScanDisk backup can be performed.
- Defragmentation status: This group tells you when the drive was last "defragged" and allows you to defragment the disk (rearrange disk sectors so that files are stored on consecutive sectors in adjacent tracks).
Partitioning a Disk in Windows 95
Partitioning a disk increases its storage efficiency by reducing waste or cluster overhang. Basically, the smaller the drive, the more efficient it is. As discussed in Chapter 8, Lesson 2: Hard Disk Drives, the basic unit of a hard drive is a cluster, and its size depends on the size of the partition. Also, a cluster can contain data from only one file.
If you have a file that is 4000 bytes and a cluster size of 8389 bytes, you will have 4389 bytes of wasted space. By creating several smaller partitions, you will have smaller clusters and, therefore, less waste. Creating a partition in the Windows 95 environment follows the same process as with MS-DOS and is explained in detail in Chapter 8, "Basic Disk Drives." Here are a few things to keep in mind when partitioning in Windows 95:
- Use FDISK to partition a drive.
- FDISK destroys all data on the drive.
- FDISK must be run from MS-DOS. The computer must be booted from the startup disk.
FAT32
One of the advantages of using FAT32 with Windows 95 OSR2 or Windows 98 is that you can create partitions up to 8 GB and limit the cluster size to 4 KB.
Lesson Summary
The following points summarize the main elements of this lesson:
- Windows 95 provides two tools for managing files: My Computer, which is designed for the novice user, and Windows Explorer, which is intended for the more advanced user.
- Objects in Explorer can be displayed in several formats, and copied or moved as necessary.
- The Recycle Bin is a key tool for preventing accidental loss of data.
- The process for partitioning disks in Windows 95 is the same as for MS-DOS.
EAN: N/A
Pages: 127