Backing Up and Restoring Project Server and STS
After installation you should back up your newly installed system. You can use the method I present in this section to back up your implementation or you can use commercial tools to automate this process. To do this you must back up the Project Server and STS databases and the STS subwebs.
Backing Up
To back up Project Server and STS, perform the following steps:
-
Open SQL Enterprise Manager and expand the Server folder, then the Databases folder.
-
Right-click either the Project Server or STS database and select All Tasks
 Backup Database to open the SQL Server Backup dialog box, as shown in Figure 6-9.
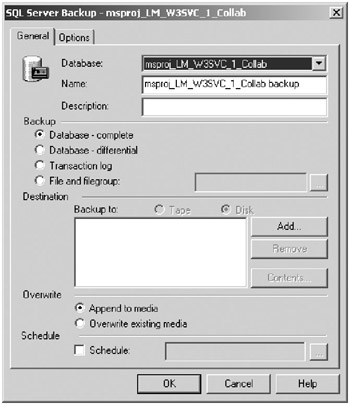
Figure 6-9. The SQL Server Backup dialog box -
Click the Add button in the Destination section to open the Select Backup Destination dialog box.
-
You must provide a file name for the backup or use the Backup Device option to select a device destination for the backup. In this example I use a file name, as shown in Figure 6-10. Click OK twice to run the backup.
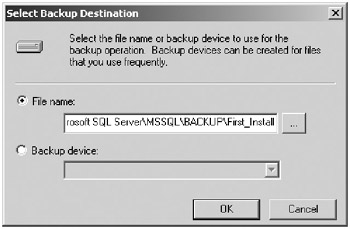
Figure 6-10. Provide a file name for the backup. -
Repeat this process for the Project Server or STS database.
-
Make a backup copy of all of your STS subweb folders and their contents from drive:\intepub\wwwroot or the appropriate parent directory for your system.
Restoring
To restore Project Server and STS, perform the following steps:
-
Open SQL Enterprise Manager and expand the Server folder, then the Databases folder.
-
Right-click either the Project Server or STS database and select All Tasks
Restore Database to open the SQL Server Restore database dialog box, as shown in Figure 6-11.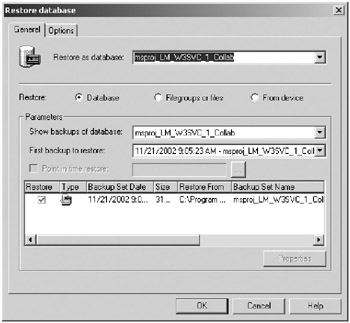
Figure 6-11. SQL Server Restore database dialog box -
Select the backup file from which to restore and click OK.
-
Repeat these steps for the Project Server or STS database and then copy the backed-up STS subwebs to restore the STS server state that matches the database.
Restoring to a Different Server
You can migrate a Project Server installation from server to server by restoring your backup files onto a different destination server. The easiest way to accomplish this is to install STS and Project Server according to the installation instructions outlined in Chapter 5. Once you’ve completed your installation, you can migrate another server’s data onto it by extending the restore procedure as follows:
-
Open SQL Enterprise Manager and expand the Server folder, then the Databases folder.
-
Right-click either the Project Server or STS database and select All Tasks
Restore Database to open the Restore database dialog box shown in Figure 6-11. -
Click the From device radio button to open the Choose Restore Devices dialog box shown in Figure 6-12. This is necessary because the backup file you’ll be using isn’t already associated with the database you’re restoring it to.
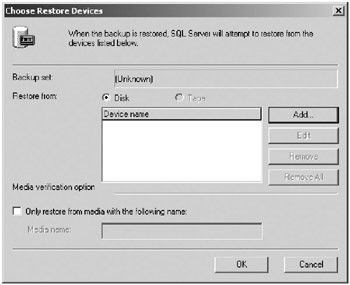
Figure 6-12. Choose Restore Devices dialog box -
Click Add to open the Choose Restore Destination dialog box shown in Figure 6-13. Use the browse button to locate a file or select the backup device option if your file is located on tape or the like. Click OK to restore the backup.
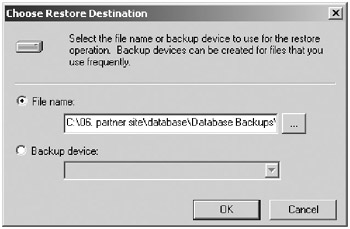
Figure 6-13. Use the browse button to locate the file. -
At this point it’s necessary to make changes in the database to resynchronize logins and connection information. Open SQL Enterprise Manager, expand the ProjectServer database, and select Users. If they exist, delete both the MSProjectServerUser and the MSProjectUser logins.
-
After you delete the existing accounts, right-click Users and select New Database User to open the Database User Properties – New User dialog box. Select MSProjectServerUser from the drop-down list and select MSProjectServerRole for Permit in Database Role.
-
Repeat the previous step, this time selecting MSProjectUser and the corresponding MSProjectRole.
-
The STS database requires similar tweaking. This time expand the STS database in SQL Enterprise Manager. Click Users and delete the STSAdmin and STSReader accounts if they exist.
Note These instructions are dependent on the assumption that you’ve created the STS COM+ identities as outlined in Chapter 5, that you’ve correctly assigned the database access initially, and that the database being restored has the same name as the backup. If this isn’t the case, refer to these instructions before proceeding.
-
After you delete the existing accounts, right-click Users and select New Database User. Select the <machinename>\STSAdmin account and select db_security admin in the Permit in Database Role.
-
Repeat the previous step, selecting the STSReader account and checking db_datareader for Permit in Database Role.
-
Rerun the PSCom+ tool by navigating to the installation drive:\Program Files\Microsoft Project Server\Bin\1033 and double-clicking the File icon.
-
Click the Start button, select Run, type CMD, and click OK. Change to the X:\Program Files\Microsoft Project Server\Bin directory, where “X” is your installation drive. Type the proxycfg command appropriate to your system, keeping in mind the lessons you learned in the “Successfully Troubleshooting Proxycfg.exe Issues” section earlier in this chapter.
-
In SQL Enterprise Manager, expand the ProjectServer database and select Tables on the expanded tree.
-
Right-click the MSP_WEB_STS_SERVERS table and select Open Table
Return All Rows. Delete the record for the current STS server Log onto Project Web Access on the new server using an administrator account. From the Admin menu, select Manage SharePoint Team Services. -
Log onto Project Web Access on the new server using an administrator account. From the Admin menu, select Manage SharePoint Team Services.
-
Click Add Server and fill in the appropriate information in the “Add a Web server running SharePoint Team Services” screen, as shown in Figure 6-14. Scroll down to verify the COM+ identities and click Save Changes. If the update isn’t accepted, recheck your entries. If you are still unsuccessful, refer to the “Successfully Troubleshooting Proxycfg.exe Issues” section in this chapter.
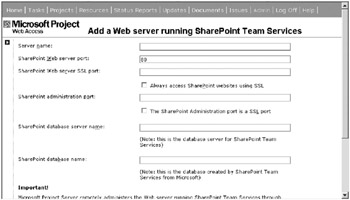
Figure 6-14. Add the STS Server through the Project Web Access Administrator interface. -
In SQL Enterprise Manager, expand the STS database, right-click the UserInfo table, and select Open Table
Return all Rows. Change the machinename\Administrators entry to the correct machine name. Caution There’s an additional step when the database isn’t running under a domain. Completing step 17 may require additional work if the database hasn’t been restored from one machine to a new machine running in the same domain. If local machine accounts are used for authentication, then it will be necessary to manually modify all of the user entries in the UserInfo table to reflect the correct logon machine name.
-
Rebuild the OLAP cube on the new server according to the directions in Chapter 12. You’ll also need to re-create your Analysis views, unless your new machine name and cube name are identical.
EAN: 2147483647
Pages: 185