Project Guide Architecture
Figure 18-5 shows the Microsoft Project Options dialog box (select Tools ![]() Options). Click the Interface tab to look at the options for the Project Guide. The settings at the bottom of the tab that relate to the Project Guide are in the Project Guide Functionality and Layout Page section and the Project Guide Content section. I discuss these two setting areas in the next section. If you click the “Use a custom page” and “Use custom content” radio buttons, notice the gbui:// prefix in the URLs/filenames.
Options). Click the Interface tab to look at the options for the Project Guide. The settings at the bottom of the tab that relate to the Project Guide are in the Project Guide Functionality and Layout Page section and the Project Guide Content section. I discuss these two setting areas in the next section. If you click the “Use a custom page” and “Use custom content” radio buttons, notice the gbui:// prefix in the URLs/filenames.
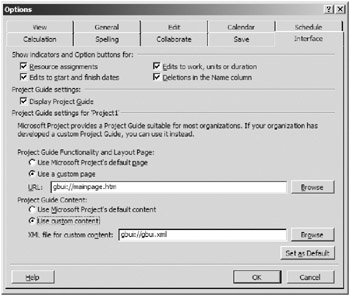
Figure 18-5. The Interface tab of the Microsoft Project Options dialog box
gbui Protocol
Microsoft Project uses a special protocol called gbui to serve Project Guide data. All of the files for the Project Guide, across all languages, are compiled into the Pj10intl.dll file and accessed using the gbui protocol. Microsoft Project knows to go to Pj10intl.dll to find any pages requested with the gbui:// prefix. The communication mechanism is very similar to HTML, except that gbui gets data from a specific file instead of a Web server.
You create most custom content using HTML, ASP, JavaScript, or other, similar Web technologies, and you store this content on your local machine or on a Web server. Because the Pj10intl.dll file is installed by Microsoft Project, you can include original Project Guide content within your custom Project Guides by using the gbui:// prefix. This allows you to slowly evolve a custom Project Guide instead of creating your own Project Guide from scratch.
Project Guide Functionality and Layout Page
One starting point for creating custom Project Guides is the Project Guide Functionality and Layout page. By default, this file is gbui://mainpage.htm and you use it to lay out the Project Guide side pane and main area views. You won’t be working with this page in this chapter, as it controls more of the fundamental functions and internal architecture of the Project Guide. For more information on customizing the main page, see the article “Customizing the Microsoft Project Guide” in the Microsoft Project 2002 Software Development Kit (http://msdn.microsoft.com/library/en-us/pdr/PDR_Overview_3338.asp).
Project Guide Content
A second starting point for customizing the Project Guide is to create custom content within the existing Project Guide framework. When you create a custom Project Guide, you create a properly formatted Project Guide XML file. The Project Guide XML content file contains the hierarchical representation of information and specifications for features such as view changes and help displays.
In this section I show you the Project Guide XML content file structure. The Project Guide XML content file has three main sections:
-
ViewChanges
-
PageChanges
-
GoalArea
The ViewChanges area determines the goal area displayed when you change a view in Microsoft Project. The PageChanges section specifies the Project Guide goal area or goal task presented when you connect to a Project Server page within Microsoft Project. The final section, GoalArea, is the hierarchical representation of information for the Project Guide and the section on which I focus most of this chapter.
ViewChanges
The ViewChanges section determines how the Project Guide will react to Microsoft Project view changes. The ViewChanges section is made up of one or more ViewChange elements, as shown in Listing 18-1. Within each ViewChange element is a ViewType, ViewScreen, or ViewName element, which relates to the type of view within Microsoft Project, and a GoalAreaID, which represents a corresponding goal area. Table 18-1 lists ViewType values, which represent an entire category of views. Table 18-2 lists the ViewScreen and corresponding ViewName values.
Listing 18.1: The ViewChanges Structure in the Project Guide XML Content File
<ViewChanges> <ViewChange> <ViewType> 0 </ViewType> <GoalAreaID> 1 </GoalAreaID> </ViewChange> <ViewChange> <ViewScreen> 7 </ViewScreen> <GoalAreaID> 2 </GoalAreaID> </ViewChange> <ViewChange> <ViewName> Resource Usage </ViewName> <GoalAreaID> 3 </GoalAreaID> </ViewChange> </ViewChanges>
| VALUE | VIEWTYPE DESCRIPTION |
|---|---|
| 0 | Task views |
| 1 | Resource views |
| –1 | Neither task nor resource views (applies to Microsoft Project Web Access or other Web pages displayed within Microsoft Project) |
| VIEWSCREEN | VIEWNAME | MICROSOFT PROJECT ENUMERATION |
|---|---|---|
| 1 | Gantt Chart | pjGantt |
| 2 | Network Diagram | pjNetworkDiagram |
| 3 | Relationship Diagram | pjRelationshipDiagram |
| 4 | Task Form | pjTaskForm |
| 5 | Task Sheet | pjTaskSheet |
| 6 | Resource Form | pjResourceForm |
| 7 | Resource Sheet | pjResourceSheet |
| 8 | Resource Graph | pjResourceGraph |
| 10 | Task Details Form | pjTaskDetailsForm |
| 11 | Task Name Form | pjTaskNameForm |
| 12 | Resource Name Form | pjResourceNameForm |
| 13 | Calendar | pjCalendar |
| 14 | Task Usage | pjTaskUsage |
| 15 | Resource Usage | pjResourceUsage |
| Note | ViewChanges applies only to goal areas. ViewChanges doesn’t work with goal tasks. |
The example in Listing 18-1 has three ViewChange sections. The first section specifies that a view change to a task type view will change the Project Guide to goal area 1 (Tasks). The second ViewChange group specifies that switching to the Resource Sheet will result in a switch to goal area 2 (Resources). The final ViewChange element specifies goal area 3 (Track) will be selected when the Resource Usage view is chosen.
If you go through the example in Listing 18-1, you may notice the Project Guide doesn’t always change goal areas as expected. The reason for this is that the ViewChange event won’t fire unless the Project Guide goal area is irrelevant to the newly selected Microsoft Project view. The following series of steps shows how the Project Guide reacts to Microsoft Project view changes. Start with the Resource Sheet selected.
-
Select the Gantt Chart view, which is of the Tasks view type, and notice the Project Guide switches to the Tasks goal area (GoalAreaID 1).
-
Select the Resource Sheet and the Resources goal area (GoalAreaID 2) becomes active.
-
Select the Resource Usage view and notice that the Project Guide doesn’t change to the Track goal area (GoalAreaID 3) as you might expect.
-
Select the Gantt Chart view.
-
Select the Resource Usage view again and the Project Guide displays changes to the Track goal area as you might have expected in step 3.
The reason the Project Guide didn’t change to the Track goal area in step 3 is because the Resource Sheet and Resource Usage view are both relevant to the Resource goal area. Switching to the Gantt Chart view, which is a task type view, and then to the Resource Usage view produces the expected change to the Track goal area. The relevant views for a task are specified in the RelevantViews section of each goal area, which I cover in the GoalArea section of this chapter.
PageChanges
PageChanges actions are very similar to ViewChanges actions, except they react to changes to Microsoft Project Web Access pages instead of Microsoft Project views. The PageChanges section consists of one or more PageChange elements, as shown in Listing 18-2. Within each PageChange element is a ProjectServerPageID element and a GoalAreaID or TaskID element.
The example in Listing 18-2 shows a PageChange element applying to a TaskID and a GoalAreaID. As mentioned in the Note in the previous section, PageChange can move to a TaskID or a GoalAreaID, whereas ViewChange only applies to GoalAreaID. The first PageChange section shown represents a change to the Updates page (select Collaborate ![]() Update Project Progress) and corresponds to Project Guide TaskID 19. The second PageChange group changes to the Resource goal area when you select the Resource Center page in Microsoft Project.
Update Project Progress) and corresponds to Project Guide TaskID 19. The second PageChange group changes to the Resource goal area when you select the Resource Center page in Microsoft Project.
| Note | PageChanges can change to Project Guide goal areas or goal area tasks. ViewChanges only apply to goal areas. |
Listing 18.2: The PageChanges Structure in the Project Guide XML Content File
<PageChanges> <PageChange> <ProjectServerPageID> 1 </ProjectServerPageID> <TaskID> 19 </TaskID> </PageChange> <PageChange> <ProjectServerPageID> 5 </ProjectServerPageID> <GoalAreaID> 2 </GoalAreaID> </PageChange> </PageChanges>
Table 18-3 contains a list of all available ProjectServerPageIDs.
| PROJECTSERVERPAGEID | PAGE DESCRIPTION |
|---|---|
| 1 | Updates page showing updates for the active project |
| 2 | Document library page for the active project |
| 3 | Issues page for the active project |
| 4 | Project Center page |
| 5 | Resource Center page |
| 6 | Portfolio Analyzer |
| 7 | Portfolio Modeler |
GoalArea
The GoalArea section of the Project Guide XML content file is the hierarchical representation of information for the Project Guide. The GoalArea section contains groupings of goal area elements with further groupings of goal task elements. Each goal area element may consist of one or more goal task elements.
GoalArea Element
Each section of the Project Guide is represented by a goal area and is specified in the Project Guide XML content file, as shown in Listing 18-3.
Listing 18.3: GoalArea Element Structure
<GoalArea> <GoalAreaID> 1 </GoalAreaID> <GoalAreaName> Tasks </GoalAreaName> <GoalAreaDescription> Plan and schedule your project's tasks. </GoalAreaDescription> <URL> gbui://tasks_main.htm </URL> <RelevantViews> <ViewType>1</ViewType> <ViewScreen>14</ViewScreen> <ViewName> Resource Sheet <ViewName> </RelevantViews> <GoalAreaTask> <-- NOTE: Goal area tasks will be covered in the next section --> </GoalAreaTask> </GoalArea>
Here’s a description of each item in the GoalArea element:
-
GoalAreaID: Each goal area must have a unique ID.
-
GoalAreaName: This is the name of the goal area. You should keep this name short because it’s the name shown at the top of the Project Guide side pane.
-
GoalAreaDescription: The description of the goal area is shown just below the side pane title and above all of the goal tasks.
-
URL: This is the URL for the HTML page associated with each goal area. This page is displayed when the goal area is selected.
-
RelevantViews: This element defines the Microsoft Project views relevant to the goal area. The valid options are ViewType, ViewScreen, and ViewName, as addressed in the “ViewChanges” section earlier in this chapter.
-
GoalAreaTask: This element represents one or more goal tasks within the goal area.
GoalAreaTask Element
Each goal area is represented by one or more goal area tasks. Listing 18-4 represents the Project Guide XML content structure of the GoalAreaTask element.
Listing 18.4: GoalAreaTask Element Structure
<GoalAreaTask> <TaskID> 11 </TaskID> <Title> Select Enterprise Resources </Title> <TaskName> Specify people and equipment from Microsoft Project Server </TaskName> <URL> file://C:\CustomPG\...\EnterpriseTeamBuilder.htm </URL> <TaskHelp> <HelpName> More Information </HelpName> <URL> file://C:\CustomPG\...\EnterpriseTeamBuilder_Help.htm </URL> </TaskHelp> <RelevantViews> <ViewType> 1 </ViewType> <ViewScreen> 7 </ViewScreen> <ViewName> Resource Form </ViewName> </RelevantViews> <RelatedActivity> <ActivityName> Enterprise Team Builder </ActivityName > <VBAMethod> EnterpriseTeamBuilder </VBAMethod> </RelatedActivity> <RelatedTask> <TaskID> 13 </TaskID> </RelatedTask> </GoalAreaTask>
The GoalAreaTask element contains the following elements:
-
TaskID: Each goal area task must have a unique ID.
-
Title: This is the title shown at the top of the Project Guide side pane. You should keep this name short because it’s the name shown at the top of the Project Guide side pane.
-
TaskName: This is the text shown in the goal area in the list of tasks.
-
URL: This is the URL for the HTML page associated with each goal task. This page is displayed when the goal task is selected.
-
TaskHelp: This section specifies the help page associated with a goal area task.
-
HelpName: This is the name for the help link shown at the bottom of a goal task.
-
URL: This is the URL for the HTML page associated with each goal task help. This page is displayed when the goal task help is selected.
-
RelevantViews: This element defines the Microsoft Project views relevant to the goal task. The valid options are ViewType, ViewScreen, and ViewName, as addressed in the “ViewChanges” section earlier in this chapter.
-
RelatedActivity: This section specifies other activities to be shown in the Next Steps and Related Activities button on the Project Guide toolbar.
-
ActivityName: This is the name shown on the Next Steps and Related Activities button.
-
VBAMethod: This is the name of the Microsoft Project VBA method for the given activity.
-
RelatedTasks: This section specifies tasks related to this goal task to be shown in the Next Steps and Related Activities button on the Project Guide toolbar.
-
TaskID: This is the TaskID of a related task.
EAN: 2147483647
Pages: 185