| In the final content- related section of this chapter, you'll learn a few tricks to help you repurpose the structure and programmatic elements of existing content types into different types that you can use. For example, you might want to use the news item content type as a base to create a specifically formatted press release item. The subsequent sections outline this process. Note The instructions for repurposing an existing content type are expanded from those found in Chapter 8 of the online Plone documentation, at http://plone.org/documentation/book/8. Feel free to consult the official documentation for additional methods of adding new content types and extending Plone.
In this example, the goal is to create a functioning Press Release content type, based on the News Item content type. The only differences between the two will be the name of the content type, the identification icon, descriptive text about the type, and a certain amount of footer text that will be automatically applied to the bottom of each new press release. To get started, log in to the ZMI, select your Plone instance from the navigation pane, and select the portal_types object from the workspace pane. From the drop-down menu, select Factory-based Type Information, as shown in Figure 7.8. Figure 7.8. The list of existing portal_types ; choosing to add a new type based on an existing one. 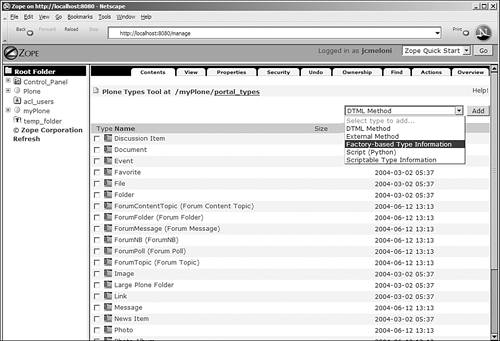
Press the Add button to continue; you will see a form containing two fields: Id and Use Default Type Information . Because you are creating a new type for press releases, enter Press Release in the Id field. Because the Press Release type will be based on the existing News Item type, select CMF Default: News Item from the drop-down of existing default types. Press the Add button to create this new type. Tip At this point, the Press Release type will be available in the Add New Item drop-down list within the Plone site itself, although it will act exactly like a news item because customization has not been completed within the ZMI.
The next step is to modify the fundamental information about the Press Release content type; currently, it's just a News Item with a different name. Navigate to the portal_types listing in the ZMI, and select the Press Release object in the workspace pane. You will see the underlying properties of this type within an editable form. In the next section, you'll make the customizations necessary for your new content type to act like a press release. Customizing the New Content Type Values are assigned to the fundamental properties of your new content type through the editable form in Figure 7.9. The default values are those for the News Item type because the Press Release type has been copied from it. Figure 7.9. Editing the factory-based type information for a press release. 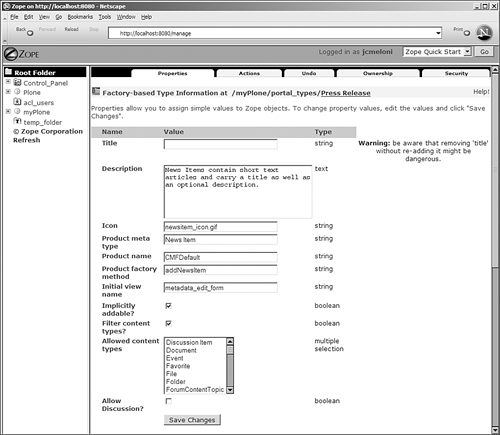
These are the properties for a Plone content type: -
Title ” The optional title for your content type. It already has an Id of Press Release , so there's no need to give it a title of Press Release , but you can do so for the sake of completeness. -
Description ” The description of the content housed in this content type. The description is shown as part of the addition form within Plone, when a user adds a new item with this content type. -
Icon ” The object Id , not the filename, of the icon you want to associate with this content type. You can retain the value assignment of newsitem_icon.gif , although, in that case, there would be no way to differentiate the content type of documents within a listing because both News Item and Press Release types would use the same icon. Tip To use a custom icon such as pressrelease_icon.gif , first add an Image object via the ZMI and then associate a new image file with that object. After you have added it to your Plone assets, you can change the value of the Icon property for the Press Release content type to your new object.
-
Product Metatype ” The metatype of the content. Use Press Release for this new content type. -
Product Name ” The Plone product to which the content type is associated. CMFDefault is appropriate. -
Product Factory Method ” The method called by the product to create a piece of content with this new type. Continuing to utilize the AddNewsItem method is appropriate in this instance because the Press Release content type was intended to reuse available programming elements. -
Initial View Name ” Deprecated and currently unused in Plone, but it remains in the form. Do not edit it. -
Implicitly Addable? ” If checked, this content type can be added within a folder. The default value is checked. -
Filter Content Types? ” Check this value only if the content type is a folder and, thus, can hold other objects. -
Allowed Content Types? ” If the Filter Content Types check box is checked, select the allowable content types from this list. None is required for the Press Release type because it is not a folder and, thus, has no folder-related filtering. -
Allow Discussion? ” If checked, readers can leave comments at the end of an item of this type. After you have entered and selected the appropriate values for the Press Release properties, the next step in the process is to modify the templates used for this new content type. Because the News Item type has been the basis for the Press Release type since you started this process, you will simply reuse the News Item templates for this portion as well. However, before customizing versions of the News Item templates, you need to know how many different actions ”and, thus, how many different templates ”you'll be dealing with. In the ZMI, select the portal_types tool from the workspace pane, select the Press Release object, and click on the Actions tab. The Actions tab provides you with a list of actions specific to the content type and enables you to add your own. Figure 7.10 shows the contents of the Action tab for the Press Release content type, which contains all the information for the News Item content type from which it was copied. Figure 7.10. Preparing to modify the associated Press Release actions. 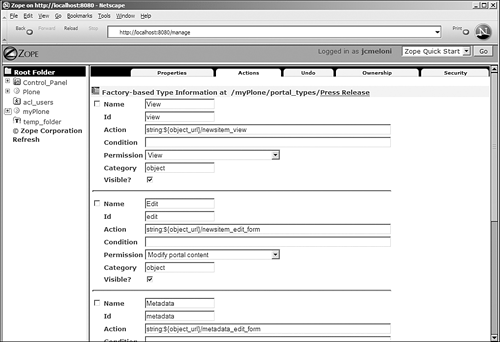
The first action in the list is the View action, which is the action that controls how the content is displayed when the user accesses a press release to read it. The View action, in this case, currently points to the News Item View action:
string:${object_url}/newsitem_view
Modify this line so that it points to an as-yet-to-be-created Press Release View action, as shown here:
string:${object_url}/pressrelease_view
You'll create this View action template soon enough; for now, continue to modify the entries within this form. The Edit action template controls the content that is displayed when a user wants to add or edit a document of the Press Release type. In this case, too, modify the News-specific action to something appropriate for the Press Release type, such as this:
string:${object_url}/pressrelease_edit_form
Save the changes on this form by pressing the Save button. Next, navigate back to the root of your Plone instance and select the portal_skins object from the workspace pane, followed by the plone_content object. The newsitem_view object referenced in the Actions form is a template within the plone_content object. To make a custom copy, click the newsitem_view object. You will see a read-only version as well as the Customize button. Press the Customize button to place an editable copy of this template in the portal_skins/custom directory. Repeat the process for the newsitem_edit_form object as well. Navigate to the portal_skins/custom directory. You should see the two newsitem_* objects you just coped. Select the check boxes next to each of them, and press the Rename button; you want these two items to be named pressrelease_view and pressrelease_edit_form , respectively. With your objects now properly named, you can begin to edit the template language they contain. Select the pressrelease_view object. You should see an editable template containing the code shown in Listing 7.3. Listing 7.3. Original Contents of the pressrelease_view Template 1: <html xmlns="http://www.w3.org/1999/xhtml" xml:lang="en" 2: lang="en" 3: metal:use-macro="here/main_template/macros/master" 4: i18n:domain="plone"> 5: <body> 6: <div metal:fill-slot="main"> 7: <tal:main-macro metal:define-macro="main" 8: tal:define="len_text python:len(here.text)"> 9: <h1 tal:content="here/title_or_id" class="documentFirstHeading"> 10: Title or id 11: </h1> 12: <div metal:use-macro="here/document_actions/macros/document_actions"> 13: Document actions (print, sendto etc) 14: </div> 15: <div class="documentDescription" tal:content="here/Description"> 16: News summary 17: </div> 18: <p tal:condition="python: not len_text and is_editable" 19: i18n:translate="no_body_text" 20: class="discreet"> 21: This item does not have any body text, click the edit tab to change it. 22: </p> 23: <div class="stx" 24: tal:condition="len_text" 25: tal:omit-tag="python:here.text_format != 'structured-text'"> 26: <div tal:replace="structure python:here.CookedBody(stx_level=2)" /> 27: </div> 28: <div metal:use-macro="here/document_byline/macros/byline"> 29: Get the byline - contains details about author and modification date. 30: </div> 31: </tal:main-macro> 32: </div> 33: </body> 34: </html>
Lines 9 “11 display the Title or Id of the document (whichever is available). Lines 12 “14 are used to print the line and action icons (Edit, Send to Friend, Print, Add to Favorites) that appear beneath the title. Lines 18 “22 display any body text that has been associated with the document, and lines 28 “30 print the author and last-modified details for the document. Unless you want to dramatically alter the way in which a Press Release type is displayed, relative to a News Item type ”and unless you have become intimately familiar with the Zope Template Language ”just make a few modifications that will set this template apart from the others. Namely, add a static footer that will display corporate disclaimer information at the end of each press release so that the site administrator does not have to type the content each time a new press release is added. To add the custom static footer, place the following (or text much like it) after the current line 27 of the code listing:
<p><b>About MyCompany</b><br/> It's very cool, all my trademarks are my own (unless they're not). All statements may become moot at any time, without warning.</p>
Save this custom template by pressing the Save button. Go through the same process for the pressrelease_edit_form template, making any changes in descriptive text that you feel are necessary for the Press Release Add/Modify form. When you have completed all of your template-related changes, restart Zope to ensure that these changes take effect. From this point forward, any time you add, edit, or view a document of the Press Release type within your Plone site, these custom templates will drive that display. Other Methods for Adding Content Types The Plone developers have already created content types for the most common types of documents used in a website. Using third-party add-on products also tends to add specialized content types, such as photo albums, wikis, and blogs . All of these predefined content types provide a variety to choose from when you want to repurpose a type into a custom type, as you just did in the previous section. However, if you have a firm grasp on the Python language as well as the overall Zope and Plone architecture, you can create a specialized content type entirely from scratch. This type of modification is now handled by Archetypes, which is an add-on Zope product that aids in the creation of new content types by providing a framework for development. More information on Archetypes, including the Developers Guide and downloadable product files, can be found at http://plone.org/documentation/archetypes/. |