| A member can add content only in an area to which that member has been given permission to do so, such as a shared folder or his own Member folder. All of the examples in this section use the Member folder as the content repository. To get to your Member folder, log in to your Plone site and click on the My Folder link in the upper-right toolbar. This presents you with the content view of your folder, which you have seen before. Unless you've added things on your own already, the only item in the document list for this folder is a line item representing your home page. As discussed earlier in this chapter, in this view you have two drop-down lists available for adding a new bit of content. In the next sections, you'll use this interface to add one of each of the different content types. Of course, feel free to add as many as you want during this introductory process. Following are the most common content types, but as you'll learn in Chapter 7, "Advanced Content- Related Techniques," you can create your own types. When you use the Add New Item drop-down list, the entries will be ordered as in this list: -
Document ” Although anything with text in it is usually generically referred to as a document, within Plone, a document is a web page. For example, the entry in your Member folder that holds the content for your home page is a document. -
Event ” Anything that is added to a calendar is considered an event. When you publish an event, it also is displayed in the calendar view. -
File ” Any content that isn't a web page document and that is in file format is a file. Microsoft Word documents and Adobe PDF documents are examples of files. -
Folder ” Although it is not content in the strictest sense of the word, a folder is a container for content. You can create as many folders and subfolders as you want in your member area. -
Image ” An image file ”JPEG, GIF, PNG, and so on ”is added as the image content type. -
Link ” This content type holds local URLs or URLs to external websites . -
News item ” When you want to call attention to something, add a news item. This item then is added to the news slot and under the News tab. When you add any of these content types, there are some consistent themes. Each item has a name , a title, and an optional description, followed by attributes particular to the content type, such as the uploaded file and the URL. In the next few sections, you'll learn more about adding and modifying each of these basic content types. Creating and Modifying Documents In Plone, a document is what you would usually refer to as a web page, or any chunk of text that is not part of another file format. For example, if you wanted to write a blurb about something and make it available to other members of the Plone site, you would probably create a document containing just that text instead of opening a word-processing program, creating a new file, typing your text, and uploading the file to your member directory. When a new user is registered within a Plone community, one document is automatically created and placed in the member's directory: the user 's home page. Documents such as the home page (and any other document that you create on your own) can be composed in one of three different types of text: -
Plain text, with no visible or structural styles through any type of markup. -
HTML, which uses HTML markup for visible and structural styles. -
Structured text, which is the default setting for creating or editing a document. When you type in structured text, special formatting is used for visible and structural elements, which is rendered as HTML when viewed by the browser. Next, you'll get an overview of the process of creating or modifying documents, followed by a brief primer on using structured text. The processes of creating a new document and modifying an existing one start differently but end in the same place: working within a form that contains the same fields, representing the properties of the document. These fields are as follows : -
Short Name ” This becomes part of the URL to the document. This short name should be relatively descriptive but should contain no underscores; it also should not be mixed case. For example, myvacation is an appropriate short name, but My Vacation_to_Alaska is not acceptable. If you do not input your own short name, Plone creates one for you. But beware: They end up like Document.2004-04-07.4992387560 when they're automatically generated, and that's not an easy-to-remember name! -
Title ” Also required, this field is used to identify the content in a number of areas. The title is displayed at the top of the page and in the browser's title bar, as part of the navigational breadcrumb trail, as a link in search results and folder content displays, and so forth. Not surprisingly, then, this field is required. -
Description ” Used to introduce the document, this is usually displayed underneath the title of a document when viewing a listing. The description is not required, but it should be used when the content is not discernable from the title of the document. -
Body Text ” This is the actual content of the document. Although it is technically not required, what would be the point of having an empty document? In this text area, you can type plain text, HTML, or structured text ”just be sure to select the matching format from the set of radio buttons that appears next in the form, or your content might look strange . Note If you're wondering about this "structured text" thing, have no fear. You'll learn the basics of structured text later in this chapter ”and even then, you can still use HTML or plain text to create documents in Plone.
-
Format ” The default selection is Structured Text. You can also select HTML or plain text; the selected radio button should match the typed text in the Body Text field or, as you'll see, in the file uploaded via the Upload Content field. -
Upload Content ” If you already have a text file full of formatted content, you can simply upload this file via the Upload Content field instead of pasting or retyping your content into the Body Text field. Uploading content into a document is not the same as uploading a file to your member directory, as you'll learn later in this chapter. In fact, if you attempt to upload a binary file, such as a Microsoft Word document or another proprietary file format, you will receive an error message to the effect that you are placing a square peg in a round hole, and to please try again. Uploading content is simply a shortcut for getting pre-existing, text-only content into a Plone document. When using this shortcut, remember to select the correct Format option. For instance, if you are uploading a file containing HTML markup, select the HTML radio button in the Format field. Similarly, structured text and plain text should be indicated appropriately. Although Plone will display HTML properly even if it is tagged as structured text, you will see only the raw code if you tag it as plain text. When you are in the contents view of your member area and decide to add a new document, you will see a form such as the one in Figure 3.9, with all of the fields described previously. As you learned earlier, you can add a new document by using either of the two content-related drop-down lists available in that view; both get you to this same form. Figure 3.9. Adding a new document. 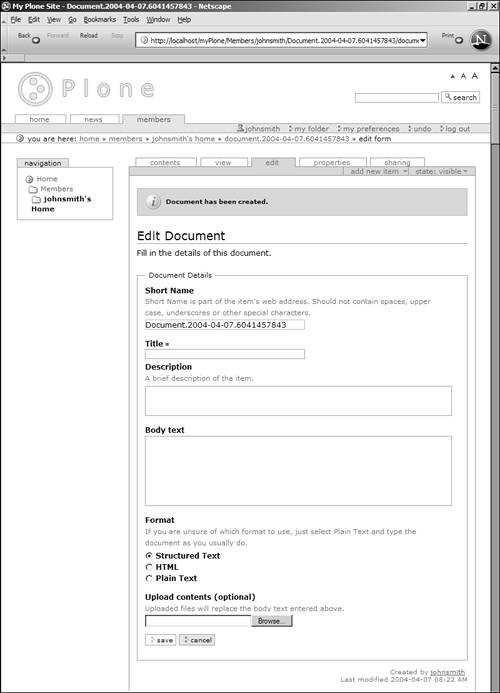
You will notice immediately that Plone has already created a document and provided a short name in the Short Name field. Plone does not wait until you press a button to create a document; it creates a document when you initiate the creation process. Tip If you decide that you don't really want to add the new document after all and you either navigate away from the page or press the Cancel button, you must delete the document shell from your member area. You can also use the Undo feature to roll back the previous action.
Unless you are particularly attached to the Plone-generated short name, the first thing you should do is replace the contents of the Short Name field with your own text. Next, enter a title, followed by a description, if you want, and the body text of the document (leave this blank if you want to upload a file containing the text). Select the appropriate content format and press the Save button to retain your changes. After you save the document, you will see a confirmation message and the contents of the document as they appear when viewed. In Figure 3.10, you can see this confirmation, plus the title, description, and contents of a poorly formatted document. Figure 3.10. A new document has been added. 
My bad formatting leads us directly into the next topic: modifying an existing document. Because the title of the document was already "Sports in the Springtime," there was no need for me to repeat it. Similarly, my structured text formatting was a bit off, so some text appears bold when it was intended to be a single paragraph of normal font weight. You can initiate the editing process by selecting the Edit tab when viewing the content in question. However, you will see the Edit tab only if you are the owner or otherwise have permission to edit the document. For example, a document created by user johnsmith will not be editable for user janedoe, unless johnsmith gave janedoe such permission. Assuming that he has not, janedoe will never see the Edit tab for that document. Taking the role of johnsmith and initiating the editing of this document, the Edit form looks exactly like the Addition form, with the content already living in the appropriate boxes. You can see this in Figure 3.11. Also note the use of the document title in the navigational breadcrumb trail at the top of the page. Figure 3.11. Editing an existing document. 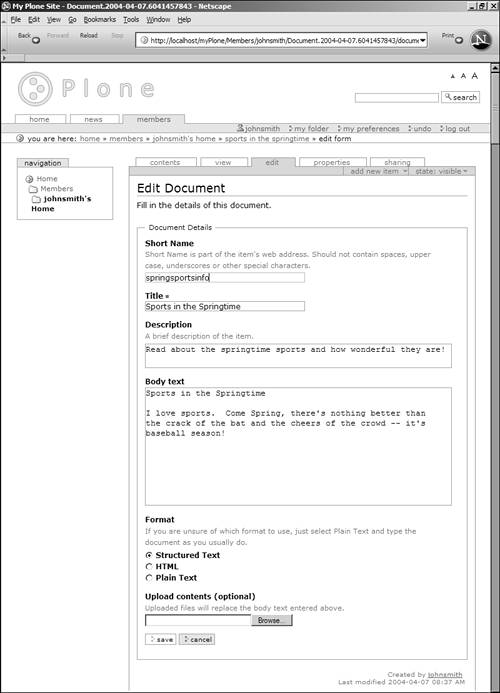
After you make the appropriate changes in content and formatting, press the Save button to see a confirmation and return to view mode. As you can see in Figure 3.12, the formatting has been fixed and the document appears as it should. If things still don't look right in your document, you can continue to go to the Edit tab, make changes, save the changes, view the changes, and so forth until you get the look you're trying to achieve. Or, you can go to your Undo area and selectively choose which editing action to roll back and choose which position you want to continue from. Figure 3.12. The document was successfully edited. 
When you have finished making changes to your document, you can place it in the publishing queue by selecting the Publish Item from the State drop-down list when viewing the item. Your item will be in the queue until the administrator decides to publish or reject it. Later in this chapter, you'll see how documents are published for public consumption. In the next section, you'll learn the basics of structured text before you move on to working with other content types. Structured Text Basics Structured text is the default text-formatting type when creating new documents in Plone. Structured text is a system of notation used when typing text that does not revolve around a set of tags or any proprietary software. Instead, following a simple set of rules helps you quickly produce a document that then is rendered in a specific structure (headings, paragraphs, lists) and displayed (bold text, italicized text, and so forth). This section provides you with the basics for working with structured text. The simplest element in a document containing structured text is the paragraph. This text is rendered as a single paragraph:
This is my first sentence. This is my second sentence.
In HTML, this would be:
<P>This is my first sentence. This is my second sentence.</P>
However, if you separated your input with line breaks, Plone would interpret it as two separate paragraphs:
This is my first sentence. This is my second sentence.
In HTML, these would be:
<P>This is my first sentence.</P> <P>This is my second sentence.</P>
Headings and levels of text are achieved through indentation. A single line of text is rendered simply as a paragraph, as shown earlier. If you indent the next line, however, the first line becomes a Level 1 heading and the second line becomes the paragraph. If you continue the indentation by typing another line and then another paragraph indented further, the previous line becomes a Level 2 heading. This can continue for at least four levels of headings, as shown in Figure 3.13. Figure 3.13. Showing multiple headings in structured text. 
This display was achieved through the following structured text:
First Level Heading First Level's paragraph. Blah blah blah. Second Level Heading Second Level's paragraph. Blah blah blah. Third Level Heading Third Level's paragraph. Blah blah blah. Fourth Level Heading Fourth Level's paragraph. Blah blah blah.
Several other block-level formatting options are available in structured text, including lists. As in HTML, you can use three different types of lists in structured text: bulleted, numbered, and definition. Bulleted-list items are simply preceded by an asterisk ( * ) and followed by a new line:
* first item * second item * third item
You can even make nested bulleted lists by using indentation:
* first item * first item in nested list * second item in nested list * second item * third item
Numbered lists are structured similarly to bulleted lists, except that the asterisk is replaced by a number. Nesting is possible with these lists as well:
1 first item 1 first item in nested list 2 second item in nested list 2 second item 3 third item
The third type of list is also quite simple; the definition is simply separated with two dashes ( -- ) from the item that it is defining:
Item One -- definition of item one. Item Two -- definition of item two.
You can see the output of these structured text list type examples in Figure 3.14. Figure 3.14. Examples of list types in structured text. 
Note You cannot nest various types of lists within each other. For example, it is not possible to nest a numbered list inside a bulleted list, or a bulleted list inside a numbered list.
You've seen examples of structurally formatted text ”paragraphs, lists, and the like. Now you need the display formatting information to round out your knowledge. The very basic display markup elements are bold, italics, and underline. To render bold content, surround the text with double asterisks :
I am **bolded**.
Italicized text is surrounded by single asterisks:
I am *italicized*.
Text to be underlined is surrounded by underscores:
I am _underlined_.
Preformatted text, which is often used for code examples or other types of text that needs to preserve its line breaks and spacing, is preceded by double colons ( :: ) and must be indented. When you break out of the indentation, normal formatting resumes. In the following example, only the two lines of code will be in preformatted text:
The following is a code listing:: print "Hello World!\n" print "How are you?\n" I am no longer a code listing.
You can also use inline preformatted text, such as when you want to show filenames or names of variables , or other code snippets. Inline preformatted text is achieved by surrounding the text with single quotations:
The names of the important variables are '$a', '$b' and '$c'.
The next set of display-formatting examples are of the functional sort ; you'll see how to present links to URLs, email addresses, and images, and how to add footnotelike references in your text. Links to URLs are created by presenting the text to be linked in quotes, followed by a colon , followed by the URL. For example, a link to Plone.org would be this:
"A link to Plone.org":http://www.plone.org/
Similarly, a mailto link would be this:
"Send me mail":mailto:joe@fakeplace.com
Linking to an image follows the same structure:
"thickbook.com logo":img:http://www.thickbook.com/images/tb_main_boringlogo.gif
Note When displayed in Plone documents, linked items are accompanied by an icon representing the link type. URLs have a little globe icon, mailto links have a little envelope, and so forth. You can see this in Figure 3.15. Figure 3.15. Examples of display formatting in structured text. 
Footnotelike references are very useful elements in long documents such as whitepapers and technical essays . References are also quite simple to produce in structured text. To create a reference, simply place the number inside square brackets:
I am writing something very important, but I have a good tangent in mind. [1]
At the end of your document, in an area for all footnote text, place two periods, then repeat the number in the square brackets, and begin typing your text:
.. [1] This is my tangent. I am sure it is fascinating.
You can see the outcome of the display-formatting examples used here in Figure 3.15. These examples have only scratched the surface of the possibilities when using structured text, but they certainly cover the basics. For more information and plenty of examples, visit http://zwiki.org/StructuredText . In the next section, you'll see how to work with news and events elements, two content types similar to documents, which are also displayed in other areas of a Plone site besides your own Member folder. Adding and Modifying Events and News News and events are both text-based content types in Plone, which, when added, appear in your member area as well as in other areas of a Plone site. When adding or modifying a news item, the fields are as follows: -
Short Name ” This becomes part of the URL to the news item. This short name should be relatively descriptive, but it cannot contain underscores or have mixed case. -
Headline ” This is a required field and is used as the linked text in your member area, under the News tab, and anywhere else the link appears. -
Lead-In ” Much like the Description field when adding a document, this is displayed under the headline. -
Body Text ” This is the content of the news item. It can be structured text, HTML, or plain text; the default type is HTML. As with adding a document, the news item is created when the new item is initiated. If you decide that you do not want to continue adding the item, you must manually remove the news item shell that already exists. After you have added the news item, you can modify it by selecting the Edit tab, just as you did when editing a document. The same set of fields applies, as do the field requirements. When you have finished making changes to your news item, you can place it in the publishing queue by selecting Publish from the State drop-down list when viewing the item. Your item will be in the queue until the administrator decides to publish or reject it. Later in this chapter, you'll see how news items are published for public consumption. When published, news are available to all members, not just you. An event is added and maintained similarly, but the form for adding or editing is much different. Because an event is essentially a news item or simple document that ties directly into a calendar, several calendar-related fields are used. The field list in the event addition/modification form is detailed here: -
Short Name ” This becomes part of the URL to the event. This short name should be relatively descriptive, but it cannot contain underscores or have mixed case. -
Title ” This is a required field. The title is used as the text for the link when the event appears in your member area, on the calendar, and so on. -
Event Location ” This optional field describes where the event will take place. This can be a meeting room, an address to a hotel, or anything else you want to use. -
Event Type ” This is an optional selection from a drop-down list of available types, such as an appointment, a meeting, and so on. Note You can modify the list of event types through the Zope Management Interface. This is discussed in Chapter 8.
-
Description ” Optional. This is a description of the event. -
Event URL ” Optional. This is a URL for the event, such as registration information or just additional information. -
Event Starts ” Required. Use the drop-down lists to select the day, month, year, hour , and minute of the start date of the event. -
Event Ends ” Required. Use the drop-down lists to select the day, month, year, hour, and minute of the end date of the event. -
Contact Name ” Optional. This is the name of the contact person for the event. Enter the full name of the person (or however you want the name to be displayed). This person does not have to be a member of the site, and no automatic linking from name to user home page occurs. -
Contact Email ” Optional. This is the email address of the contact person for the event. -
Contact Phone ” Optional. This is the phone number of the contact person for the event. As with adding a news item, an event entry is created when the new item is initiated. If you decide that you do not want to continue adding the item, you must manually remove the event shell that already exists. After you have added the event, you can modify it by selecting the Edit tab, just as you did when editing a document, news item, or anything else in Plone. The same set of fields applies, as do the field requirements. The event item display is different from that of other content types you've seen so far because the form fields play an important role in placing items in appropriate areas of an event template. Instead of having one large body text field for typing, events contain specific ypes of information that are then placed in particular areas when displayed. You can see an example of an event that has been fully edited in Figure 3.16. Figure 3.16. A completed event. 
When you have finished making changes to your event, you can place it in the publishing queue by selecting Publish from the State drop-down list when viewing the item. Your item will be in the queue until the administrator decides to publish or reject it. When published, events are available to all members. In the next section, you'll learn the process for adding another content type: files. Adding and Editing Files As you learned earlier in this chapter, any file that already exists in a proprietary format, such as Microsoft Word or Adobe PDF, is a file. Files have one of the simplest addition/modification forms in Plone because they have only three fields (you've seen all of them already): -
Title ” Optional. The title is used as the text for a link to your file. If it is left blank, the name of the file becomes the default title. -
Description ” Optional. This text appears below the title. -
Upload File ” Required. Use this field to upload the target file from your hard drive to the Plone site. After you have added the document, you can modify it by selecting the Edit tab, just as you did when editing a document, news item, or anything else in Plone. The same set of fields applies, as do the field requirements. When a file is added and visible to a user, another tab is added: the Download tab. When you select the Download tab after viewing the description and link to the item from the View tab, a download is initiated. In other words, the Download tab functions as if you click on the Click Here to Get the File link under the View tab. Also available under the View tab is the file size and the MIME type of the file being viewed. For example, if the file is a 62K PDF, the following appears under the link to the document:
Size 62798 - File type application/pdf
When you have finished adding or modifying your uploaded file, you can place it in the publishing queue by selecting Publish from the State drop-down list when viewing the item. Your item will be in the queue until the administrator decides to publish or reject it. When published, the file is available to all members. In the next section, you'll learn the process for working with the remaining standard content types in Plone: images, links, and folders. Adding and Editing Other Content Types This section introduces you to the remaining standard content types used in Plone: images, links, and folders. Given the earlier description of a file ”any nondocument that is in a proprietary format ”you would think that images would fall under this category. But images have their own content type in Plone because they are displayed differently than simple files. When an image is added to Plone, it can be viewed inline ”if the type is supported by the user's web browser ”and does not have to be downloaded to be viewed, as a file does. These fields are used to add an image: -
Short Name ” This becomes part of the URL to the image. This short name should be relatively descriptive, but should not contain underscores or have mixed case. -
Title ” This is optional. The title is used as the text for a link to your file. If it is left blank, the name of the file becomes the default title. -
Description ” Text that appears below the title, used to introduce and describe the image. The description is not required. -
Image ” Use this required field to upload the target file from your hard drive to the Plone site. After you have added the image, you can modify it by selecting the Edit tab, just as you did when editing a document, news item, or anything else in Plone. The same set of fields applies, as do the field requirements. When a file is added and visible to a user, the image is viewed inline if the image type is supported. The file size also appears. Figure 3.17 shows an example of an uploaded image ”in this case, a JPEG ” appearing inline when viewed. Figure 3.17. Viewing an image inline. 
The next standard content type is a link. Just as it sounds, a link is a reference to a URL, on either the Internet or an intranet. These fields are used for adding a link: -
Short Name ” Optional. This should be relatively descriptive but should not contain underscores or have mixed case. -
Title ” Required. The title is used on the display page but not as text for the link. -
Description ” Optional. This is a description of the URL to which you are linking. -
URL ” Required. This is the URL itself. If you do not use a protocol prefix, such as http:// or https :// , Plone assumes that the URL is relative. After you have added the link, you can modify it by selecting the Edit tab, just as you did when editing a document or anything else in Plone. The same set of fields applies, as do the field requirements. The final standard content type in Plone is the folder. You have already worked with folders because your member area is, by default, a folder. But you can create additional folders within your member area, and you can provide others with access to add or modify the documents within it, as well as view the content. To add a folder, simply select it from the Add New Item drop-down menu. These fields are used for adding or modifying a folder: -
Short Name ” Optional. This becomes part of the URL to the folder. This short name should be relatively descriptive but should not contain underscores or have mixed case. -
Title ” Required. No default value is provided if you fail to create your own title. The title of the folder is used in directory listings and is clickable; selecting a folder link displays the contents of the folder to the user. -
Description ” Optional. This is a description of the folder that you are creating (or modifying). After you have created a new folder, it is ready and waiting for new items to be added to it. When you have finished adding or modifying your images, links or folders, you can place these in the publishing queue by selecting Publish from the State drop-down menu when viewing the item. Your item will be in the queue until the administrator decides to publish or reject it. When published, the item is available to all members. In the next section, you'll learn how the documents are published and made visible to other users. |