Chapter 13: Sharing Project Information with Other Programs
![]() Download CD Content
Download CD Content
In this chapter you will learn to:
-
Copy and paste data to and from Project.
-
Generate a new Office document that contains essential project details and an illustration.
-
Use Project to open a file produced in another program.
-
Save Project data to other file formats using import/export maps.
| See Also | Do you need a quick refresher on the topics in this chapter? See the quick reference entries on pages xxxiv–xxxv. |
In this chapter, you focus on various ways of getting data into and out of Microsoft Office Project 2003. In addition to the standard Windows copy and paste features with which you might be familiar, Project offers a variety of options for importing and exporting data.
Throughout this chapter, you’ll see the following terms:
-
The source program is the program from which you copy information.
-
The destination program is the program to which you paste information.
| Tip | This tip describes enterprise project management (EPM) functionality. This chapter describes various ways of sharing information between Project and other applications, usually to communicate project details to stakeholders. Project Professional, when used with Project Server, offers much more sophisticated ways of communicating with resources and other stakeholders online. To learn more about the enterprise collaboration tools available with Project Server, see Part 4, “Introducing Project Server.” |
| Important | On the CD Before you can use the practice files in this chapter, be sure you install them from the book’s companion CD to their default location. See “Using the Book’s CD-ROM,” on page xiii, for more information. |
Copying and Pasting with Project
You can copy and paste data to and from Project by clicking the Copy Cell, Copy Picture, Paste, and Paste Special commands on the Edit menu (or the corresponding buttons on the Standard toolbar). When copying data from Project, you can choose one of two options, depending on the results you want:
-
You can copy text (such as task names and dates) from a table and paste it as text into a destination program, such as Word.
-
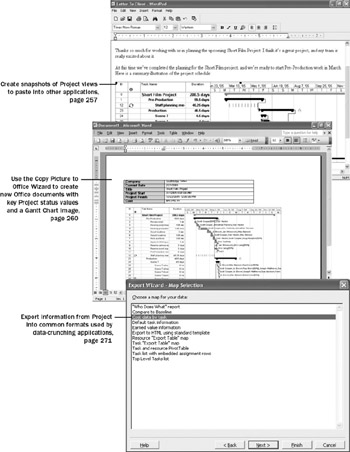
You can copy a graphic image of a view from Project and paste it as a graphic image in the destination program. With the Copy Picture command on the Edit menu, you can create a graphic image of a view or a selected portion of a view. Use the Copy Picture feature to optimize the image for onscreen viewing (in PowerPoint, for example) or for printing (in Word, for example).
Tip The Copy Picture command also includes an option to save the snapshot to a GIF image file. You can then include the GIF image in a Word document or e-mail message, or post it directly to an intranet site.
There is an important distinction between using Copy and Copy Picture. If you use Copy, you can edit the data in the destination program. However, Copy Picture yields an image that you can edit only with a graphics editing program, such as Microsoft Paint.
| Tip | Many Windows programs, such as Word and Excel, have a Paste Special command on their Edit menu. This command gives you more options for pasting text from Project into the destination program. For example, you can use the Paste Special command in Word to paste formatted or unformatted text, a picture, or a Project Document Object (an OLE object). You can also choose to paste just the data or paste it with a link to the source data in Project. For more information about using OLE with Project, type About incorporating text, graphics, or objects into the Search box in the upper right corner of the Project window. The Search box initially contains the text Type a question for help. |
You also have two options when pasting data into Project from other programs:
-
You can paste text (such as a list of task or resource names) into a table in Project. For example, you can paste a range of cells from Excel or a sequence of paragraphs from Word into Project. You might paste a series of task names that are organized in a vertical column from Excel or Word into the Task Name column in Project, for instance.
-
You can paste a graphic image or an OLE object from another program into a graphical portion of a Gantt Chart view. You can also paste a graphic image or an OLE object into a task, resource, or assignment note; into a form view, such as the Task or Resource Form views; or into the header, footer, or legend of a view or report.
| Important | Pasting text as multiple columns requires some planning. First make sure that the order of the information in the source program matches the order of the columns in the Project table. You can either rearrange the data in the source program to match the column order in the Project table, or vice versa. Second make sure that the columns in the source program support the same types of data—text, numbers, dates, and so on—as do the columns in Project. |
For the short film project, you’d like to add a Gantt chart image to a document you’ve prepared for a stakeholder of the project. In this exercise, you copy a snapshot of a Gantt chart and paste it into Microsoft WordPad (or Word, if you prefer). You copy the same way regardless of the destination program you have in mind. For example, you could paste the snapshot into a word processor file or an e-mail message. To begin, you’ll format the Gantt Chart view to show the information you want.
In this exercise, you copy an image of a Gantt Chart view to the Clipboard and then paste it into another document.
| Important | If you are running Project Professional, you may need to make a one-time adjustment to use the My Computer account and to work offline. This helps ensure that the practice files you work with in this chapter don’t affect your Project Server data. For more information, see “Starting Project Professional,” on page 10. |
OPEN: Short Film Project 13a from the \My Documents\Microsoft Press\Project 2003 Step by Step\ Chapter 13 Sharing folder. You can also access the practice files for this book by clicking Start, All Programs, Microsoft Press, Project 2003 Step by Step, and then selecting the chapter folder of the file you want to open.
-
On the File menu, click Save As.
The Save As dialog box appears.
-
In the File name box, type Short Film Project 13, and then click the Save button.
-
On the Project menu, point to Filtered For: All Tasks, and then click Summary Tasks.
Project displays only the summary tasks in the project.
-
On the View menu, click Zoom.
The Zoom dialog box appears.
-
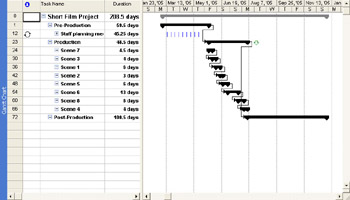
In the Zoom dialog box, click Entire project, and then click OK.
Project adjusts the timescale of the Gantt chart to show the entire project. Your screen should look similar to the following illustration:
-
On the Standard toolbar, click the Copy Picture button.
The Copy Picture dialog box appears.
-
Under the Render image label, select For screen, and then click OK.
Project copies a snapshot of the Gantt Chart view to the Clipboard.
Next you’ll open a proposal that’s been created in a word processor. You can open this in WordPad or in Word if you have it.
-
Do one of the following:
-
If you do not have Word installed, click the Windows Start button, point to All Programs, point to Accessories, and then click WordPad.
-
If you have Word installed, start it.
-
-
In WordPad or Word, on the File menu, click Open.
-
Locate and open the document named Letter To Client in your Chapter 13 Sharing folder (you may have to select All Files in the Files of type box).
-
Once the document has opened, select the paragraph (insert Gantt Chart picture here).
-
On the Edit menu, click Paste.
Project pastes the snapshot of the Gantt Chart view from the Clipboard to the document. If you are using WordPad, your screen should look similar to the following illustration:
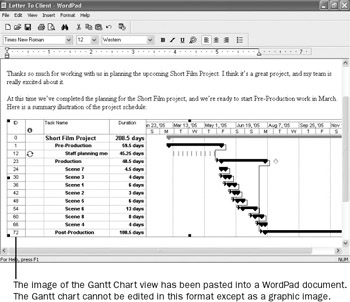
Again, note that rather than pasting the image into a Word or WordPad document, you could paste this image into an e-mail message or another type of document.
-
On the WordPad or Word File menu, click Exit. When prompted to save the document, click No.
EAN: 2147483647
Pages: 199