Applying Contours to Assignments
In the Resource Usage and Task Usage views, you can see exactly how long each resource is scheduled to work on each task. In addition to viewing assignment details, you can change the amount of time a resource works on a task in any given time period. There are two ways to do this:
-
Apply a predefined work contour to an assignment. Predefined contours generally describe how work is distributed over time in terms of graphical patterns. For example, the Bell predefined contour distributes less work to the beginning and end of the assignment, and distributes more work toward the middle. If you were to graph the work over time, the graph’s shape would resemble a bell.
-
Edit the assignment details directly. For example, in the Resource Usage or Task Usage view, you can change the assignment values directly in the timescaled grid.
How you contour or edit an assignment depends on what you need to accomplish. Predefined contours work best for assignments in which you can predict a likely pattern of effort—a task that requires considerable ramp-up time might benefit from a back-loaded contour, for example, to reflect the likelihood that the resource will be most productive toward the end of the assignment.
In this exercise, you apply a predefined contour to one task’s assignments, and you manually edit another assignment.
-
On the Edit menu, click Go To, enter 79 in the ID box, and then click OK.
Project scrolls to task 79, Record final narration. This task has three resources assigned to it:
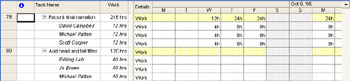
As you can see in the timescaled data at the right, all three resources are scheduled to work on this task at a regular rate of eight hours per day—except for the first and last days of the task. These assignments have a flat contour. This is the default work contour type Project uses when scheduling work.
You want to change Michael Patten’s assignment on this task so that although the other assigned resources work full-time, he starts with a brief daily assignment and increases his work time as the task progresses. He should continue working on the task after the other resources have finished their assignments. To accomplish this, you will apply a back-loaded contour to the assignment.
Note The reason each resource assigned to task 79 has just four hours of work on the task’s first and last day is that the task is scheduled to start halfway through the workday (at 1 P.M.) on Wednesday, and finish in the middle of the workday on Tuesday.
-
In the Task Name column, select Michael Patten, the second resource assigned to task 79.
-
On the Standard toolbar, click the Assignment Information button.
Project displays the Assignment Information dialog box.
-
Click the General tab.
-
In the Work Contour box, select Back Loaded, and then click OK to close the Assignment Information dialog box.
Project applies the contour to this resource’s assignment and reschedules his work on the task:
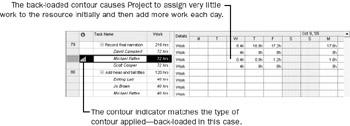
If you scroll the timescaled data to the right, you see that in each successive day of the task’s duration, Michael Patten is assigned slightly more time to work on the assignment. You also see a contour indicator in the Indicators column, showing the type of contour that is applied to the assignment.
-
Point to the indicator:
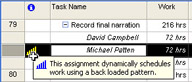
Project displays a ScreenTip describing the type of contour applied to this assignment.
Because Michael Patten’s assignment to this task finishes later than the assignments of the other resources, Michael Patten determines the finish date of the task. One common way to phrase this is that Michael Patten is the driving resource of this task; his assignment determines, or drives, the finish date of the task.
Next you will directly edit another task’s assignment values.
Tip Applying a contour to this assignment caused the overall duration of the task to be extended. If you do not want a contour to extend a task’s duration, change the task type (on the Advanced tab of the Task Information dialog box) to Fixed Duration before applying the contour. Applying a contour to a fixed-duration task will cause Project to recalculate the resource’s work value so that he or she works less in the same time period.
-
On the Edit menu, click Go To, enter 2 in the ID box, and then click OK.
Project scrolls vertically to task 2, Review script:

Note that Clair Hector is currently assigned four hours per day for each day of the assignment’s duration. Why four hours? Clair normally has eight working hours per day on these days (as determined by her resource calendar). She was assigned to this task at 50 percent assignment units, however, so the resulting scheduled work is just four hours per day.
You want to change Clair Hector’s assignment on the last two days of this task so that she will work full-time on it. To accomplish this, you will manually edit her assignment values.
-
Select Clair Hector’s four-hour assignment for Thursday, March 10.
-
Type 8h, and then press the [Tab] key.
-
In Clair’s assignment for Friday, type 8h, and then press [Enter]:
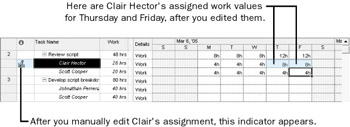
Now Clair is assigned eight hours per day on these days. Project displays a contour indicator in the Indicators column, this time showing that a manually edited contour has been applied to the assignment.
Tip If you want to document details about contouring an assignment, or anything about an assignment, you can record the details in an assignment note. In Task Usage or Resource Usage view, select the assignment, and then click the Assignment Notes button on the Standard toolbar. Assignment notes are similar to task and resource notes.
EAN: 2147483647
Pages: 199