Adjusting Working Time for Individual Resources
Project uses different types of calendars for different purposes. In this exercise, we will focus on the resource calendar. A resource calendar controls the working and nonworking times of a resource. Project uses resource calendars to determine when work for a specific resource can be scheduled. Resource calendars apply only to work resources (people and equipment) and not to material resources.
When you initially create resources in a project plan, Project creates a resource calendar for each resource. The initial working time settings for resource calendars exactly match those of the Standard base calendar. (This is a calendar built into Project that accommodates an 8 A.M. to 5 P.M., Monday through Friday work schedule.) If all the working times of your resource match the working time of the Standard base calendar, you do not need to edit any resource calendars. However, chances are that some of your resources will need exceptions to the working time in the Standard base calendar—such as
-
A flex-time work schedule
-
Vacation time
-
Other times when a resource is not available to work on the project, such as time spent training or attending a conference
Any changes you make to the Standard base calendar are automatically reflected in all resource calendars that are based on the Standard base calendar. Any specific changes you have made to the working time of a resource are not changed, however.
| Tip | If you have a resource who is available to work on your project only part-time, you might be tempted to set the working time of the resource in your project to reflect a part- time schedule—for example, 8 A.M. to 12 P.M. daily. However, a better approach would be to adjust the availability of the resource as recorded in the Max. Units field to 50%. Changing the unit availability of the resource keeps the focus on the capacity of the resource to work on the project, rather than on the specific times of the day when that work might occur. You set the maximum units for a resource in the Resource Sheet view, which you display by selecting the resource and then clicking Resource Sheet on the View menu. For more information about resource units, see “Setting Up People Resources,” on page 55. |
In this exercise, you specify the working and nonworking times for individual work resources.
-
On the Tools menu, click Change Working Time.
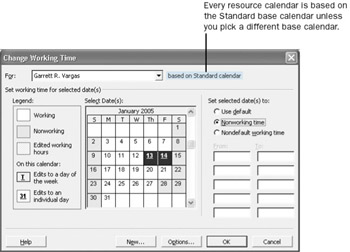
The Change Working Time dialog box appears.
-
In the For box, click Garrett R. Vargas.
Garrett R. Vargas’s resource calendar appears in the Change Working Time dialog box. Garrett, the producer of the TV commercial, has told you he will not be available to work on Thursday and Friday, January 13 and 14.
-
In the calendar below Select Date(s), drag the vertical scroll bar or click the up or down arrow buttons until January 2005 appears.
-
Select the dates January 13 and 14.
Tip To quickly select this date range, drag from 13 through 14.
-
Under Set selected date(s) to, click Nonworking time.
Your screen should look similar to the following illustration:

Project will not schedule work for Garrett on these dates.
Tip If your team uses the calendar module in Outlook and Project Web Access, resources can automatically report to you times they are not available to work on project activities. These times are based on calendar items marked as busy or out of office in Outlook. Once the times are reported, you can easily update the resource’s working time in the project plan without retyping anything. For more information, see Part 4, “Introducing Project Server.”
To conclude this exercise, you will set up a “4 by 10” work schedule (that is, 4 days per week, 10 hours per day) for a resource.
-
In the For box, click John Rodman.
-
When prompted to save the resource calendar changes you made for Garrett, click Yes.
-
Select the Monday through Thursday column headings in the calendar.
Tip To quickly select the Monday through Thursday column headings, drag from the M through the Th.
Although you can see only one month at a time in the dialog box, selecting a column heading for a day of the week selects every occurrence of that day—past, present, and future.
-
In the lower To box, click 5:00 PM and replace it with 7:00 PM.
-
Click the Friday column heading.
-
Under Set selected date(s) to, click Nonworking time.
Now Project can schedule work for John as late as 7 P.M. every Monday through Thursday, but it will not schedule work for him on Fridays.
-
Click OK to close the Change Working Time dialog box.
Because you have not yet assigned these resources to tasks, you don’t see the scheduling effect of their nonworking time settings. You will in Chapter 4, “Assigning Resources to Tasks.”
| Tip | If you find that you must edit several resource calendars in a similar way (to handle a night shift, for example), it may be easier to assign a different base calendar to a resource or collection of resources. This is more efficient than editing individual calendars, and it allows you to make project-wide adjustments to a single base calendar if needed. For example, if your project includes a day shift and a night shift, you can apply the Night Shift base calendar to those resources who work the night shift. You change a resource’s base calendar in Step 2 of the Resource Working Times Project Guide, or in the Base Calendar box on the Working Time tab of the Resource Information dialog box. You can open this dialog box by clicking Resource Information on the Project menu when in a resource view. For collections of resources, you can make these changes directly in the Base Calendar column on the Entry table in the Resource Sheet view. |
EAN: 2147483647
Pages: 199