Linking New Project Plans to a Resource Pool
You can make a project plan a sharer plan for a resource pool at any time: when initially entering the project plan’s tasks, after you have assigned resources to tasks, or even after work has begun. After you have set up a resource pool, you might find it helpful to make sharer plans of not only projects already under way but also all new projects. That way, you get used to relying on the resource pool for resource information.
| Tip | A big timesaving advantage of making new project plans sharers of a resource pool is that your resource information is instantly available. You don’t have to reenter any resource data. |
In this exercise, you create a project plan and make it a sharer plan for the resource pool.
-
On the Standard toolbar, click the Open button.
The Open dialog box appears.
-
Navigate to the Chapter 20 Consolidating folder, and double-click Resource Pool 20.
Project prompts you to select how you want to open the resource pool.

Important The default option is to open the resource pool as read-only. You might want to choose this option if you and other Project users are sharing a resource pool across a network. If you store the resource pool locally, however, you should open it as read-write. To read more about how to open a resource pool, click the Help button in the Open Resource Pool dialog box. fs::;G20PS12.xxx
-
Click the second option to open the project plan as read-write, and then click OK.
-
On the View menu, click Resource Sheet.
The Resource Sheet view appears.
-
On the Standard toolbar, click the New button.
-
Click the Show/Hide Project Guide button on the Project Guide toolbar.
The Project Guide closes.
-
On the File menu, click Save As.
The Save As dialog box appears.
-
In the File name box, type Hanson Brothers Project 20, and then click the Save button.
-
On the Standard toolbar, click the Assign Resources button.
The Assign Resources dialog box is initially empty because you have not yet entered any resource information in this project plan.
-
On the Tools menu, point to Resource Sharing, and then click Share Resources.
The Share Resources dialog box appears.
-
Under Resources for ‘Hanson Brothers Project 20’, select the Use resources option.
-
In the From list, make sure that Resource Pool 20 is selected in the drop-down list, and then click OK to close the Share Resources dialog box.
In the Assign Resources dialog box, you see all of the resources from the resource pool appear.
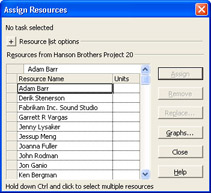
Now these resources are ready for assignments to tasks in this project.
-
Click the Close button to close the Assign Resources dialog box.
-
On the File menu, click Close. When prompted, click the Yes button to save your changes.
The Hanson Brothers Project 20 project plan closes, and the Resource Pool 20 plan remains open.
-
On the File menu, click Close. When prompted, click the Yes button to save your changes to Resource Pool 20.
You save changes to the resource pool because it records the names and locations of its sharer plans.
EAN: 2147483647
Pages: 199