Chapter 20: Consolidating Projects and Resources
![]() Download CD Content
Download CD Content
In this chapter you will learn to:
-
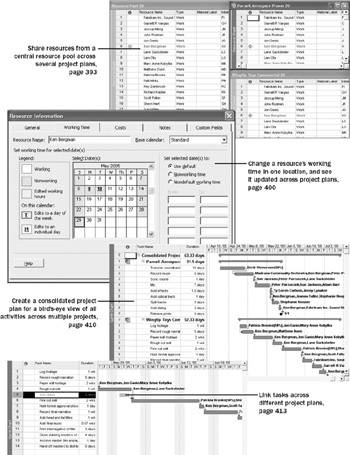
Create a resource pool to share resources across multiple projects.
-
Look at resource allocation across multiple projects.
-
Change resource assignments in a sharer plan, and see the effects in the resource pool.
-
Change a resource’s working time in the resource pool, and see the effects in the sharer plan.
-
Make a specific date nonworking time in the resource pool, and see the effects in the sharer plan.
-
Create a project plan, and make it a sharer plan for the resource pool.
-
Manually update the resource pool from a sharer plan.
-
Insert project plans to create a consolidated project.
-
Link tasks between two project plans.
Important This chapter describes various ways of sharing resources and managing multiple projects. This process is more generally called portfolio management or enterprise project management. Project Professional, when used with Project Server, offers much more sophisticated ways of managing a portfolio of projects and resources across an enterprise. To learn more about the portfolio management tools available with Project Server, see Part 4, “Introducing Project Server.”
Most project managers must juggle more than one project at a time. These projects often share resources and are worked on simultaneously. Microsoft Office Project 2003 has several features to make it easier to work with multiple projects. In this chapter, you share resource information between multiple project plans and join separate project plans as a single consolidated plan.
| Important | On the CD Before you can use the practice files in this chapter, be sure you install them from the book’s companion CD to their default location. See “Using the Book’s CD-ROM,” on page xiii, for more information. |
Creating a Resource Pool
When managing multiple projects, it is common for work resources (people and equipment) to be assigned to more than one project at a time. It might become difficult to coordinate the resources’ time among the multiple projects, especially if those projects are managed by different people. For example, a sound engineer in a film studio might have task assignments for a TV commercial, a promotional program, and a documentary film—three projects proceeding simultaneously. In each project, the engineer might be fully allocated or even underallocated. However, if you add together all her tasks from these projects, you might discover that she has been overallocated, or assigned to work on more tasks than she can handle at one time.
A resource pool can help you see how resources are utilized across multiple projects. The resource pool is a project plan from which other project plans draw their resource information. It contains information about all resources’ task assignments from all the project plans linked to the resource pool. You can change resource information—such as maximum units, cost rates, and nonworking time—in the resource pool, and all linked project plans will use the updated information.
The project plans that are linked to the resource pool are called sharers. Here is one way of visualizing a resource pool and sharer plans:
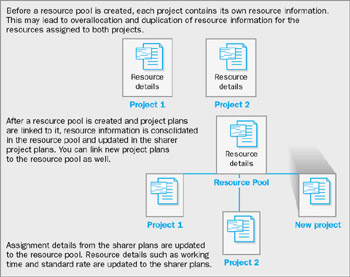
If you manage just one project with resources that are not used in other projects, a resource pool provides you no benefit. However, if your organization plans to manage multiple projects, setting up a resource pool enables you to do the following:
-
Enter resource information once but use it in multiple project plans.
-
View resources’ assignment details from multiple projects in a single location.
-
View assignment costs per resource across multiple projects.
-
Find resources who are overallocated across multiple projects, even if those resources are underallocated in individual projects.
-
Enter resource information, such as nonworking time, in any of the sharer plans or in the resource pool so that it is available in the other sharer plans.
A resource pool is especially beneficial when working with other Project users across a network. In those cases, the resource pool is stored in a central location, such as a network server, and the individual owners of the sharer plans (which might be stored locally or on a network server) share the common resource pool.
In this exercise, you arrange the windows of two project plans that will become sharer plans; this helps you see the effects of creating a resource pool. You then create a project plan that will become a resource pool and you link the two sharer plans to it.
| Important | On the CD If you are running Project Professional, you may need to make a one-time adjustment to use the My Computer account and to work offline. This helps ensure that the practice files you work with in this chapter don’t affect your Project Server data. For more information, see “Starting Project Professional,” on page 10. |
OPEN: Wingtip Toys Commercial 20a from the \My Documents\Microsoft Press\Project 2003 Step by Step\Chapter 20 Consolidating folder. You can also access the practice files for this book by clicking Start, All Programs, Microsoft Press, Project 2003 Step by Step, and then selecting the chapter folder of the file you want to open.
-
On the File menu, click Save As.
The Save As dialog box appears.
-
In the File name box, type Wingtip Toys Commercial 20, and then click the Save button.
-
On the Standard toolbar, click the Open button.
The Open dialog box appears.
-
Double-click the Parnell Aerospace Promo 20b file.
-
On the File menu, click Save As.
The Save As dialog box appears.
-
In the File name box, type Parnell Aerospace Promo 20, and then click the Save button.
These two project plans were previously created, and both contain resource information. Next you will create a new project plan that will become a resource pool.
-
On the Standard toolbar, click the New button.
-
Click the Show/Hide Project Guide button on the Project Guide toolbar.
The Project Guide closes.
-
On the File menu, click Save As.
-
In the File name box, type Resource Pool 20, and then click the Save button.
Tip TipYou can name a resource pool anything you want, but it is a good idea to indicate that it is a resource pool in the file name.
-
On the Window menu, click Arrange All.
Project arranges the three project plan windows within the Project window. You do not need to arrange the project windows in this way to create a resource pool, but it is helpful to see the results as they occur in this chapter.
Next you will switch the resource pool to the Resource Sheet view.
-
On the View menu, click Resource Sheet. Your screen should look similar to the following illustration:
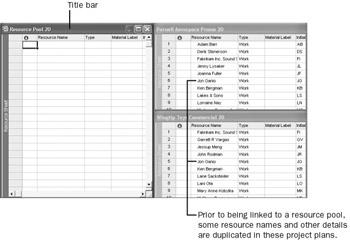
Looking at the resource names in the two project plans (Parnell Aerospace Promo 20 and Wingtip Toys Commercial 20), you can see that several of the same resources appear in both project plans. These include Fabrikam Inc. Sound Studio, Jon Ganio, Ken Bergman, and others. None of these resources are overallocated in either project.
-
Click the title bar of the Wingtip Toys Commercial 20 window.
-
On the Tools menu, point to Resource Sharing, and click Share Resources.
The Share Resources dialog box appears.
-
Under Resources for ‘Wingtip Toys Commercial 20’, select the Use resources option.
The Use resources From list contains the open project plans that can be used as a resource pool.
-
In the From list, click Resource Pool 20 in the drop-down list.
Your screen should look similar to the following illustration:

-
Click OK to close the Share Resources dialog box.
You see the resource information from the Wingtip Toys Commercial 20 project plan appear in the Resource Pool 20 plan. Next you will set up the Parnell Aerospace Promo 20 project plan as a sharer plan with the same resource pool.
-
Click the title bar of the Parnell Aerospace Promo 20 window.
-
On the Tools menu, point to Resource Sharing, and then click Share Resources.
-
Under Resources for ‘Parnell Aerospace Promo 20’, click the Use resources option.
-
In the From list, make sure that Resource Pool 20 is selected.
-
Under On conflict with calendar or resource information, make sure that the Pool takes precedence option is selected.
Selecting this option causes Project to use resource information (such as cost rates) in the resource pool rather than in the sharer plan should it find any differences between the two project plans.
-
Click OK to close the Share Resources dialog box.
You see the resource information from the Wingtip Toys Commercial 20 project plan appear in the resource pool. Your screen should look similar to the following illustration:
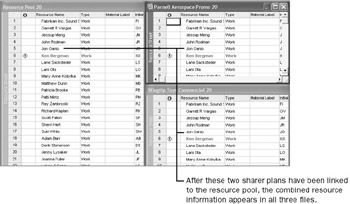
The resource pool contains the resource information from both sharer plans. Project will consolidate resource information from the sharer plans based on the name of the resource. Jon Ganio, for example, is listed only once in the resource pool, no matter how many sharer plans list him as a resource. However, Project cannot match variations of a resource’s name—for example, Jon Ganio from one sharer plan and J. Ganio from another. For this reason, it is a good idea to develop a convention for naming resources and stick with it.
Again, you do not have to arrange the project windows as you did in this exercise to link the sharer plans to the resource pool. But it is helpful in this chapter to see the results as they occur.
| Tip | If you decide you do not want to use a resource pool with a project plan, you can break the link. On the Tools menu, point to Resources Sharing, and click Share Resources. Under Resources for <Current Project Name>, select the Use own resources option. |
Any project plan, with or without tasks, can serve as a resource pool. However, it is a good idea to designate a project plan that does not contain tasks as the resource pool. This is because any project with tasks will almost certainly conclude at some point, and you might not want assignments for those tasks (with their associated costs and other details) to be included indefinitely in the resource pool.
Moreover, a dedicated resource pool without tasks can enable people such as line managers or resource managers to maintain some information about their resources, such as nonworking time, in the resource pool. These people might not have a role in project management, and they will not need to deal with task-specific details in the resource pool.
EAN: 2147483647
Pages: 199