Chapter 18: Customizing Project
![]() Download CD Content
Download CD Content
In this chapter you will learn to:
-
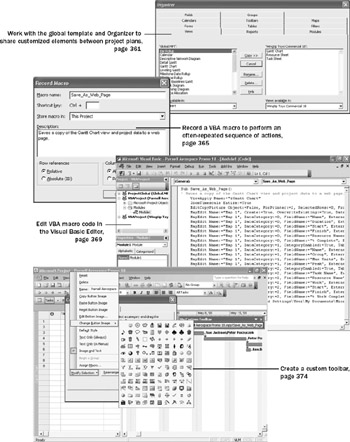
Copy a customized element, such as a table, from one project plan to another by using the Organizer.
-
Record and play back a simple macro.
-
Edit a macro in the Visual Basic Editor.
-
Create a custom toolbar.
This chapter describes some of the ways you can customize Microsoft Office Project 2003 to fit your own preferences. Some of the customization options in Project are similar to those you see in other programs in the Microsoft Office System such as Word or Excel. Some customization options even apply to all programs in the Microsoft Office System regardless of the specific program in which you set them. Other options are unique to Project.
| Important | Some of the actions you perform in this chapter can affect your overall settings in Project regardless of the specific project plan you are using. To keep your Project environment unaffected or at the “factory settings,” after you complete this chapter, we include steps to undo some actions. |
| Important | On the CD Before you can use the practice files in this chapter, be sure you install them from the book’s companion CD to their default location. See “Using the Book’s CD-ROM,” on page xiii, for more information. |
Working with the Organizer
The Organizer is the feature you use to share customized elements among project plans. The complete list of elements you can copy between files with the Organizer is indicated by the names of the tabs in the Organizer dialog box, which you will see shortly.
One feature of Project that you can work with through the Organizer is the global template. This is a Project template named Global.mpt, and it is installed as part of Project. The global template provides the default views, tables, and other elements in Project. The list of elements provided by the global template includes the following:
|
|
| Tip | This tip describes enterprise project management (EPM) functionality. Project Standard always uses the global template, and Project Professional uses the global template when not connected to Project Server. However, when Project Professional is connected to Project Server, it uses the enterprise global template rather than the global template. The enterprise global template is stored within Project Server and generally provides the same services as does the global template, but on an enterprise project management scale. For more information, see Part 4, “Introducing Project Server.” |
Initially, the specific definitions of all views, tables, and similar elements are contained in the global template. For example, the fact that the default usage table contains one set of fields and not others is determined by the global template. The very first time you display a view, table, or similar element in a project plan, it is automatically copied from the global template to that project plan. Thereafter, the element resides in the project plan. Any subsequent customization of that element in the project plan (for example, changing the fields displayed in a table) applies to only that one project plan and does not affect the global template. The exception to this is macros, toolbars, and import/export maps. Project always stores these elements in the global template rather than in the active project plan.
You could use Project extensively and never need to touch the global template. When you do work with the global template, you do so through the Organizer. There are two primary actions you can accomplish relating to the global template:
-
Create a customized element, such as a custom view, and make it available in all project plans you work with by copying the custom view into the global template.
-
Replace a customized element such as a view or table in a project plan by copying the original, unmodified element from the global template to the project plan in which you’ve customized the same element.
The settings in the global template apply to all project plans you work with in Project. Because we don’t want to alter the global template you use, in this exercise we’ll focus on copying customized elements between two project plans. Keep in mind, though, that the general process of using the Organizer shown here is the same whether you are working with the global template and a project plan or two project plans. In fact, any custom element you copy into the global template becomes available in all the project plans you use.
| Important | In the Organizer, when you attempt to copy a view, table, or other element from a project plan to the global template, Project alerts you if you will overwrite that same element in the global template. If you choose to overwrite it, that customized element (such as a customized view) will be available in all new project plans and any other project plans that do not already contain that element. If you choose to rename the customized element, it becomes available in all project plans but does not affect the existing elements already stored in the global template. It’s generally a good idea to give your customized elements unique names, like Custom Gantt Chart, so that you can keep the original element intact. |
In this exercise, you will copy a custom table from one project plan to another.
| Important | If you are running Project Professional, you may need to make a one-time adjustment to use the My Computer account and to work offline. This helps ensure that the practice files you work with in this chapter don’t affect your Project Server data. For more information, see “Starting Project Professional,” on page 10. |
OPEN: Parnell Aerospace Promo 18a and Wingtip Toys Commercial 18b from the \My Documents\ Microsoft Press\Project 2003 Step by Step\Chapter 18 Customizing folder. You can also access the practice files for this book by clicking Start, All Programs, Microsoft Press, Project 2003 Step by Step, and then selecting the chapter folder of the file you want to open.
-
On the File menu, click Save As.
The Save As dialog box appears.
-
In the File name box, type Wingtip Toys Commercial 18, and then click the Save button.
-
Repeat steps 1 and 2 to save Parnell Aerospace Promo 18a as Parnell Aerospace Promo 18.
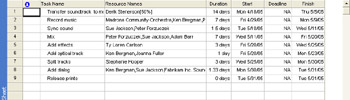
The Wingtip Toys Commercial 18 project plan contains a custom table named Custom Entry Table, which is currently displayed in the Task Sheet view. Your screen should look similar to the following illustration:

You’d like to copy this custom table to the Parnell Aerospace Promo 18 project plan.
-
On the Tools menu, click Organizer.
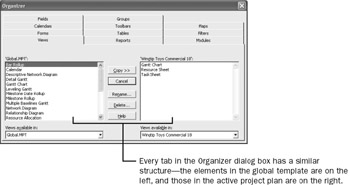
The Organizer dialog box appears. Your screen should look similar to the following illustration:
-
Click several of the tabs in the dialog box to get an overview of the available options, and then click the Tables tab.
As you can see, every tab of the Organizer dialog box has a similar structure: elements from the global template appear on the left side of the dialog box, and the same types of elements from the active project plan appear on the right.
You might notice that the list of tables in the Wingtip plan is not the complete list of tables you can display. The list you see for the Wingtip plan in the Organizer includes only the tables that have actually been displayed already in the Wingtip plan. If you were to display another table, the Schedule table, for example, Project would copy that table definition from the global template into the Wingtip plan.
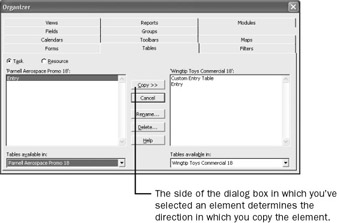
Selecting an element on the left side of the dialog box and then clicking the Copy button will copy that element to the project plan listed on the right. Conversely, selecting an element on the right side of the dialog box and then clicking the Copy button will copy that element to the file listed on the left.
-
In the Tables available in drop-down list on the left side of the Organizer dialog box, select Parnell Aerospace Promo 18.
This project plan appears in the list because it is open in Project. Your screen should look similar to the following illustration:
As you can see, the Parnell plan (on the left) does not have the Custom Entry Table, and the Wingtip plan (on the right) does.
-
In the list of tables on the right side of the dialog box, click Custom Entry Table.
Tip Notice that the two arrow symbols (>>) in the Copy button switch direction (<<) when you select an element on the right side of the dialog box.
-
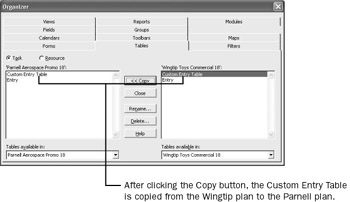
Click Copy.
Project copies the Custom Entry Table from the Wingtip plan to the Parnell plan. Your screen should look similar to the following illustration:
-
Click Close to close the Organizer dialog box.
To conclude this exercise, you will display the newly copied custom table.
-
On the Window menu, click Parnell Aerospace Promo 18.
Project switches to the Parnell plan, the plan to which you just copied the custom table.
-
On the View menu, click More Views.
The More Views dialog box appears.
-
In the Views list, click Task Sheet, and then click Apply.
-
On the View menu, point to Table: Entry, and then click Custom Entry Table.
Project displays the custom table in the Parnell plan. Your screen should look similar to the following illustration:
-
On the View menu, click Gantt Chart.
| Important | In this exercise, you copied a table between project plans. When copying an entire view, however, keep in mind that it is comprised of tables, filters, and groups. When copying custom views between plans, you might also need to copy a custom table, filter, or group that is part of the custom view. |
EAN: 2147483647
Pages: 199