Getting Started with SQL Server 2000: The Basics
| After installing it, you have several minimum tasks to complete before SQL Server begins storing and retrieving data, including:
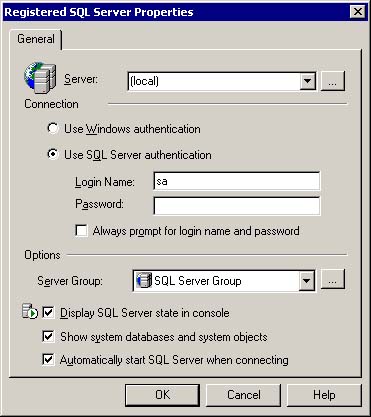
All the tasks you need to perform are described in this section. Most can be handled without writing code by using the SQL Server Enterprise Manager utility in SQL Server 2000. Running SQL Server Enterprise ManagerYou can perform many of the most common database configuration and setup tasks in SQL Server by using a utility called SQL Server Enterprise Manager. Because of its power and ease of use, SQL Server Enterprise Manager is one of the most important tools in Microsoft SQL Server 2000. The utility makes the database administrator's task easier by putting an easy-to-use graphical interface on top of a number of chores that were formerly accomplished (and can still be accomplished) with somewhat arcane SQL commands. You launch Enterprise Manager from its icon in your Microsoft SQL Server program group. After you've launched it, you'll gain access to the SQL Server(s) available on your network. The following sections in this chapter describe some of the most common tasks you will perform with Enterprise Manager in a production application. Note In a new SQL Server installation, you have only one username, sa, and it has no password. You'll obviously want to change this situation soon because a username without a password is like a bank vault without a lock. For more information on how to manage user accounts and security in SQL Server, see the Managing Users and Security in SQL Server Enterprise Manager section later in this chapter. The first time you run Enterprise Manager, you must register your SQL Server installation. Doing so lets Enterprise Manager know which SQL Server you want to work with; it also lets you administer more than one SQL Server installation. You register a SQL Server in the Registered SQL Server Properties dialog box, as shown in Figure 3.5. Figure 3.5. Enterprise Manager's Registered SQL Server Properties dialog box
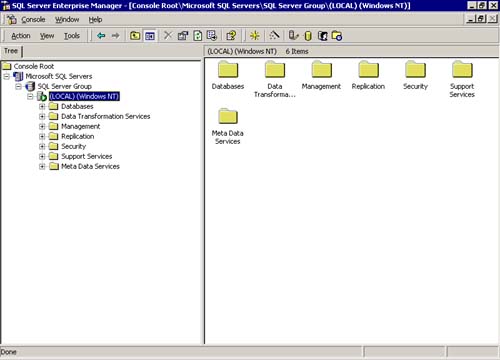
If you're attempting to register a SQL Server running on the machine you're working on, it is easiest to use the server name (local), including the parentheses. If you're trying to connect to a SQL Server over a LAN, it is easiest to use the Server browse ( … ) button to browse the servers available on your network. Tip The Registered SQL Server Properties dialog contains an important but often hard-to-find option checkbox: Show system databases and system objects. When this option is unchecked, your system databases and objects remain hidden in the various Enterprise Manager windows. That reduces the clutter when you're working only with your application's tables and files. However, if you want to see these system objects, just return to this dialog to edit the properties and check this option. After you've registered the server you want to work with, click on the OK button in the Registered SQL Server Properties dialog. (You have to do so only once. SQL Enterprise Manager then remembers how to connect to the server you want to work with.) Your server's name also appears in the Microsoft SQL Servers console window (along with any other servers that you've registered). On a machine with a connection to a local SQL Server, the Microsoft SQL Servers console window looks like that shown in Figure 3.6. Figure 3.6. Microsoft SQL Servers console window with a local SQL Server in Enterprise Manager
Creating a Database with SQL Enterprise ManagerAfter registering your server, you're ready to get down to business. The next step is to create a database and begin populating it with database objects, such as tables, views, and stored procedures. Although you can create databases by using SQL code, doing so with Enterprise Manager is much easier. The reason is that Enterprise Manager lets you design most database objects graphically, shielding you from the complexity of SQL code. To create a new database with SQL Server Enterprise Manager do the following.
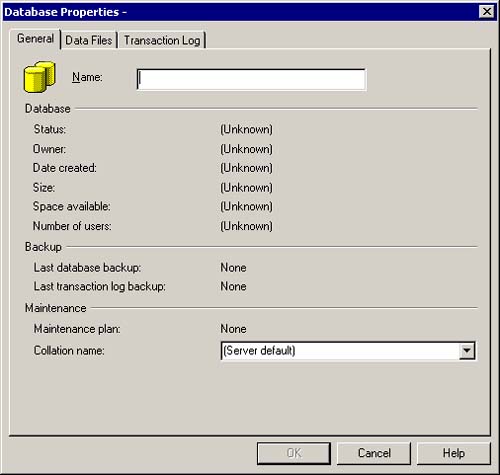
Note On the General tab, you can also specify a default collation for the database. A collation determines the character set and the rules by which characters are sorted and compared. This specification is particularly important when you're dealing with data in languages other than English, but it is also used to specify whether case-sensitive or case-insensitive sorting and comparing is to be used. Creating Tables in a SQL Server DatabaseIn Microsoft SQL Server, you can create tables in two ways:
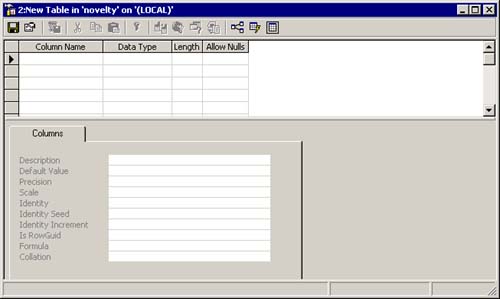
Both techniques have advantages and disadvantages. Using SQL DDL commands is more complicated than building tables graphically, particularly if you haven't worked with SQL extensively in the past; using SQL is more flexible and forces you to write and maintain code to create your database. On the one hand, DDL commands lend themselves to being automated, as in creating a script to build a database with a single click. They also allow functionality and options that are not exposed by the Enterprise Manager's GUI and are a (crude) method of documenting the database schema. On the other hand, using the SQL Server Enterprise Manager enables you to create a database structure quickly and easily, using all the graphical user interface advantages. However, Enterprise Manager isn't as easy to automate. Some database programmers prefer to use SQL code to create their databases because they always have a written record (in the form of their SQL DDL code) of what went into creating the database. The technique you use is a function of your personal preference, your or ganization's standards for development, and the kinds of database applications you're likely to create. We introduce both techniques in the following sections. Tip SQL Server 2000 has a feature that will generate the SQL DDL code for the objects in an existing database. You can view it by right-clicking on a database in the Databases folder in the Microsoft SQL Servers console window, selecting All Tasks, and then selecting Generate SQL Script to bring up the Generate SQL Scripts dialog window. Using Enterprise Manager to Create Tables in SQL ServerAfter you've created a database in SQL Server, you can use SQL Server Enterprise Manager to create tables in the database. To create a table in a database, follow these steps.
Creating an Identity Column to Uniquely Identify RecordsIt is useful (although not required) for every record to have a piece of information that uniquely identifies it. Often, this unique identifier has nothing intrinsically to do with the data represented by the record. In SQL Server, a column can be defined to be an identity column (analogous to the concept in Jet of an AutoNumber field). An identity column automatically assigns a unique numeric value to a column in each record as the record is created. If you're familiar with Jet's AutoNumber field, it is useful to contrast it to SQL Server's identity column. A SQL Server identity column is different from, and in some ways more flexible than, a Jet AutoNumber field. Identity columns in SQL Server have the following attributes.
A SQL Server identity column is less flexible than a Jet AutoNumber field in one respect: If you're going to create an identity column for a table, you must do it when you create the table (before adding any data). The reason is that SQL Server requires that any field created later must allow null values; again, non-null fields can only be created before the table contains any data. To create an identity column using SQL Server Enterprise Manager, follow these steps.
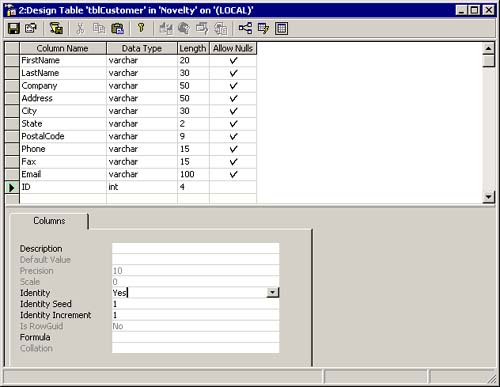
When your identity column has been set, the Design Table dialog box looks like that shown in Figure 3.11. Figure 3.11. Creating an identity column in the Design Table dialog box in SQL Server Enterprise Manager
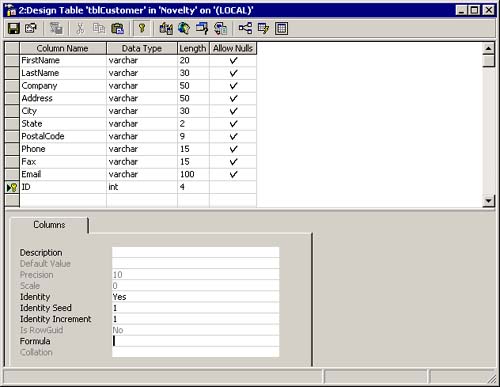
Bear in mind when you're using identity columns in SQL Server that they're not guaranteed to be sequential. For example, if Kevin tries to create a record designated ID number 101, then Laura creates the next record (ID number 102), and Kevin's insert transaction fails, a record with ID number 101 will never be created. That may not be such a big deal, especially in a database application that never exposes the value of a primary key to the user (a design principle you should strive for). But remember that "lost" identity values are a possibility. If you use identity columns to give each record uniqueness, don't be surprised if you browse your data someday and discover that there's no invoice number 101. Using Other Methods to Generate Primary KeysYour database tables aren't required to have primary keys. You'll probably find, however, that having a primary key even if it's a bogus value made up by the server at the time the record was created is a good idea. Recall that you need a primary key to do important things like joining multiple tables in queries. Primary keys are also handy ways to refer to records in the user interface. Rather than passing the whole record from one procedure to the next, having a primary key lets you pass a minimal amount of data pertaining to the record. One alternative tactic for generating primary keys is to generate a unique random value in the primary key field for each record as it is created. This tactic is used for tables containing Auto Number fields that have been converted, or upsized, from Microsoft Access to SQL Server. It's also the technique used for replicated Access databases to avoid collisions between records that are entered by remote, disconnected users. Another tactic is to store a counter value in a temporary table and use that value to set each new record's primary key column as the record is created. This tactic involves a transaction that reads the counter table's current value, using it to populate the primary key of the new record, and then increments the value in the counter table in one atomic operation. This technique has the advantage of providing a sequential numbering system over which you have complete control. The disadvantage (when compared to the simpler technique of creating an identity column) is that you need to write a stored procedure and add tables to your database to implement it. Storing a counter value also creates contention for a single table, which could cause a performance problem in a heavily loaded system. A final tactic is to derive a key from cues supplied by the data; for example, the key for a record for a person named Vito Polito might be VP001. If another person with the initials VP comes along, the system would give that record the key VP002, and so on. This tactic has the advantage of providing a key that isn't totally dissociated from the data, but it does require more coding on your part (in the form of a stored procedure executing as a trigger, described later in this chapter). Marking a Column as the Primary KeyWhen you create an identity column, you'll almost certainly want to designate that column as your table's primary key. You can do that in SQL Server Enterprise Manager's Design Table dialog box, as follows.
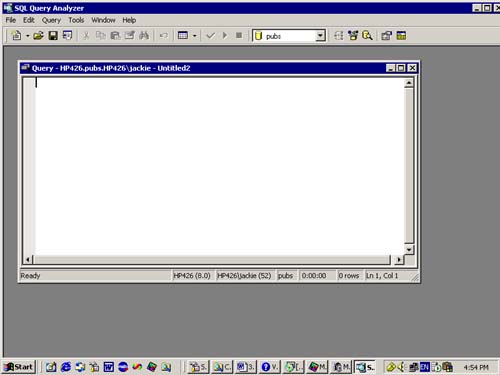
Note You can designate multiple fields as a table's primary key; it is known as a concatenated key. You do so in situations when, for example, you want the first and last names of every person in the table to be unique. That would prevent the name Amy Rosenthal from being entered in the table twice, but it wouldn't prevent other people named Amy from being entered into the table. To designate multiple fields for the primary key, select the desired rows by using <Ctrl> Click. Using SQL Query Analyzer to Access a DatabaseYou can issue SQL commands to SQL Server through a utility called SQL Query Analyzer (formerly ISQLW). With SQL Query Analyzer, you can not only run SQL queries, but also perform other actions on records, such as update, delete, and insert. You can also use SQL Query Analyzer to perform sophisticated database and server management tasks such as creating databases, tables, views, and stored procedures. If you're familiar with the SQL syntax, getting started with SQL Query Analyzer is easy. (Mastering it, on the other hand, can be tricky which is why, for many of the more complicated examples in this chapter, we rely on SQL Query Analyzer's graphical cousin, SQL Enterprise Manager.) To issue commands to the database by using SQL Query Analyzer, launch SQL Query Analyzer from the Microsoft SQL Server program group (or the Tools menu of the SQL Server Enterprise Manager). SQL Query Analyzer displays the Connect to SQL Server dialog box. Then choose the server you want to connect to, type in a username and password, and click on Connect. The SQL Query Analyzer main window appears, as illustrated in Figure 3.13. When commands are executed, an additional multitab pane is added to display results, messages, and various statistics and plans. We present the results and messages tabs in later examples in this chapter. Figure 3.13. The main window of SQL Query Analyzer
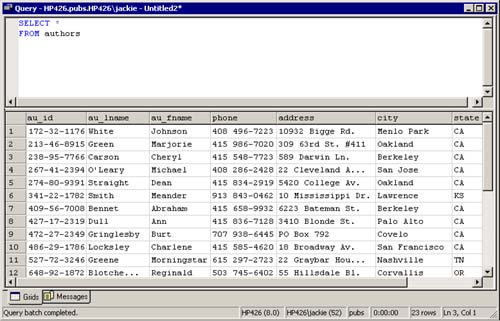
Once you've launched SQL Query Analyzer, you can begin issuing commands to the database in SQL. To be sure it's working properly, though, test the connection to the database before attempting to do anything else. You can do so with the pubs database that ships with SQL Server, as follows.
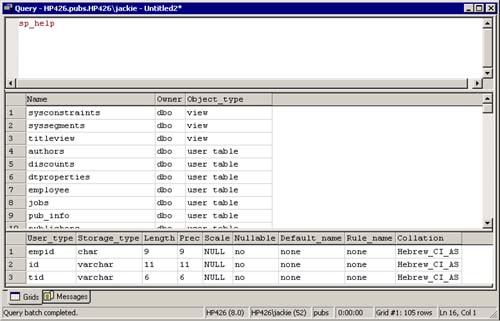
Tip In addition to executing all the script commands currently in the Query window, you can execute one or more of the lines by selecting (highlighting) the lines to execute and then executing them by pressing F5 or by clicking on the green Execute Query button on the toolbar. Doing so allows you to easily repeat portions of commands, perhaps after modifying them. Viewing All the Objects in Your Database By Using sp_helpSQL Server enables you to see all the objects available in any database. The system gives you this capability through a stored procedure a bit of code stored and executed on the server. The stored procedure sp_help enables you to browse databases. You execute sp_help the same way you execute any SQL query entering it by using SQL Query Analyzer's Query window. To get a road map to the objects in your database by using sp_help, follow these steps.
Note You can write your own stored procedures in SQL Server. For more on this topic, see the Creating and Running Stored Procedures section later in this chapter. Also, although the stored procedures you create are usually local to an individual database, other stored procedures are provided by the system and are available to every database in a SQL Server. For another example of such a system-provided stored procedure, see the Displaying the Text of an Existing View or Stored Procedure section later in this chapter. Using an Existing DatabaseYou can work with a particular database by executing the USE command in SQL Query Analyzer. When you designate a particular database with USE, all the subsequent SQL commands you issue are performed against that database. This point is important to remember because you can easily issue commands inadvertently against the wrong database if you're not careful. Note Inadvertently issuing commands against the wrong database is one reason that you should designate a database other than master to be your server's default database (that is, only server configuration data should go into the master database). Every server login can define its own default database. You can change the default database when you create the login or anytime thereafter; the technique for doing so is described in the Creating and Maintaining Logins and Users section later in this chapter. For example, to switch from the master database to the Novelty database, do the following.
Remember, if you forget the name of a database (or its spelling), you can look it up in SQL Enterprise Manager or list the available databases using the sp_helpdb stored procedure, which returns information about a specified database or all databases. Issuing SQL Commands to SQL Query AnalyzerYou can execute any type of SQL command against a database by using SQL Query Analyzer, which has some advantages over other methods of sending commands to SQL Server. Remembering SQL syntax can be more difficult than using SQL Enterprise Manager particularly when you're using seldom-executed commands such as those for creating databases but SQL Query Analyzer has the advantage of being interactive. The utility responds immediately to commands you issue. SQL Query Analyzer also has a number of features not offered by SQL Enterprise Manager, such as the capability to run queries and stored procedures. In Chapter 2 we discussed the syntax of most of the basic SQL commands you're ever going to want to issue against a relational database. Most of this information is also applicable to running queries and creating database structures in SQL Server. Using Database Views to Control Access to DataA view is a query definition stored in a database. It is conceptually similar to a query definition in the Microsoft Jet database engine, in the sense that it is a stored definition that resides in the database and gives client applications access to data. You use views in situations when you want to give users access to data but don't want to give them direct access to the underlying tables. However, once defined, views can be thought of as virtual tables and used whenever a database table would be used. The fact that a view looks exactly like a table to a client application gives you a number of advantages. For example, when users access data through views rather than through direct access to tables:
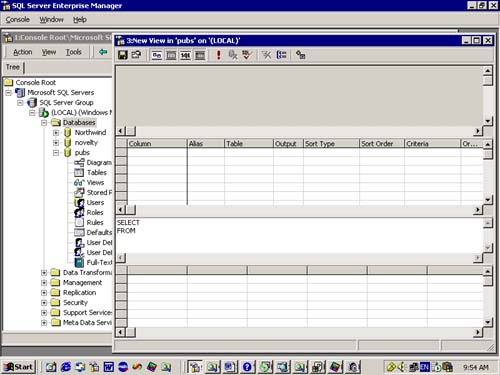
To take full advantage of views, you should have a security strategy for your database. That permits you to attach security permissions to views instead of tables, which makes it easier to grant and revoke permissions from different types of users. We discuss security in the Managing Users and Security in SQL Enterprise Manager section later in this chapter. Creating Views in SQL Server Enterprise ManagerAs with many of the database objects that you can create in SQL Server, you can create views in either SQL Query Analyzer or SQL Server Enterprise Manager. Both techniques are fundamentally similar; SQL Server Enterprise Manager's technique is slightly more graphical, whereas SQL Query Analyzer's technique is interactive, permitting you to test a view as soon as you create it. To create a view in SQL Server Enterprise Manager, do the following.
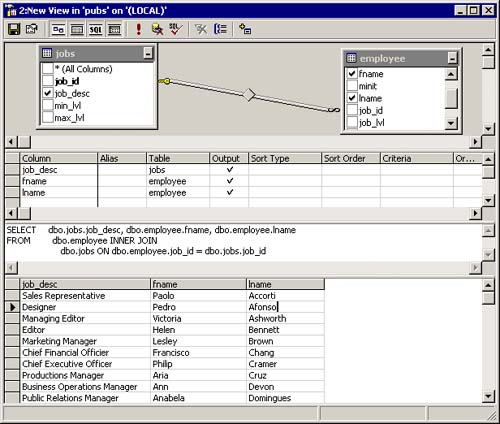
With creation of the view EmployeeJobs view, we have an object that we can deal with as if it were a simple table the fact that it is actually the result of a join of two tables is hidden. Thus we can have shorter, simpler SQL statements based on this one, while still having a correctly designed (normalized) database. Similarly, we can create a view that is based on calculations or manipulations of the data in a table. For example, suppose that we normally want to retrieve the names of employees as a single field that combines first and last names in the format lname, fname. We could create the view by using CREATE VIEW EmployeeNames_view AS SELECT lname + ', ' + fname AS Name FROM employee Using Views in a Production ApplicationA view is a construct that gives you greater control over the retrieval of data in your SQL Server database. This control manifests itself in various ways. By limiting the number of rows or columns retrieved by the view, you control the data that a particular user can retrieve. This control can enable you to do neat tricks, such as create selection criteria that are known only to you or lock out users from particular subsets of your data based on their security permissions. You can do these things because each object in the database including tables, views, and stored procedures can be associated with individual users or security groups. In a database that takes advantage of views and stored procedures, direct access to tables is generally limited to the database administrator; client applications are limited to accessing views or stored procedures that, in turn, are responsible for retrieving data from base tables. A Hide column is an example of an application of this technique. If the Hide column of a record is set to True, that row is never returned to a user; it's filtered out by the view responsible for retrieving the data from the database. Client applications never know that anything has changed because they're always issuing requests to the same view. Accessing databases through views, rather than through direct access to tables, is an important component of any robust production SQL Server database installation. In addition to enabling you to limit the number of rows and columns retrieved, shielding your database tables with views gives you the capability to change things without breaking client applications. This process of inoculating your database design from modifications caused by changes in business rules can be taken a step further by introducing middle-tier components. Conceptually, such components are similar to views and stored procedures in that they shield your database design from changes in your software application's mission, but they have advantages over views and procedures stored in SQL Server. Among these advantages are the fact that they're easier to program, they return data in the form of objects instead of rows and columns, and they aren't tied to any one database management system or programming language. (See Chapter 12 for more about middle-tier components.) Creating Views with an SQL Query Analyzer BatchYou can create views with SQL Query Analyzer. The process for doing so is less graphical but more flexible than creating views in Enterprise Manager. To create a view of tblEmployee that doesn't contain the (confidential) Salary field, using SQL Query Analyzer, follow these steps.
Note Earlier in this chapter we showed how to design a view graphically in the SQL Server Enterprise Manager right-clicking on a view and then selecting Design View from the pop-up menu. You can also edit the text of a view by double-clicking on a view and then modifying the text in the dialog box. In addition to being an example of how to create a view with SQL Query Analyzer, the preceding code is another example of executing a batch in SQL Query Analyzer. The batch not only creates the view, but it also switches to the correct database and runs the view when it's finished creating it. This result confirms that the view is doing what you think it's supposed to be doing. You can create batches to simplify the process of creating database objects by using SQL Query Analyzer; in most cases when you're creating database objects, you want to do more than one thing at once. Dropping a table, then creating a table, and then populating it with sample data is a typical use for an SQL batch; checking to see if a user account exists and then creating that user account with a default password is another use for it among many others. Creating and Running Stored ProceduresAlthough views give you a great deal of control over how data is retrieved from your SQL Server database, an even more powerful technique involves the use of stored procedures. A stored procedure is similar to a view, except that it gives you the capability to perform more complex operations on data. For example, stored procedures let you:
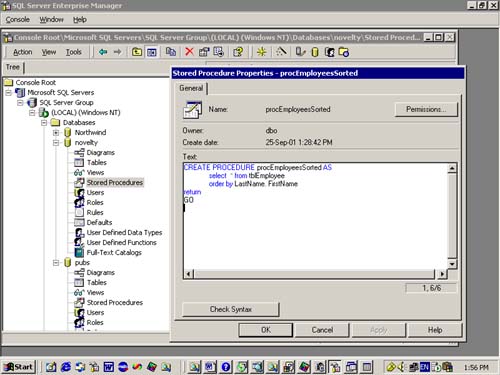
None of these features are available with traditional views. In some ways, it may be better to think of a stored procedure as a special kind of procedure hence the name. It is called a stored procedure because it is stored in the database itself, rather than being part of the application that runs on the client machine or on the application server. The preceding list indicates that a stored procedure can range from a simple one-line query to a routine that performs a series of complex queries and operations before returning a result. Stored procedures are written in their own database-oriented and database-specific programming language. That language has most, if not all, the programming constructs that you would expect although sometimes the syntax is somewhat arcane. The language used in SQL Server is called Transact-SQL. Note Microsoft has stated that future versions of SQL Server will allow writing stored procedures in any language supported by the .NET platform (such as Visual Basic.NET), rather than only in Transact-SQL. That will make it easier for developers to move from one aspect of application development to another without having to learn the syntax of a new programming language. Although this section is by no means an exhaustive description of all the commands available to you for stored-procedure programming, it gives you the basic information you'll need about how stored procedures work, why they're useful, and how you can incorporate them into your applications built on SQL Server. Creating Stored Procedures in SQL Server Enterprise ManagerYou can create stored procedures in SQL Server's Enterprise Manager by doing the following.
Running a Stored Procedure from SQL Enterprise ManagerYou can run stored procedures (as well as views and other SQL commands) from within SQL Server Enterprise Manager. Doing so is helpful when you want to test procedures or views that you've created. To test a stored procedure in SQL Enterprise Manager, follow these steps.
Of course, you can run a stored procedure by directly running the SQL Query Analyzer you don't need to start it from within the SQL Server Enterprise Manager. Creating Stored Procedures in SQL Query AnalyzerThe steps for creating stored procedures in SQL Query Analyzer are nearly identical to the way you create them in SQL Enterprise Manager. Note Be sure that you create the stored procedure in the Novelty database. It's easy to forget to switch to the correct database (using the USE command or listbox in SQL Query Analyzer) before issuing commands against it. Creating stored procedures with SQL Server Enterprise Manager makes committing this error harder. To create a stored procedure in SQL Query Analyzer, execute the Create Procedure command.
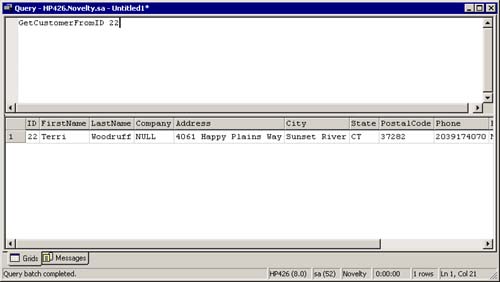
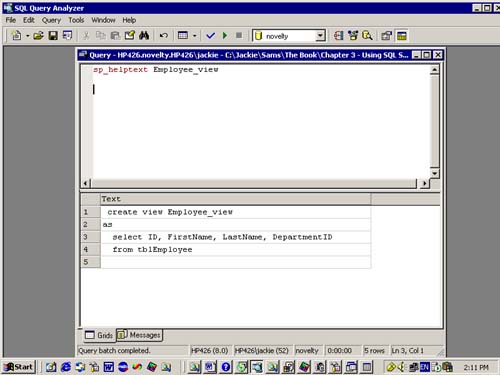
The procedure obviously returns data only if there is data in the table to retrieve. Note Now might be a good time to load the database with some customer data. A text file script named CustomerData.sql that loads customer data into the Novelty database is available at http://www.awprofessional.com/titles/0672323435. Additional scripts are available there for loading data into other database tables. Displaying the Text of an Existing View or Stored ProcedureYou can use the stored procedure sp_helptext to display the code for a view or stored procedure. To display this data, enter sp_helptext, followed by the name of the database object that you want to view. The SQL Server processor then returns the full text of the view or stored procedure. For example, to see the code for the view Employee_view that you created in the earlier section on views, do the following.
Creating TriggersA trigger is a special type of stored procedure that's executed when data is accessed in a particular table. You can think of triggers almost as event procedures that execute when data is updated, deleted, or inserted into a table. You generally use triggers when you need to do something complicated to your data in response to some kind of data access. For example, you might use a trigger to keep a log every time that certain information in the database is changed, or you might use one to create a complicated default value for a field in a new record, based on queries of one or more tables. You shouldn't use triggers for simple defaults; instead, you should use the default command or property. You shouldn't use them to maintain referential integrity; you should use SQL Server's inherent referential integrity constraint features for that. When you need to do something that goes beyond what's possible with SQL Server's feature set, you should consider using a trigger. For example, you can use triggers to provide a unique value in a column to serve as a record's primary key; this tactic is used in Microsoft Access Upsizing Tools, which applies a trigger to generate a random primary key for each record. (You can also use identity columns for this purpose, as discussed previously in this chapter.) An example of such a trigger is CREATE TRIGGER tblCustomer_ITrig ON dbo.tblCustomer FOR INSERT AS DECLARE @randc int, @newc int SELECT @randc = (SELECT convert(int, rand() * power(2, 30))) SELECT @newc = (SELECT ID FROM inserted) UPDATE tblCustomer SET ID = @randc WHERE ID = @newc Note For each of these triggers to work properly and be able to update the ID column, you must reset the ID column so that it is specified as not being an identity column. To do so, you have to return to the Design Table dialog and set the ID column's Identity property to "No". Creating a random number to uniquely identify a record is by far the simplest technique for generating a primary key. However, it has two drawbacks. First, the primary keys are generated in no discernable order, which may seem like a cosmetic problem. But, if you're trying to create an invoicing system, it's helpful to know that invoice 20010 follows invoice 20009. The other and potentially more serious problem is the fact that there's no guarantee that the randomly generated primary key is actually going to be unique. The reason is that the trigger doesn't check to see if the random number it came up with has been used by some other record in the database. Granted, a random integer has a very small chance of being generated twice by the system (because an SQL Server integer data type is a four-bit whole number that can store values in the range of about negative 2.1 billion to about positive 2.1 billion). Business Case 3.1: Creating a Trigger That Enables Soundalike SearchesBrad Jones, president of Jones Novelties, Incorporated, has approved the preliminary work of his database developer. She is now ready to tackle the next kind of database problem: queries on people's names that involve misspellings and homophones (sound the same, but spelled differently), which can be difficult to handle. Is a search being conducted on Smith when the person spells it Smythe? Is it McManus or MacManus? Anyone having an unusual last name knows the problems that such similarities can be. Jones's database developer recognizes that she's going to run into this kind of problem, so she decides to take advantage of a function of SQL Server to resolve this problem. This function, soundex(), converts a word to an alphanumeric value that represents its basic sounds. If she stores the soundex value of a name at the time she creates it, she can then search on the soundex value of the name in a query. The query returns more records, but it returns all the records that match the criterion. Implementing this feature in the Jones Novelties database requires several steps:
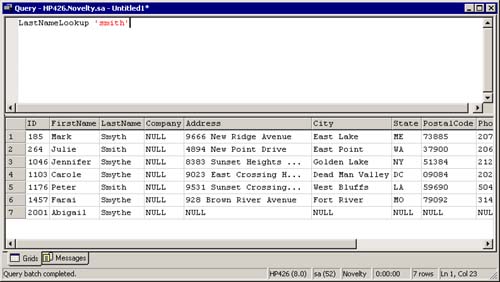
The database developer begins by altering the tblCustomer table to accommodate a soundex value for each record in the database. She issues the following command to SQL Query Analyzer: ALTER TABLE tblCustomer add LastNameSoundex varchar(4) NULL Next, she runs an update command that gives soundex values to records that are already in the database, which she only has to do once. She runs the update by issuing the following SQL command to SQL Query Analyzer: UPDATE tblCustomer SET LastNameSoundex = soundex(LastName) GO SELECT LastName, LastNameSoundex FROM tblCustomer GO Including the SELECT statement in the batch after the update isn't necessary, but it's there if the database developer wants to confirm that the operation worked and see which data it changed. Now she can create the trigger that will insert a soundex value for each customer as he's entered into the database. She enters the following code for this trigger in SQL Query Analyzer: CREATE TRIGGER trCustomerI ON tblCustomer FOR insert, update as UPDATE tblCustomer SET tblCustomer.LastNameSoundex = soundex(tblCustomer.LastName) FROM inserted WHERE tblCustomer.ID = inserted.ID Note Although SQL Server 2000 allows definition of multiple triggers of the same type (Insert, Update, Delete) for a single table, the order of their execution is not fully controllable. You can specify which is to be executed first and which is to be executed last. To ensure that the preceding trigger is executed after all other Insert triggers for tblCustomer (such as the one to assign a value to the ID column), the following line is executed in the Query Analyzer after the trigger has been created: sp_settriggerorder @triggername= 'trCustomerI', _ @order='last', @stmttype = 'INSERT' The reason that this trigger seems a bit more complicated than it needs to be has to do with how triggers are executed. The rule for triggers is that they're executed only once, even if the insert, update, or delete that caused the trigger to execute is some kind of crazy batch process involving thousands of records. As a result of this rule, the triggers that the database developer writes must be capable of handling a potentially unlimited number of records. The key to handling the appropriate set of records in a trigger is to perform an update based on all the possible records that were changed by the procedure that caused the trigger to execute in the first place. How does a trigger know which records were affected by this procedure? Triggers have access to this information through virtual tables called inserted and deleted. The inserted virtual table contains the record(s) inserted (or updated) by the procedure that launched the trigger; the deleted virtual table contains the data deleted by the procedure that launched a delete trigger. Because Jones's database developer is building both an insert trigger and an update trigger, referencing the records in the inserted virtual table covers all the inserted or updated records, no matter how they were inserted or updated. Every record is assured to have a soundex value generated for it by the trigger. Now that she has a bulletproof trigger that creates a soundex value for any record in tblCustomer, she tests it by inserting a record that fools a conventional query. Assuming that she will have a number of people named Smith in her database, the following insert command should suffice: insert into tblCustomer (FirstName, LastName) values ('Abigail', 'Smythe') She can confirm that the trigger created a soundex value for this record by immediately querying it back from the database: SELECT LastNameSoundex, LastName FROM tblCustomer WHERE LastName = 'Smythe' Now that she's confirmed that her trigger works, she can create a stored procedure that takes advantage of the LastNameSoundex column. This procedure takes a parameter the last name of the person she's looking for and returns all the people in tblCustomer whose names sound like the name for which she's looking. The code to create the stored procedure is CREATE PROC LastNameLookup @name varchar(40) as SELECT * from tblCustomer where soundex(@name) = LastNameSoundex Finally, she's ready to retrieve records from the database, based on their soundex values. To do so, she executes the LastNameLookup stored procedure: LastNameLookup 'smith' After executing this procedure, SQL Query Analyzer returns a result set consisting of every person whose last name is similar to Smith in the database, including some Smythes, as shown in Figure 3.21. Figure 3.21. Result set returned by the LastNameLookup stored procedure
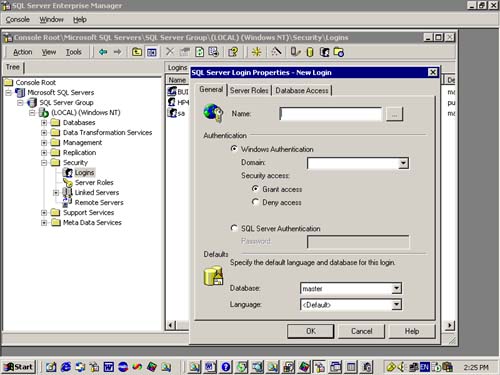
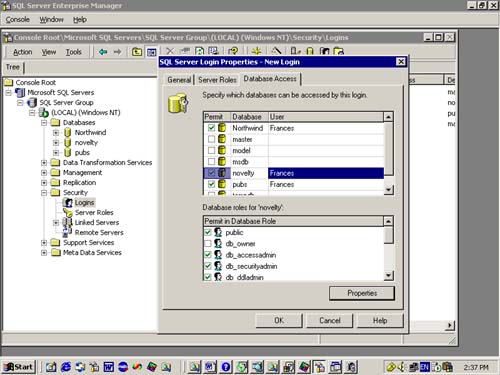
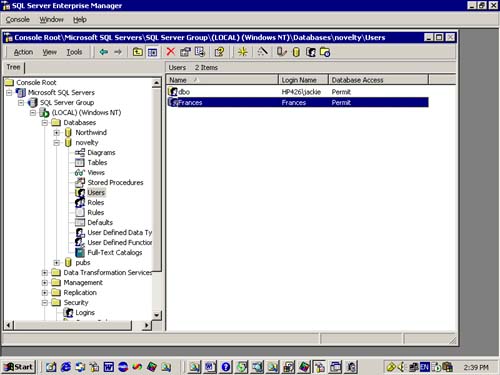
Managing Users and Security in SQL Server Enterprise ManagerOne of the most important reasons for using SQL Server is to manage multiple users who are attempting to access the same data at the same time. Although a number of problems arise from this situation (such as users accessing privileged information and two users attempting to update the same record at the same time), you can resolve many of them with server-side settings. SQL Server's security features give you a great deal of flexibility in determining who gets access to data. Each database can have its own set of users, and each user can have his own set of permissions. A permission set gives a user the capability to access and change data and (if you choose) potentially create and destroy database objects himself. SQL Server's security features also enable you to assign roles to individual users to facilitate the assignment of permissions. For example, you may choose to create a developer role that has permission to access all the objects in the database, a manager role that has the capability to access sensitive information such as salary and sales information about the company, and a user role for normal users without extraordinary permissions in accessing the database. How you assign users to roles is up to you, but you should use roles even in a simple database to make managing access easier. Creating and Maintaining Logins and UsersA robust and flexible security system requires giving users their own identities. SQL Server gives you this ability by letting you designate logins and users. A login represents an account (or human being) that has access to your SQL Server. Logins are used to create users. Creating a user permits you to give a login specific permissions for a particular database. You can also add users to roles to give them a broad group of permissions all at once. If the difference between a login and a user doesn't make sense to you, think about it this way: A login is created at the server level; a user is created at the database level. In other words, you must have a login before you can become a user of a particular database. To begin creating a user, create a login for an individual.
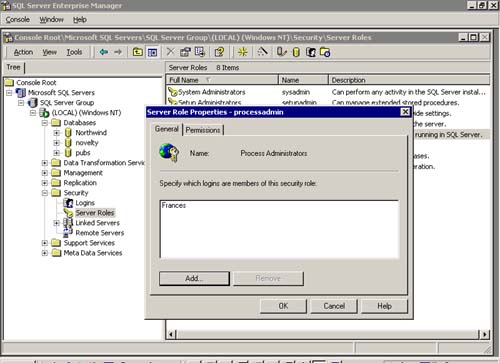
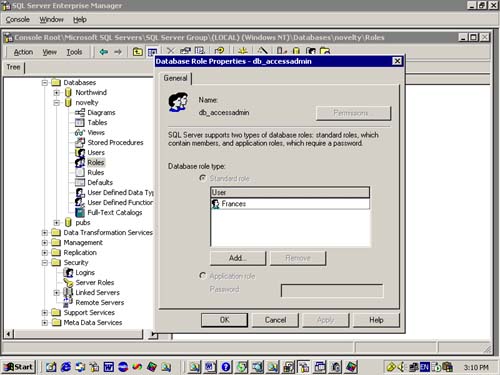
Managing Roles with SQL Server Enterprise ManagerSQL Server 2000 uses roles to group users who have the same permissions. Any user added to a role inherits the permissions of that role. And changing the permissions of a role changes the permissions of all the users assigned to that role. That way, in order to add or revoke a large number of permissions for a particular user, you simply change which role the user belongs to. SQL Server 2000 has two types of roles Server roles and Database roles. Server roles control access to operations that affect the entire SQL Server, such as starting and stopping the server, configuring advanced features such as replication, managing security, and creating databases. Database roles control access to operations and data for a specific database. To add a user to a Server role in Enterprise Manager, do the following.
Tip You can also add or remove a specific user from a Server role by using the Server Roles tab of the SQL Server Login Properties dialog box, discussed previously in the Creating and Maintaining Logins and Users section. To add a user to a Database role in SQL Server Enterprise Manager, do the following.
Note SQL Server 2000 also supports user-defined database roles, in addition to the fixed database roles that we have discussed. These roles allow for customized access to data and operations for the database (at this point the Permission button would be enabled). More information on user-defined database roles can be found in SQL Server Books Online. Testing Security Features in SQL Query AnalyzerYou might be curious to see what happens when a "civilian" user attempts to use database objects for which he doesn't have permissions. Because SQL Query Analyzer lets you log in as any user, you can test its security features by using its Query dialog as follows.
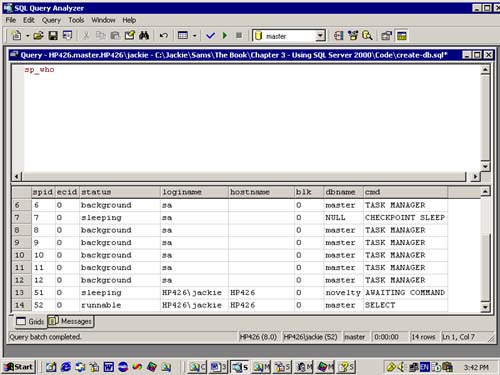
Applying Security Attributes in SQL Query AnalyzerOperations related to database security can be performed in SQL Query Analyzer. You generally do so when you want a database's security features to be created by the same SQL batch that creates the database. If you always append the commands pertaining to security to the same SQL batch that creates the database object, you're less likely to forget to apply security features to new database objects that you create. To create a new SQL Server Authentication login using the Query Analyzer, use the sp_addlogin stored procedure. For example, to create the login Frances, execute the command sp_addlogin 'Frances' To give the login Frances the password "stairmaster", add the password as an additional argument to the sp_addlogin procedure: sp_addlogin 'Frances', 'stairmaster' If instead of adding a SQL Server login, you want to add a Windows login for an existing Windows account, use the sp_grantlogin stored procedure, in a similar way. Note, however, that you can't specify a password, as passwords aren't part of the definition of a Windows-type login in SQL Server (they are handled by the standard Windows password mechanisms). To make the login Frances a user of the Novelty database, use the sp_adduser procedure: USE novelty GO sp_adduser 'Frances', 'Frannie' GO To show a list of all the logins and default databases in your SQL Server installation with the SQL Query Analyzer, use the SQL command: USE master GO SELECT name, dbname from syslogins To add a user to a Database role, use the sp_addrolemember stored procedure: sp_addrolemember 'db_datawriter','Frannie' You can display a list of all the Database roles in a database by using the stored procedure sp_helprole. You apply and remove permissions for a particular database object by using the SQL Grant and Revoke commands. The Grant command permits a user granted a particular role to have access to a database object, whereas the Revoke command removes a permission. For example, to grant members of the public role complete access to tblCustomer, use the SQL command: GRANT ALL on tblCustomer to public If instead, you want to restrict members of that group to selecting data from tblCustomer, qualify the Grant command with the Select option: GRANT SELECT on tblCustomer to public To revoke permissions on a database object, use the Revoke command. For example, to revoke permission to access tblCustomer from those previously granted the public role, use the SQL command: REVOKE ALL on tblCustomer to public You can also grant or revoke permissions for update, select, delete, and insert on tables and views. You can further grant or revoke permissions to execute stored procedures. Determining Who Is Logged In with sp_whoYou have the capability to determine which users are logged into a database at any time by using the stored procedure sp_who. It returns information on the users who are logged into the system and which database(s) they're working in. To use sp_who, execute it in SQL Query Analyzer's Query window. SQL Query Analyzer returns a list of current logins, such as shown in Figure 3.27. Figure 3.27. Results of running the sp_who stored procedure
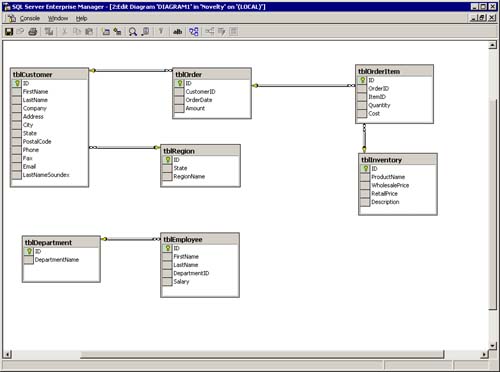
Viewing a list of currently logged-in users gives you the ability to do a number of things, such as terminate user sessions from the server, as described in the next section. Ending a Process with the kill CommandIn SQL Server, the system administrator has the ability to kill a process such as a user session or a database lock with the kill command. You generally do this when a user's session terminated abnormally and you want to get rid of her hung session, or when a client procedure has initiated a lock on a piece of data and won't let go. (These situations are rare, but they do happen, particularly in development.) To use the kill command, you must first run the sp_who stored procedure (if you're trying to kill a user session) or the sp_lock procedure (if you're trying to kill a database lock). Both procedures return a column called spid, the procedure ID of the process. After you know the spid, you can kill the process by using the kill command. For example, say that you run sp_who and notice that there's a hung session, with an spid of 10, from a user who you know for certain won the lottery three weeks ago and won't be returning to work. To kill spid 10, issue the following command in SQL Query Analyzer: kill 10 The bogus session is immediately killed. Note It's a good idea to run sp_who periodically, particularly during development, just to see what's going on in your database. Removing Objects from the DatabaseThe SQL Server term for removing an object from the database is to drop the object. When you drop an object from the database, it is deleted permanently. For tables that contain data, both the structure and the data are deleted permanently. To drop a database object a table, for example in SQL Server Enterprise Manager, simply right-click on it. In the pop-up menu, select Delete. The object is deleted. To drop a database object in SQL Query Analyzer, use the drop command. For example, to drop the tblCustomer table, use DROP TABLE tblCustomer Business Case 3.2: Generating an SQL Script That Creates a DatabaseTo run the sample code in this book first requires running the script NoveltyDB.sql to create and set up the Novelty database on your computer. (Did you look inside that script? Did you wonder how it was written?) Because a database design may undergo many changes while it is being developed, the developer should periodically create a script that documents the database and also allows her to create (and re-create) the database automatically. Although the developer could have complete control and write such a script manually, she is much better off using the SQL Server Enterprise Manager to generate the script at least as the basis of a script that she may go ahead and modify. This approach is much faster and much less error-prone. The database developer at Jones Novelties, Incorporated, has decided to take this approach to creating the company's database. The script that she develops allows a simple installation of the database objects on a computer that may not even have the database defined on it. In other words, the script does everything necessary to create and install the database and its objects on a "virgin" computer, which is normally required when a system is being installed at a new site. The database schema that comprises the Novelty database is shown in Figure 3.28. Figure 3.28. The schema of the Jones Novelties, Incorporated, Novelty database
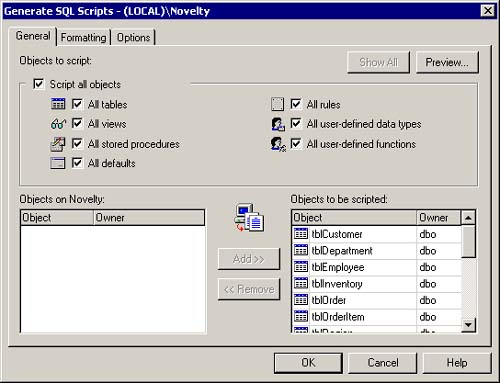
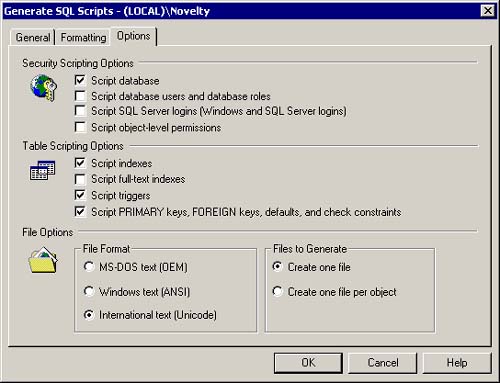
The script that creates the database will be executed in SQL Query Analyzer. To minimize error messages, the script destroys any old database objects each time it's run. That is, whenever a change is made in the design of the database in design mode, the entire database can be re-created from scratch by simply executing the entire script again. This approach ensures that all the changes made in the database design are applied to the database each time the developer rebuilds it. The drawback of this technique, of course, is the fact that if the developer isn't careful, the batch will wipe out all the tables in the database and the data contained in the tables. So the developer may want to consider disabling or deleting such scripts from the system after putting the database server into production. As always, backing up the database before making changes is essential, in case something goes wrong. Let's now say that you're the database developer for Jones Novelties, Incorporated. To generate scripts, do the following.
Note The script generated on your machine may not be identical to the following script, owing to specific machine, server, or database settings. However, you should have no trouble following along. The script shown is littered with GO statements to ensure that the preceding command(s) is(are) executed before continuing with the script. You will also often see blocks of commands such as SET QUOTED_IDENTIFIER OFF GO SET ANSI_NULLS ON GO and SET QUOTED_IDENTIFIER ON GO SET ANSI_NULLS ON GO before the execution of some commands. They ensure that the database is correctly configured (temporarily) for the required operation and then reset following execution of the command. Although we introduce the script in pieces in this section, the idea behind writing an SQL script is to execute it as one big procedure. Accordingly, when you're generating or writing real-world scripts, dump the whole thing into the SQL Query Analyzer Query window (either by loading it from a text file or by copying and pasting) and hit the Execute button to run the script. Alternatively, you can highlight specific sections or create multiple scripts and execute them individually. When developing SQL scripts with SQL Query Analyzer, you can edit the commands in the Query windows, test them by executing them and checking the results, and then save them to a file when you're done. The first thing that you need to do is to create the physical database. Listing 3.1 presents the script that will do so. Listing 3.1 Script to create the Novelty database/****** Object: Database Novelty Script Date: 10-Jul-02 12:41:09 PM ******/ IF EXISTS (SELECT name FROM master.dbo.sysdatabases WHERE name = N'Novelty') DROP DATABASE [Novelty] GO CREATE DATABASE [Novelty] ON (NAME = N'novelty_Data', FILENAME = N'c:\program files\ Before trying to create any new object, the generated script will always check to see if the object exists, and then drop (delete) it if it does exist. After checking/dropping the Novelty database, the script creates the new database. Note If you're writing or customizing the database script, you can turn the EXISTS test around to prevent your script from dropping a table that contains data. You typically do that in a production database, as you don't want to inadvertently destroy a table that contains data. For a database that's being developed, however, dropping the database unconditionally, if it exists, is usually appropriate. The physical data and log files are specified, along with original size and growth values. This line of code, in which actual disk file paths and names are specified, is the one line of the script that you may very well want to change before running it for a new installation. The code in Listing 3.2 sets various database options. You can read about the meaning of each option by looking it up in the SQL Server documentation (Books Online). Listing 3.2 Script to set database options for Novelty databaseexec sp_dboption N'Novelty', N'autoclose', N'false' GO exec sp_dboption N'Novelty', N'bulkcopy', N'false' GO exec sp_dboption N'Novelty', N'trunc. log', N'false' GO exec sp_dboption N'Novelty', N'torn page detection', N'true' GO exec sp_dboption N'Novelty', N'read only', N'false' GO exec sp_dboption N'Novelty', N'dbo use', N'false' GO exec sp_dboption N'Novelty', N'single', N'false' GO exec sp_dboption N'Novelty', N'autoshrink', N'false' GO exec sp_dboption N'Novelty', N'ANSI null default', N'false' GO exec sp_dboption N'Novelty', N'recursive triggers', N'false' GO exec sp_dboption N'Novelty', N'ANSI nulls', N'false' GO exec sp_dboption N'Novelty', N'concat null yields null', N'false' GO exec sp_dboption N'Novelty', N'cursor close on commit', N'false' GO exec sp_dboption N'Novelty', N'default to local cursor', N'false' GO exec sp_dboption N'Novelty', N'quoted identifier', N'false' GO exec sp_dboption N'Novelty', N'ANSI warnings', N'false' GO exec sp_dboption N'Novelty', N'auto create statistics', N'true' GO exec sp_dboption N'Novelty', N'auto update statistics', N'true' GO Now that the database has been created, you can go ahead and use it that is, run commands against it. If you wanted to execute the remaining schema creation commands against a different database (for example, for testing on the same server), you could simply specify a different database in the use command: USE [NoveltyTest] GO Before proceeding to the object creation commands, the script checks for and deletes all existing objects that it intends to create. They include constraints, triggers, stored procedures, views, and tables. This order is significant because a table can't be dropped if any of its associated objects still exist. The code for doing this task is shown in Listing 3.3. Listing 3.3 Script to delete existing objects in the Novelty databaseif exists (select * from dbo.sysobjects where id = object_id(N'[dbo]. The script now goes ahead and creates the new database objects. First the tables are created, as shown in Listing 3.4. Listing 3.4 Script to create tables in the Novelty database/****** Object: Table [dbo].[tblCustomer] Script Date: 10-Jul-02 12:41:10 PM ******/ CREATE TABLE [dbo].[tblCustomer] ( [ID] [int] IDENTITY (1, 1) NOT NULL , [FirstName] [varchar] (20) COLLATE Latin1_General_CI_AI NULL , [LastName] [varchar] (30) COLLATE Latin1_General_CI_AI NULL , [Company] [varchar] (50) COLLATE Latin1_General_CI_AI NULL , [Address] [varchar] (50) COLLATE Latin1_General_CI_AI NULL , [City] [varchar] (30) COLLATE Latin1_General_CI_AI NULL , [State] [char] (2) COLLATE Latin1_General_CI_AI NULL , [PostalCode] [varchar] (9) COLLATE Latin1_General_CI_AI NULL , [Phone] [varchar] (15) COLLATE Latin1_General_CI_AI NULL , [Fax] [varchar] (15) COLLATE Latin1_General_CI_AI NULL , [Email] [varchar] (100) COLLATE Latin1_General_CI_AI NULL , [LastNameSoundex] [varchar] (4) COLLATE Latin1_General_CI_AI NULL ) ON [PRIMARY] GO /****** Object: Table [dbo].[tblDepartment] Script Date: 10-Jul-02 12:41:11 PM ******/ CREATE TABLE [dbo].[tblDepartment] ( [ID] [int] IDENTITY (1, 1) NOT NULL , [DepartmentName] [varchar] (75) COLLATE Latin1_General_CI_AI NOT NULL) ON [PRIMARY] GO /****** Object: Table [dbo].[tblEmployee] Script Date: 10-Jul-02 12:41:11 PM ******/ CREATE TABLE [dbo].[tblEmployee] ( [ID] [int] IDENTITY (1, 1) NOT NULL , [FirstName] [varchar] (50) COLLATE Latin1_General_CI_AI NOT NULL , [LastName] [varchar] (70) COLLATE Latin1_General_CI_AI NOT NULL , [DepartmentID] [int] NULL , [Salary] [money] NULL ON [PRIMARY] GO /****** Object: Table [dbo].[tblInventory] Script Date: 10-Jul-02 12:41:11 PM ******/ CREATE TABLE [dbo].[tblInventory] ( [ID] [int] IDENTITY (1, 1) NOT NULL , [ProductName] [varchar] (75) COLLATE Latin1_General_CI_AI NOT NULL , [WholesalePrice] [money] NULL , [RetailPrice] [money] NULL , [Description] [ntext] COLLATE Latin1_General_CI_AI NULL ) ON [PRIMARY] TEXTIMAGE_ON [PRIMARY] GO /****** Object: Table [dbo].[tblOrder] Script Date: 10-Jul-02 12:41:12 PM ******/ CREATE TABLE [dbo].[tblOrder] ( [ID] [int] IDENTITY (1, 1) NOT NULL , [CustomerID] [int] NULL , [OrderDate] [datetime] NULL , [Amount] [money] NULL ) ON [PRIMARY] GO /****** Object: Table [dbo].[tblOrderItem] Script Date: 10-Jul-02 12:41:12 PM ******/ CREATE TABLE [dbo].[tblOrderItem] ( [ID] [int] IDENTITY (1, 1) NOT NULL , [OrderID] [int] NOT NULL , [ItemID] [int] NOT NULL , [Quantity] [int] NULL , [Cost] [money] NULL ) ON [PRIMARY] GO /****** Object: Table [dbo].[tblRegion] Script Date: 10-Jul-02 12:41:12 PM ******/ CREATE TABLE [dbo].[tblRegion] ( [ID] [int] IDENTITY (1, 1) NOT NULL , [State] [char] (2) COLLATE Latin1_General_CI_AI NOT NULL , [RegionName] [varchar] (25) COLLATE Latin1_General_CI_AI NULL ) ON [PRIMARY] GO Then the constraints are created, as shown in Listing 3.5. Listing 3.5 Script to create constraints in the Novelty databaseALTER TABLE [dbo].[tblCustomer] WITH NOCHECK ADD CONSTRAINT [PK_tblCustomer] PRIMARY KEY CLUSTERED ( [ID] ) ON [PRIMARY] GO ALTER TABLE [dbo].[tblDepartment] WITH NOCHECK ADD CONSTRAINT [tblDepartment_IDPK] PRIMARY KEY CLUSTERED ( [ID] ) ON [PRIMARY] GO ALTER TABLE [dbo].[tblEmployee] WITH NOCHECK ADD CONSTRAINT [PK_tblEmployee] PRIMARY KEY CLUSTERED ( [ID] ) ON [PRIMARY] GO ALTER TABLE [dbo].[tblInventory] WITH NOCHECK ADD CONSTRAINT [PK_tblInventory] PRIMARY KEY CLUSTERED ( [ID] ) ON [PRIMARY] GO ALTER TABLE [dbo].[tblOrder] WITH NOCHECK ADD CONSTRAINT [PK_tblOrder] PRIMARY KEY CLUSTERED ( [ID] ) ON [PRIMARY] GO ALTER TABLE [dbo].[tblOrderItem] WITH NOCHECK ADD CONSTRAINT [PK_tblOrderItem] PRIMARY KEY CLUSTERED ( [ID] ) ON [PRIMARY] GO ALTER TABLE [dbo].[tblRegion] WITH NOCHECK ADD CONSTRAINT [PK_tblRegion] PRIMARY KEY CLUSTERED ( [ID] ) ON [PRIMARY] GO CREATE UNIQUE INDEX [IX_tblRegion] ON [bo].[tblRegion]([State]) ON [PRIMARY] GO ALTER TABLE [dbo].[tblCustomer] ADD CONSTRAINT [FK_tblCustomer_tblRegion] FOREIGN KEY ( [State] ) REFERENCES [dbo].[tblRegion] ( [State] ) ON DELETE CASCADE ON UPDATE CASCADE GO ALTER TABLE [dbo].[tblEmployee] ADD CONSTRAINT [FK_tblEmployee_tblDepartment] FOREIGN KEY ( [DepartmentID] ) REFERENCES [dbo].[tblDepartment] ( [ID] ) ON DELETE CASCADE ON UPDATE CASCADE GO ALTER TABLE [dbo].[tblOrder] ADD CONSTRAINT [FK_tblOrder_tblCustomer] FOREIGN KEY ( [CustomerID] ) REFERENCES [dbo].[tblCustomer] ( [ID] ) ON DELETE CASCADE ON UPDATE CASCADE GO ALTER TABLE [dbo].[tblOrderItem] ADD CONSTRAINT [FK_tblOrderItem_tblInventory] FOREIGN KEY ( [ItemID] ) REFERENCES [dbo].[tblInventory] ( [ID] ) ON DELETE CASCADE ON UPDATE CASCADE , CONSTRAINT [FK_tblOrderItem_tblOrder] FOREIGN KEY ( [OrderID] ) REFERENCES [dbo].[tblOrder] ( [ID] ) ON DELETE CASCADE ON UPDATE CASCADE GO SET QUOTED_IDENTIFIER OFF GO SET ANSI_NULLS ON GO Finally, the views, stored procedures, and triggers are created, as shown in Listing 3.6. Listing 3.6 Script to create views, stored procedures, and triggers in the Novelty database/****** Object: View dbo.EmployeeDepartment_view Script Date: 10-Jul-02 12:41:13 PM Although the script that was automatically generated by the Enterprise Manager is certainly good enough to run "as is," you should feel free to modify it as you desire. Just be sure to remember that if you re generate the script, all your manual changes will be lost. One useful modification would be to include a Print command in strategic places in the script, to display some text to the SQL Query Analyzer's Messages window. Doing so gives a visible indication of the script's progress. You can also use the printed output as a debugging tool that can help you determine where errors in your batch might be. Using the Print command is optional and has no direct bearing on the creation of the database. Remember, when you're using batches such as this one, feel free to run and rerun them whenever you want. This batch is written in such a way that it completely destroys and re-creates the database when it is executed. If you load sample data into your database during testing, you don't have to worry about that data inadvertently hanging around when you put your database into production mode. In addition, creating a database from a batch lets you easily migrate your database design to multiple servers. That enables you to have two physically distinct database servers one for development, and another for production. |

EAN: 2147483647
Pages: 97