Flylib.com

Books Software


Importing Images With Aperture


Importing Images With Aperture

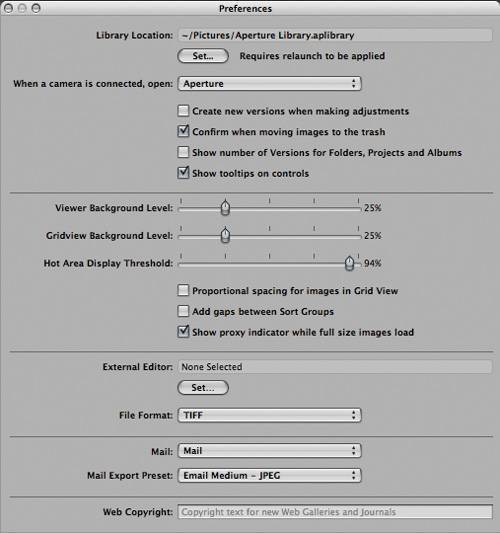
The first step in any photo editing workflow is to import the images you want to work with, whether from a camera, an external drive, or another location on your computer's hard disk.

Before importing, however, you need to understand two things about how Aperture works: the difference between a master image and versions of that image, and the location of the master Library.

Master Image vs. Versions

Aperture is nondestructive. Your original image is always preserved as a digital master file ; any adjustments to the image are made on versions of the original image.

It's important to understand that while versions show up as thumbnails that behave like image files in the Projects panel and the Browser, they are not actually new image files. Think of versions as proxy images. In reality, they are little bundles of math that instruct Aperture to apply certain adjustments to the master file. You can create as many versions of the master image as you want.

The beauty of this design is that, since version files are quite small, you can make countless versions of a full-resolution RAW image without significantly increasing your storage needs, and you can always return to your untouched master file.

If you make an adjustment to an image, there is no need to rename it or to perform a Save As operation. The version you created is saved within your project. Of course, at any time you can create a full image file that incorporates the adjustments you made to a version simply by printing or exporting the version.

Later in this lesson you will practice creating versions of a master image.

Library Location

Your master images are located in the Library. The default location of the Library is the Pictures folder of your home directory.

If you have a dedicated external drive for images, you will need to change the location of your Library. Since Aperture consolidates the images you import and stores them all in the Library, it's important to locate your Library on a disk that has an adequate storage capacity.

1.

Choose Aperture > Preferences.

2.

Change the Library Location path in the text field at the top of the Preferences window. Click Set and navigate to the new Library location on your external drive. Click Select.


Importing From a Camera or Card Reader

For the exercises in this tutorial, we'll use images that are provided with the Aperture Sample Projects library. However, you may want to include some images of your own to work with, so let's take a moment to import some of your own images into Aperture.

Note

Aperture supports color-managed workflows, managing ICC color profile information for your input and output devices. If you are using a color-managed workflow, it's important to calibrate and profile your devices before importing your images. For more on color -managed workflows, see Lesson 3, "Professional Web and Print Output," or the Aperture documentation.


You can import images from three places: a camera or memory card, an existing iPhoto Library, and an existing folder in your Finder. We'll start by importing from a camera.

1.

Connect your camera's memory card reader or connect your camera to your computer.

Notice that your Projects panel has changed to include the Import pane, and a visual guide in the form of an arrow indicates the import path and destination. This arrow is called the Import arrow . You can import your images into a new project or an existing project simply by clicking to select the chosen project in the Projects panel.

2.

Press Command-N to create a new project, and name your project Lesson 01 Import . The Import arrow will shift to indicate that Lesson 01 Import is the new import destination.

Note

If you don't select an existing project, Aperture will create an untitled project for you.

Grouping by Timestamp While Importing Images

One nice feature of Aperture is that it gives you the option to group your images according to their timestamp information, that is, to auto-stack your images, while you import. This is extremely useful, as you can automatically group photographs that were taken in the same timeframe. Often, photographs taken within a minute of each other are of the same subject, and it can be helpful to group them together.

We'll explore stacks in more detail later in this tutorial. For now, let's just take a quick look at how to auto-stack images during import.

3.

Below the main Browser area is the Auto-Stack slider. The slider determines the maximum interval in seconds between images in a stack. Click the slider marker and move it to 15 seconds.

The images you import will now be automatically grouped according to their timestamp. Any images taken within 15 seconds of each other will be grouped together into a stack.

4.

Click the icon to the left of the Auto-Stack slider to Close All Stacks.

Adding Metadata While Importing Images

Another useful feature in Aperture is the ability to add metadata as you import your images. Let's take a moment to look at the Metadata Inspector, and add some metadata to the images you are importing.

5.

Click any image currently displaying in the Browser to select it. (Here, we show sample images, but your images may of course be different.)

Notice that to the right of the main Browser, the Metadata Inspector has expanded to include sections for image, time zone adjustment, and name format information, as well as other metadata. You can use the Inspector to enter, view, and edit your images' metadata during import.

At the top of the window, the Image Information section lists basic information about your image. Below that is the Time Adjustment section, where you can alter the time zone of your images' timestamp.

The next section, Name Format, lets you enter a more descriptive image name. You can choose from various naming presets or edit them to create your own.

The bottom section lets you add detailed metadata information such as copyright notice, credit line, keywords, and object name. You can choose to view different preset metadata categories by selecting the Add Metadata From pop-up-menu. You can choose from a number of templates, and you can enter as much or as little information as you choose.

Note that several of the presets allow you to view and edit an image's EXIF and IPTC data. The EXIF information includes a wide range of camera settings such as shutter speed, date and time, focal length, exposure, metering pattern, and flash information. The IPTC information, which can be embedded in a digital image by most image-editing applications, includes information like captions or copyright notices.

Note

Aperture also lets you easily apply a customized watermark to any image or group of images. See the user 's guide for details.


Of course, metadata information can also be added and edited after you import your images, and we'll discuss metadata in more detail later in this tutorial. But it is often handy to enter at least basic information about the shoot while you are importing the images.

For now, let's practice entering metadata during an import.

6.

Click anywhere on the gray background of the browser, press Command-Shift-A to deselect the image you highlighted in the previous step. Then type your name into the Credit text field of the Metadata Inspector.

7.

Click the Import All button in the lower-right corner to begin your import.

Note

You can choose to import a single image, a selection of images, or the entire contents of your card or camera. If you choose to import the entire contents, make sure you do not have any images selected prior to your importAperture will assume by default that you wish to import them all.

The progress indicator to the left of your project illustrates the progress of the import.

As the images are imported, they are displayed in the Browser. Notice that any images taken within 15 seconds of each other are grouped into stacks, and all images carry your name in the credit line of the Metadata Inspector. Note that you can adjust the Auto-Stack grouping parameters at any time simply by selecting the images and adjusting the Auto-Stack slider.

Aperture imports a master file into your Library and simultaneously creates a version file and a thumbnail of each image. You can begin to edit your images as they appear.

Aperture is a QuickTime-compatible application, so it supports standard QuickTime-compatible formats in addition to file formats such as RAW, JPEG, JPEG2000, GIF, TIFF, and PNG (for a comprehensive list please refer to the user's guide).

Tip

Digital master files, especially RAW images, tend to be extremely large. Since your projects may consist of hundreds or even thousands of master files, it's a good idea to invest in a high-capacity external hard drive for optimal performance.

8.

Click either Erase and Eject Card, or Eject Card.

Note

Aperture stores your images, so it's safe to erase the contents of your card once the import is complete. If you wish to leave your card or camera mounted, then simply click Done.