Before You Start Fresh
|
|
Both the act of formatting and the act of partitioning (at least without using third-party software such as PowerQuest’s PartitionMagic) a hard disk erases all data on that drive.
With a brand-new hard drive, both formatting and partitioning are required but it matters less because a new hard drive is essentially blank; no data has been written to it yet. With an existing hard drive, all your data will disappear, so you need to store your files to another medium (Zip disk, recordable CD or DVD, or a floppy drive) from which you can retrieve them later.
Backing up your files is not your only concern, although it’s an important one. You also need to be aware whether or not your hard drive is using drive-overlay software (discussed shortly). And make sure you have everything you need before you start to format your hard drive.
Backing Up Critical Files
Even if you’ve been performing regular backups and/or drive images, take a moment to back up anything that may not have been placed in storage since the last time you copied your files.
If you haven’t been following those strong recommendations to do so, now is the time to back up all your important files. If your system has reached the point where you feel you need to format, you may be better off backing up using a utility like Windows Backup instead of creating a drive image. This is because you may not want to take problems currently residing on your system into the newly refreshed system by restoring a drive image of your previous “mess.”
Wait! Are You Using a Drive-Overlay Program?
Drive-overlay programs are the same as the “BIOS helper” software I’ve told you about, where special drive software acts as an intermediary between a (usually older) BIOS and a large-capacity hard drive. Drive-overlay programs allow the BIOS to detect and work with the full size of that large drive. Otherwise, older systems may only see 8GB or 16GB of a 20GB, 40GB, 60GB, or 120GB hard drive, which leaves you with a lot of unclaimed and unusable disk space.
Examples of drive-overlay programs are EZ-BIOS and EZ-Drive. These programs may have come to you via the disk management utilities packed with new hard drives to help you use the new drive even if your BIOS is outdated. Or, you may have purchased them separately.
Your drive documentation may tell you that the overlay program is working, or you’ll be notified on the screen when your PC first boots. If you’re using overlay software, you can’t use the straight refreshing methods given here. Instead, visit the manufacturer’s web site and locate and follow the exact directions for reformatting and/or repartitioning a drive that uses that overlay software. Of course, if you can update your BIOS to a recent enough version that you don’t need to use the overlay software, you’re better off removing the overlay software (per the software’s instructions) and using the format and fdisk commands as described in this chapter.
These drive-overlay programs are great because they bridge the gap between older PCs and large new drives. However, the level of inconvenience they offer when you have a problem with the drive (because the overlay often prevents you from working directly with the drive) can be high. It’s like trying to perform delicate surgery through impenetrable rubber.
What You Need to Start Fresh
Make sure you have what you need to start fresh. Most, if not all, of these things should be in your PC Recovery Resource Kit as outlined in Chapter 4. These include (but aren’t necessarily limited to)
-
Boot disk(s)
-
Windows install CD
-
Updated drivers for your devices
-
Master disks or copies of all your installed software
-
Product keys/install codes for all appropriate software (including Windows)
-
Copies of backups or drive images
-
Your PC journal (Enter the fact that you’re reformatting in your journal and jot down notes about anything special you need to remember about the process.)
Now Is a Good Time to Clean Up
Problems with loose power, data cable connections, or dust insinuating itself between these delicate connections are not uncommon with hard drives. Whenever I’m freshening a hard drive, I do some cleanup and tightening up:
-
I follow the usual precautions for shutting down and turning off the PC, disconnecting power, removing the cover, and grounding myself.
-
Once the system has cooled for several minutes, I make sure the screws holding the hard drive I’m about to reformat are in place. I carefully put my fingers on either side of the drive to make certain it’s firmly seated, and I eyeball it to be sure it’s not cocked at a strange angle.
-
I make sure the connection from the power supply is firmly seated in the back of the hard drive.
-
I make sure the data cable is firmly seated into the back of the hard drive, as illustrated in Figure 16.1. Pin 1 with the red-coded line of the data cable faces the power connector.
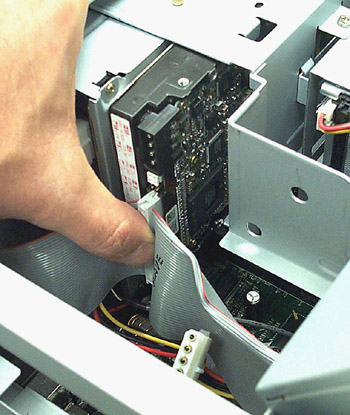
Figure 16.1: The ribbon cable connection to the hard drive must be firmly connected.Photo courtesy of Emily Sherrill Weadock
-
If there is an unusual amount of dust around the drive, I use a can of compressed air (utilizing its focus wand, the plastic tube you insert into the nozzle) to remove dust from around the connections.
-
I double-check the connections one more time, making certain dust didn’t get blown somewhere it shouldn’t be.
-
I replace the cover, reconnect power, and then start the formatting process.
|
|
EAN: 2147483647
Pages: 140