Other Means of Booting
|
|
Now turn your attention to situations where your PC may start up fine, and boot up without error, but it simply won’t load the operating system or won’t load it in such a way that you can properly use it.
Some of these solutions depend on a boot or startup disk such as the ones you created or collected in Chapter 2. Other solutions use the troubleshooting tools built into Windows to let you get around a problem so you can reach a point where you can attempt to fix the problem, like Safe Mode and the Windows XP Recovery Console.
| Note | What if you’re receiving Windows Registry errors trying to load Windows? This is covered in Chapter 9, “Stabilizing Your Operating System.” |
Using Your Boot Disk
How you start your PC using a boot disk depends on what type of boot disk you have, as you learned in Chapter 4. The usual process is as follows:
-
With your PC turned off, insert the boot or startup disk in the appropriate drive (usually the floppy drive).
-
Turn the PC on.
A system boot disk (usually a floppy) tries to boot your system, but it’s likely to leave you at a DOS command prompt. From there, follow the steps outlined in Chapter 4 to try to get into Windows. Realize that if the system boots from the floppy and not the hard drive, the hard drive is the bad guy. The ribbon cable may have slid out, the ribbon cable may have gone bad, the hard drive power connector may have slid out, the BIOS may be set incorrectly (the C: drive isn’t on the boot list), or the drive may have gone bad. Check the simplest possibility first—the BIOS setting!
A startup disk, depending on the type, usually facilitates getting you into Windows itself and typically loads a CD-ROM driver in case you need to load your Windows install CD at some point during the recovery process.
If you’re using Windows XP, you can also use your Windows XP install CD to boot your system. You insert it into your CD or DVD drive and then try to start your system. You can also couple the Windows XP install CD for startup with the Recovery Console, discussed later in this chapter, to try to fix some of the problems.
Special Boot Disks
Besides your standard boot disk, you may also have special boot disks (discussed in Chapter 4). These may include special recovery disks from manufacturers. Some computers today—including “self-healing” PCs being introduced by IBM and others—have an emergency restore function built right into the keyboard. Use these boot disks according to the instructions provided either with your PC documentation or with your emergency utility package.
Performing a Clean Boot
A clean boot is to a way of trying to load a normal Windows session, but minus all the extra functionality that tends to get added to the bootup and Windows startup process over a period of time. A clean boot is useful if you suspect that something loading during bootup or startup is what is causing the problem you are currently experiencing.
The tool within Windows to do this is called the System Configuration utility (or MSconfig), and you can use it to prepare to boot your Windows cleanly by following these steps:
-
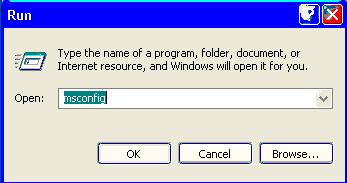
From the Windows Start Menu, choose Run.
-
In the Open dialog box, type msconfig and click OK.
-
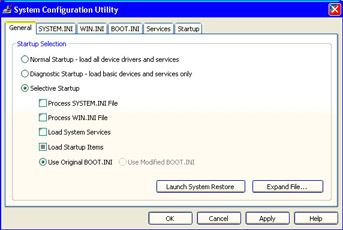
Select the General tab, click to choose Selective Startup, and then click to clear these check boxes:
-
Process SYSTEM.INI File
-
Process WIN.INI File
-
Load Startup Items
-
-
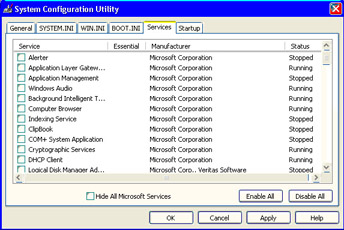
Choose the Services tab.
-
Click to select Hide All Microsoft Services and then click Disable All. Click OK.
-
When prompted whether or not to restart your PC, click Restart.
-
Once the system restarts, evaluate the startup to be sure it starts fine. If you see messages on the screen, write them down so you can research them afterward. Ditto for any other notable issues.
If the problem with booting resolves once you restart using a clean boot, something in those initial startup files is causing a problem. You can repeat steps 1–2 in the previous sequence and then, for step 3, click to readd one of the services you removed. Do this one at a time. For example, the first time you return to the System Configuration Utility, re-add the process SYSTEM.INI file. Then proceed with your restart and clean boot. If Windows has a problem once you do this, the problem is most likely your SYSTEM.INI file.
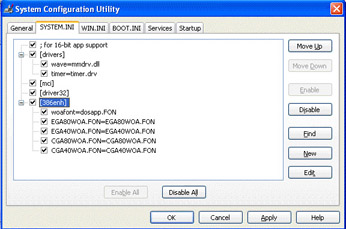
| Tip | You can use the SYSTEM.INI, WIN.INI, and Startup tabs in the System Configuration Utility to review what is selected to run from each. Click to remove checkmarks to disable the feature or function. |
Now, until you remove Selective Startup, your PC will always start using this clean bootup method. To return to a normal startup, follow these steps:
-
Run MSconfig.
-
From the General tab, click to select Normal Startup. Click OK.
-
Next, select the Services tab, click to uncheck Hide All Microsoft Services, and then click Enable All. Click OK.
The next time you restart your PC, it will boot up normally.
| Note | Notice in the General tab of the System Configuration Utility another option called Diagnostic Startup. While this is also a troubleshooting option, part of how it works involves invalidating any restore points you may have created using System Restore. For this reason, a clean boot is probably a safer option for you. |
Using Windows Advanced Options Menu
Although you mostly know Windows through the way it automatically loads as you boot your PC, Windows actually offers some different options for starting the operating system, depending on what you need to do or the situation you face.
You can find the Windows Advanced Options menu (called the Start menu in earlier versions of Windows) by pressing and briefly holding the F8 key when your PC begins to boot and before Windows tries to load.
Look at Table 7.1, which lists the options that may be helpful to you.
| Option | What It Does |
|---|---|
| Safe Mode* | Choose this option to start Windows in a special troubleshooting mode. |
| Safe Mode with Networking | Select this option to start Windows in this troubleshooting mode, but with basic network support. This option is useful if you’re running a network. |
| Safe Mode with Command Prompt | Same as Safe Mode with Networking, except this option takes you to a DOS-style command prompt for running commands rather than into the Windows graphical user interface (GUI). |
| Enable Boot Logging* | Use this option to create an extensive log of the boot process (explained in detail in Chapter 6, “Transforming Yourself into a Smart Troubleshooter”). |
| Last Known Good Configuration | Use this option to try to start Windows normally but using the last known good settings, which reverts your system to the way it was during your last saved session. |
| Start Windows Normally* | Use this option to start Windows as you normally would. |
* These options are available in earlier versions of Windows.
Using Windows Safe Mode
Windows Safe Mode is a special troubleshooting mode for loading Windows in the event of a problem and has been available in Windows 98/98 Second Edition, Windows Millennium, and Windows XP.
Safe Mode operates something like its name suggests: It loads Windows in a way that reduces your overall system’s dependence on unessential hardware and focuses on core, default drivers to load only the basic devices such as your hard drive. As such, devices like your printer, CD-ROM drive, digital camera, and scanner won’t be available in Safe Mode. While this is limiting, it’s a much better way to try to run Windows if you suspect a driver or something else you have installed to the operating system is causing your current symptoms.
What does get loaded in Safe Mode is this:
-
Default video adapter and monitor settings
-
Basic Microsoft mouse driver
-
Only essential device drivers
-
Network connections, only if you specify Safe Mode with Networking
Windows Safe Mode won’t help in every situation. If your Windows installation or hard drive is seriously compromised, for example, you probably won’t be able to load Windows even in this special mode. This could occur if essential files have been deleted or corrupted.
Don’t use Windows Safe Mode to do your normal work. Safe Mode is generally used to get in, check or adjust a setting, and then restart your system in normal Windows mode.
To load Windows in Safe Mode, follow these steps:
-
From Windows Start, choose Shut Down and then Restart.
-
As the system begins its restart, press the F8 key.
-
From the Windows Advanced Options menu (in earlier versions, the Start menu) that appears, choose Safe Mode.
Note Ever try to upgrade your video adapter and find you have problems with the driver? Safe Mode can be used to set your system back to a basic display driver. Using this basic default driver may better allow you to upgrade the system without problems. Then you can restart your system and install the driver for the new video adapter. Chapter 8, “When Upgrades Go Wrong” has more information about upgrades.
Using Safe Mode to Reach Windows Troubleshooting
You may have noticed that you didn’t get a big, thick manual with your copy of Windows. That’s because almost all of the documentation is built into Windows itself or is online on the Internet through Windows. Unfortunately, this isn’t too helpful when your PC won’t load Windows properly. How do you get to it?
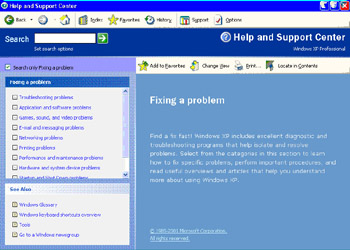
Through Safe Mode, you can reach some of the troubleshooting wizards built into Windows through the Help and Support Center.
Once you have Windows loaded in Safe Mode, take the following steps:
-
Go to the Windows Start Menu and click Help and Support.
-
From the Help and Support Center window, click Fixing a Problem.
-
Click any of the options on the list in the upper left-hand pane to select troubleshooting and help categories. Follow the wizard through its steps.
Using Safe Mode to Remove a Problem
One of the best ways to use Safe Mode is to remove either a newly installed or updated driver or a newly installed device or program that may have disrupted Windows enough to cause it not to load—or not to load properly.
For example, let’s say a disaster has rendered your current video adapter inoperable. You replace it with another video adapter, which seems to work fine. Then you apply a driver upgrade for the video adapter. When you next reboot, the PC either shows no display whatsoever or the driver you have for it creates a miserable display in Windows.
To resolve this, you can either try to reinstall the driver or roll the driver back to the previous version you were using that worked. You can do this in either Safe Mode (if needed) or in normal Windows (if you can get into it) by taking these steps:
-
From the Windows Start Menu, choose Shut Down and then Restart.
-
As the system begins its restart, press the F8 key.
-
From the Windows Advanced Options menu that appears, choose Safe Mode.
-
Once Windows loads in Safe Mode, choose Windows Start and select Control.
-
In Control Panel, double-click the System icon. Choose the Hardware tab and click Device Manager.
-
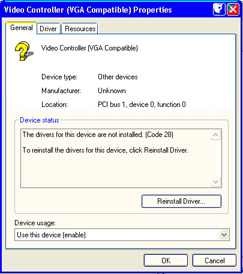
Locate your display adapter (what Windows calls your video adapter), right-click it, and choose Properties.
-
Select the General tab and click Reinstall Driver. (To select Roll Back Driver, choose the Driver tab and click Roll Back Driver.)
-
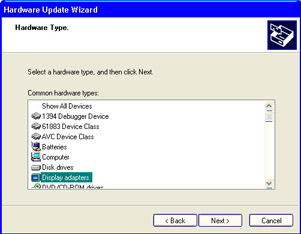
When the Hardware Update Wizard appears, choose Install from a List or Specific Location (Advanced). Click Next.
-
Click Don’t Search. I will choose the driver to install. This allows you to choose your setup rather than Windows automatically trying to configure it for you.
-
From the Hardware Type window, select Display Adapters and click Next.
-
Click Have Disk.
-
With the disk containing the needed driver for your video adapter installed in the proper drive, point Windows to the location of this driver.
-
Click OK.
-
From Windows Start, choose Shut Down and then Restart.
This process works for Windows XP, but earlier versions of Windows do not support the extra options like Roll Back Driver. If you’re using an earlier version than Windows XP, follow the steps in the previous chapter for removing a device driver in Device Manager and supplying the driver for it when you restart the PC. Restarting the PC should automatically load the Add Hardware wizard when it perceives a “new” device has been installed.
Using Safe Mode with System Restore
Now let’s look at another way you can use Safe Mode in disaster recovery.
If you have enabled System Restore in Windows Millennium or Windows XP to create restore points in order to revert your system back to an earlier point of reference, you can use Windows Safe Mode, if needed (since you can restore in normal mode, too), to get your system started and then restore your system to a point when it behaved well. All created restore points should be available to you, provided you used System Restore prior to the current problem. However, it’s usually best if you choose the System Restore created closest to the date the PC last worked well.
But there are a few things you should know before you do this. First, any restoration of a previous configuration in Safe Mode can’t be undone later through System Restore. Second, System Restore can’t create any new restore points while in Safe Mode. In addition, one time when I tried this, I found that it corrupted all restore points except the one I restored, so I had to build fresh restore points from that point forward.
To try to perform a System Restore in Safe Mode, take the following steps:
-
If your system is up and running, perform a shutdown and restart, and restart the system in Safe Mode.
-
Once Windows loads, from the Windows Start Menu, choose Help and Support.
-
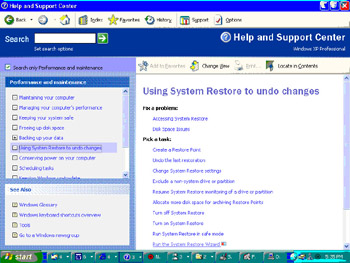
From the Help and Support Center window, click Performance and Maintenance.
-
Under Performance and Maintenance, select Using System Restore to Undo Changes.
-
Under Pick a Task in the right-hand pane, select Run the System Restore Wizard.
-
Select Restore my Computer to an Earlier Time. Pick the date you want to restore to and the computer will restart.
Using Last Known Good Configuration
Last known good configuration refers to another method you can use to try to roll Windows back to a point before a serious problem developed. This option was formerly available in only professional versions of Windows such as Windows NT 4.0, Windows 2000, and Windows XP Professional Edition.
This option is helpful for situations where a new driver or program may have caused a problem with your configuration or with Windows Registry and does not require you to go into the Safe Mode in order to use it. Nor does it require that you have turned on a feature ahead of time, as with System Restore.
However, last known good configuration is meant as a tool rather than as a magic bullet. It won’t work if your Windows installation is seriously damaged or corrupted by a drive problem, a virus, or other means. For example, if you install a bad program that actually removes core Windows files, rolling back to the last known good configuration will not help.
To see if this option can help you with your current dilemma, follow these steps:
-
From the Windows Start Menu, click Shut Down and then choose Shut Down and Restart.
-
When the system restarts and displays Please Select the Operating System to Start, press the F8 key.
-
From the Windows Advanced Options menu, choose Last Known Good Configuration. Press Enter.
| Tip | Wondering which solution to use? A good rule of thumb to follow is this: If Windows starts but has problems, use normal Windows mode and then Launch System Restore. If Windows does not start, use the Last Known Good Configuration option. If that fails, try to start Windows in Safe Mode and then launch System Restore. |
Using Windows XP Recovery Console
For those of you who may have been around long enough to hear of DOS, Windows Recovery Console is a command-line console troubleshooting environment that looks very much like DOS. You type commands at a DOS-looking command prompt rather than working in the GUI of Windows.
But it’s not quite DOS. There are more limitations and safeguards. For example, some commands can only be used in Recovery Console and you only have access to strategic folders such as Windows.
| Warning | Recovery Console is only available in Windows XP. |
Recovery Console is also not quite like the recovery disks that still come with some PCs as a tool provided by PC manufacturers to help you recover your basic setup after some catastrophic event. Some of these recovery disks can be destructive, especially if you’re not sure how to use them, because you can end up wiping your hard drive back to the point you were at when you first bought your PC (another healthy reminder why you need to back up your data to protect it).
Windows XP Recovery Console can be used in two different ways:
-
Run from the CD
-
Installed to Windows as a startup choice
Be aware, however, that there are times when you may not be able to run Recovery Console the way you choose. For example, a serious problem with your hard drive or Windows might prevent you from being able to load it from the hard drive. You might also face a situation when you can’t use your CD or DVD drive to run your Windows XP install CD (or you’ve misplaced it because you were napping during Chapter 4 “Assembling Your PC Recovery Resource Kit”).
| Tip | For this reason, I installed Recovery Console to my hard drive and I keep my Windows XP install CD handy. You may find it smart to do that, too. |
The Limitations of Recovery Console
Most, if not all, commands listed for Recovery Console only work in Recovery Console; they usually don’t work when run from the command-line console (similar to a DOS window) in Windows itself.
Installing Recovery Console
Should you choose to install Recovery Console to your hard drive, as I suggest, you’ll see it’s a simple and fast process.
| Note | When installed to the hard drive, Recovery Console takes approximately 7MB of disk space. |
To install Recovery Console, take these steps:
-
With Windows XP loaded, place your Windows XP CD into the CD or DVD drive.
-
Click Start Ø Run.
-
From the Run dialog box, type CD_drive_letter:\i386\winnt32.exe /cmdcons.
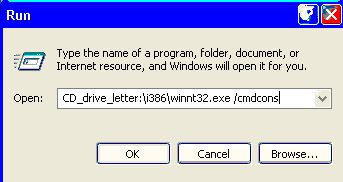
-
Follow the on-screen instructions.
Tip You’ll want your connection to the Internet available when you do this because Recovery Console immediately checks a Microsoft web site and then downloads and automatically installs any necessary updates. While you can press the Esc key to get around this, you probably want the updates.
Deciding When to Use Recovery Console
Because Recovery Console requires you to work with commands—which not everyone is comfortable using—and because there are some limitations on what you can do using Recovery Console, try to resolve your situation first using the roll back to the last known good configuration option or Safe Mode before you move to Recovery Console.
Launching Recovery Console
How you launch Recovery Console depends on whether you opted to install it to your hard drive or whether you choose to run it right from your Windows XP install CD.
Launching from Windows XP CD
When you use Recovery Console from the Windows XP install CD, the CD can act as a boot disk. It boots and prepares the system with just enough basics to allow you to run Recovery Console to troubleshoot—and hopefully resolve—your current crisis. To do this, take the following steps:
-
Insert the Windows XP install CD in your CD or DVD drive.
-
Shut down and restart the PC.
-
You may be prompted to load certain options to make the system boot from the CD; choose any options you require.
-
Once Recovery Console setup loads, follow the on-screen prompts until you reach the point where you can select R for repair/recovery.
-
Choose the Windows installation you want to recover. (Note that this option is available only where more than one operating system is installed to the PC.)
-
When Recovery Console appears, begin typing commands or type help for a list of them.
-
When you’re done, type exit to quit Recovery Console and restart the PC.
Tip When you’re finished with the Windows XP install CD, remember to return it to your software kit as part of your PC Recovery Resource Kit.
Launching Installed Recovery Console
To launch the Recovery Console from your hard drive (if installed), follow these steps instead:
-
Shut down and restart the PC.
-
When prompted by the Startup menu, select Recovery Console.
Important Recovery Console Commands
As its name suggests, Recovery Console includes commands designed to provide information when troubleshooting a problem and commands that allow you to fix specific issues. Table 7.2 lists those commands you’re most apt to use in a recovery situation, followed by some examples of how you would use Recovery Console to analyze and/or repair a problem. For a complete list of commands available in Recovery Console, use Help and Support in Windows XP to search on the words “Recovery Console.” You can then either look at them command by command or review an overview of commands listed under Recovery Console Commands (see Figure 7.1).
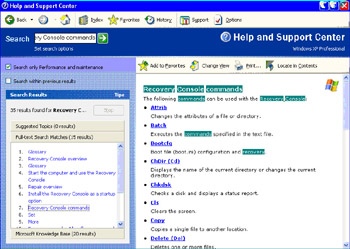
Figure 7.1: Get a list of all Recovery Console commands.
| Warning | Use extreme care in properly typing the commands and their switch options (special controls that affect exactly how the command does its job) in Recovery Console. While safeguards and limitations are built into Recovery Console to reduce the amount of damage that can be done, it’s still possible to make a serious mistake. |
| Commands | Switches | Function |
|---|---|---|
| Chkdsk | Checks the specified disk for errors. | |
| /p | Checks extensively, but does not repair. | |
| /r | Checks and tries to recover lost file data. | |
| Del | Deletes a file. This file will not show up in Recycle Bin. | |
| Disable | Disables a specified service or device driver. | |
| Diskpart | Creates or deletes drive partitions. Use this command with extreme care; creating, changing, or deleting disk partitions removes all data contained on the partition. | |
| Exit | Quits Recovery Console. | |
| Expand | Extracts the contents of—or just a specified file from within—a compressed cabinet (*.cab) file, such as those found on your Windows install CD. | |
| /d | Lists the files contained in a .cab file without expanding the files. | |
| /f:filename | Extracts the specific file. | |
| Fixboot | Fixes—by rewriting—the partition boot sector for your hard drive. | |
| Fixmbr | Repairs—by rewriting—the master boot record for your booting hard drive. | |
| Format | Formats a disk. | |
| Help | Lists Recovery Console commands. | |
| Listsvc | Lists all the drivers and services in use on your PC. | |
| RD | Removes a directory. | |
| Ren | Renames a specified file to a new specified filename. | |
| Type | Types the contents of a text or batch file. | |
| |more | Breaks a long text file or batch file into screen-sized sections. |
Examples of Recovery Console Command Usage
Before seeing the practical uses for these commands, let’s go through the steps you take to perform one of these commands. Let’s assume that a virus or other problem has overwritten the master boot record, which is keeping your hard drive from booting. You would
-
Shut down and restart the PC.
-
When prompted by the Startup menu, select Recovery Console.
-
Once Recovery Console loads, type this command at the command line: Fixmbr \device\HardDisk0.
-
Press Enter.

-
When the operation is complete, type exit
-
Once Recovery Console quits, the PC restarts; evaluate the PC’s behavior and look for any on-screen error messages to make sure it is now starting properly.
Here are some examples of Recovery Console commands you’ll find useful:
Chkdsk c: /p /r This command performs an exhaustive check of the C: drive, marks any bad sectors, and tries to recover lost file data (although this may not be recovered in any form you can use).
Del bootlog.bak This command erases the bootlog.bak file.
Disable USBdev1.vxd This command temporarily disables the specified USB device driver.
diskpart /add \Device\HardDisk0 20 This command adds a partition of 20MB (the number 20 specifies the size in megabytes) to HardDisk0.
expand g:\addon\driver.cab /f:widget.sys c:\Windows\system\drivers This command takes the source file (driver.cab) and extracts from it a single file (widget.sys) that is then expanded and copied to the Windows\System\Drivers folder.
Fixboot D: This command rewrites the system boot sector for the specified drive (D:).
Fixmbr \device\HardDisk0 This rewrites the master boot record for the specified drive (HardDisk0). If you fail to specify the device, the master boot record for your booting drive is rewritten.
Format D:\ This command formats the D: drive, effectively erasing all its contents, preparing it for fresh use or the installation of an operating system.
Ren C:\utillog.txt utillog.bak This command renames the file utillog.txt to utillog.bak.
Recovering from a Bad System Restore
Since I’ve mentioned System Restore several times in this chapter, it only seems right to talk about another type of disaster that can occur. This disaster happens when you inadvertently convert back to a restore point that you didn’t want. For example, this could be a restore point that was created when your PC was having profound problems, and restoring this point revisits all that havoc upon you.
However, you should be able to undo this restore point and select a different restore point, if desired. To reverse your current restore point, take these steps:
-
From the Windows Start menu, point to All Programs Ø Accessories Ø System Tools Ø System Restore.
-
From the Welcome to System Restore window, click Undo my Last Restoration. Click Next.
-
You may or may not see a listing provided by System Restore of the changes between your current system and the previous configuration. If present, click OK.
-
From the Confirm Restoration Undo window, click Next.
Windows should then go through the reversion process and restart your computer. Once Windows reloads, a confirmation appears telling you that the process was complete and you are reverted to your system the way it was before you last restored a restore point.
Sadly, some of your biggest PC disasters may occur when you’re just trying to improve your systems by upgrading a component such as the BIOS, a driver, memory, or a hardware component with a better product. The next chapter describes the steps to work around a failed upgrade.
|
|
EAN: 2147483647
Pages: 140
- Challenging the Unpredictable: Changeable Order Management Systems
- Enterprise Application Integration: New Solutions for a Solved Problem or a Challenging Research Field?
- Context Management of ERP Processes in Virtual Communities
- Intrinsic and Contextual Data Quality: The Effect of Media and Personal Involvement
- Healthcare Information: From Administrative to Practice Databases