Setting Up a Peer-to-Peer Network
Networks appear in two guises: client/server and peer-to-peer. In general, a client/server network splits the computing workload into two separate, yet related, areas. On one hand, you have users working at intelligent “front-end” systems called clients. In turn, these client machines interact with powerful “back-end” systems called servers. The basic idea is that the clients have enough processing power to perform tasks on their own, but they rely on the servers to provide them with specialized resources or services, or access to information that would be impractical to implement on a client (such as a large database).
In a peer-to-peer network, no computer is singled out to provide special services. Instead, all the computers attached to the network have equal status (at least as far as the network is concerned), and all the computers can act as both servers and clients. On the server side, each computer can share any of its resources with the network and control access to these shared resources. For example, if a user shares a folder with the network, he or she also can set up passwords to restrict access to that folder. On the client side, each computer can work with the resources that have been shared by the other peers on the network (assuming they have permission to do so, of course).
We discuss peer-to-peer networks in this chapter. We’ll concentrate mostly on the software side: the networking programs and features that are part of the Microsoft Windows XP package. However, the next couple of sections discuss the all-important hardware side: the devices and equipment without which networking isn’t possible. We look at the two main network types: Ethernet and wireless.
Understanding Ethernet Network Hardware Requirements
The most popular network type, particularly when it comes to small networks, goes by the generic name of Ethernet. Although there are many different Ethernet network configurations, the easiest one to set up and maintain requires three physical components:
-
Network interface card (NIC) This is an adapter that, usually, plugs into an expansion bus slot inside a client computer (although some NICs are external and plug into USB ports or PC Card slots). The NIC’s main purpose is to serve as the connection point between the PC and the network. The conventional NIC’s backplate (that is, the portion of the NIC you can see after the card is installed in the computer) contains one or more ports into which you plug a network cable. These are the three main types of NIC:
-
Ethernet This type of NIC provides 10 Mbps throughput.
-
Fast Ethernet This is a relatively new iteration of the Ethernet architecture that supports 100 Mbps throughput. Because of this speed, Fast Ethernet is rapidly becoming the networking standard (if it isn’t already). Note, too, that many NICs are “10/100” cards that support both Ethernet and Fast Ethernet.
-
Gigabit Ethernet This type of card features 1 Gbps throughput. This is impressive speed, to be sure, but it’s probably overkill on a small network.
Note If you have a broadband Internet connection, you’ll need two NICs for the computer hosting that connection: one for the Internet connection and a second one for the network connection.
-
-
Network cable To set up a communications pathway between network computers, you need to install cables that connect the various network nodes together. The vast majority of Ethernet NICs provide an RJ-45 port that supports unshielded twisted-pair (UTP) cable, which in Ethernet circles is also often referred to as 10Base-T cables. If you’re using Fast Ethernet NICs, be sure to get at least Category 5 cable.
-
Network hub A hub (also known as a concentrator) is a central connection point for network cables. That is, for each computer, you run a twisted-pair cable from the computer’s NIC to an RJ-45 port on the hub. Hubs range in size from small boxes with four to eight RJ-45 ports, to large cabinets with dozens of ports for various cable types. If you’re using Fast Ethernet NICs, be sure to get a hub that also supports 100 Mbps. There are also 10/100 hubs available if you’re using a mix of Ethernet and Fast Ethernet NICs.
Understanding Wireless Network Hardware Requirements
The cabling requirements of a standard Ethernet setup, and the restrictions these requirements impose upon a client, have led an increasing number of network users to consider the cable-free configuration of a wireless network. Using the IEEE 802.11b (or Wi-Fi) standard, wireless network connections can be established using radio frequencies in the 2.4-GHz range to achieve speeds up to 11 Mbps, though some manufacturers are using signal-processing chips that allow an effective rate of 22 Mbps. Wireless networks require two device types:
-
Wireless NIC This is a special NIC that includes (or has built into its circuitry) a small antenna that receives and transmits data using radio frequencies. If your network consists of only computers with wireless NICs, you don’t need any other equipment (although you will have to set up your NICs to use ad hoc mode for direct NIC-to- NIC communication; see the operating manual that came with each wireless NIC).
-
Wireless access point If your network consists of both wireless and cable connections, you need an access point to combine them. An access point is a switch or router that enables you to connect the wireless portion of your network with the Ethernet portion. Access points typically have an “uplink” port that connects via cable to the Ethernet hub.
Caution Wireless networks are less secure than wired ones because the wireless connection that enables you to access the network from afar can also enable an intruder from outside your home or office to access the network. Microsoft has a nice collection of wireless network security tips in the following Knowledge Base article:
http://support.microsoft.com/?scid=kb;en-us;309369
Running the Network Setup Wizard
In previous versions of Windows, setting up a network usually involved working with obscure settings. These are still available in Windows XP, but there’s also a less perplexing route to network connectivity: the Network Setup Wizard. Even if you enjoy working with TCP/IP settings and network protocols, using the Network Setup Wizard is the best way to ensure trouble-free network operation.
Windows XP has a feature called Internet Connection Sharing (ICS) that enables you to share one computer’s Internet connection with other computers on the network. How you start setting up your network depends on whether you’ll be using ICS:
-
If you’ll be using ICS, run the Network Setup Wizard on the computer that will be sharing its connection. This machine is called the ICS host. Make sure this machine’s Internet connection is active before running the wizard. When you’re done, you can run the Network Setup Wizard on the other clients, in any order.
-
If you won’t be using ICS, run the Network Setup Wizard on any computer, in any order.
Configuring the ICS Host
Here are the steps to follow to run this wizard on the ICS host computer:
-
Launch Control Panel’s Network Connections icon.
-
In the Network Tasks section of the dialog box, select Set Up A Home Or Small Office Network.
-
In the initial Network Setup Wizard dialog box, click Next, and then click Next again. The wizard prompts you to select an Internet connection method.
-
Make sure the This Computer Connects Directly To The Internet option is selected, and then click Next.
-
Select the Internet connection and click Next.
-
Run through the rest of the Network Setup Wizard’s steps, as described below (see “Completing the Network Setup Wizard”).
Configuring Other ICS Machines
Here are the steps to follow to run the Network Setup Wizard on the other computers in an ICS network:
-
Launch Control Panel’s Network Connections icon, select Set Up A Home Or Small Office Network, and in the initial Network Setup Wizard dialog box, click Next, and then click Next again.
-
The next wizard dialog box tells you it found the shared Internet connection. Make sure the Yes, Use The Existing Shared Connection For This Computer’s Internet Access option is selected, and then click Next.
-
Run through the rest of the Network Setup Wizard’s steps, as described below (see “Completing the Network Setup Wizard”).
Configuring a Network Without ICS
Follow these steps to run the Network Setup Wizard to configure a network without ICS:
-
Launch Control Panel’s Network Connections icon, select Set Up A Home Or Small Office Network, and in the initial Network Setup Wizard dialog box, click Next, and then click Next again.
-
Select the Other option and click Next.
-
You now have three choices (click Next when you’ve made your choice):
-
This Computer Connects To The Internet Directly Or Through A Network Hub Choose this option if your computer is attached to a hub that also has a DSL or cable modem attached to it.
-
This Computer Connects Directly To The Internet. I Do Not Have A Network Yet Choose this option if you computer has an Internet connection that you won’t be sharing with the network.
-
This Computer Belongs To A Network That Does Not Have An Internet Connection Choose this option if you computer doesn’t have a network connection and no other computer on the network will be sharing an Internet connection.
-
-
If your computer has an Internet connection, select the appropriate connection from the first two options and click Next. Otherwise, select the third option and click Next.
-
Run through the rest of the Network Setup Wizard’s steps, as described below (see “Completing the Network Setup Wizard”).
Completing the Network Setup Wizard
The rest of the Network Setup Wizard’s steps are common to all configurations:
-
If you have more than one connection on your computer, the wizard offers to bridge the connections for you. (In Windows XP, a network bridge is software component that enables the computers on two different networks—both connected to the bridging computer—to see each other. Note that any connection that has Internet Connection Sharing or Internet Connection Firewall enabled cannot be added to the network bridge.) If you want to enable the bridge, select Let Me Choose The Connections To My Network and click Next. Now select the check box beside the connection that you use to access the network and click Next.
-
Enter a computer description and a computer name (which must be unique among the networked computers) and click Next.
-
Enter a workgroup name (which must be the same for all the networked computers) and click Next.
-
Click Next to apply the network settings.
-
The wizard asks how you want to run the Network Setup Wizard on your other computers. You have four choices (click Next when you’re done).
-
Create A Network Setup Disk Choose this option if you’ll be including Windows 9x or Windows Me computers in the network. This creates a floppy disk that includes a version of the Windows XP Network Setup Wizard. You insert this disk into a Windows 9x or Windows Me client and run the wizard on that computer.
-
Use The Network Setup Disk I Already Have Choose this option if you’ve already created a Windows XP Network Setup Disk.
-
Use My Windows XP CD Choose this option to run the Network Setup Wizard on the Windows 9x or Windows Me computers using the Windows XP CD. In this case, you insert the CD in the other computer. When the Welcome window appears, click Perform Additional Tasks and then click Set Up A Home Or Small Office Network.
-
Just Finish The Wizard Choose this option if you don’t need to run the wizard on Windows 9x or Windows Me computers.
-
-
Click Finish.
Working with Network Settings
You can change your network settings by launching Control Panel’s Network Connections icon. The configuration of the resulting Network Connections window depends on the computer’s role in the network. For example, if the computer is the ICS host, you’ll see a configuration similar to the one shown in Figure 16-1. Three items are shown in that figure, though yours may vary:
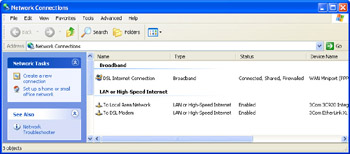
Figure 16-1: This is the Network Connections window for a typical ICS host.
-
DSL Internet Connection This icon represents the ICS host’s Internet connection—a broadband connection via a DSL modem, in this case. That is, it’s the connection that runs from the DSL modem out to the Internet.
-
To Local Area Network This icon represents the connection to the network. That is, it’s the connection that runs from one NIC to the network hub.
-
To DSL Modem This connection represents the connection to the modem. That is, it’s the connection that runs from the second NIC to the DSL modem.
Contrast this with the Network Connections window for a client machine on the same network, shown in Figure 16-2. In this case, there are only two items:
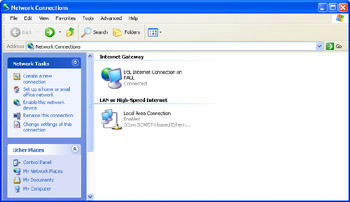
Figure 16-2: This is the Network Connections window for a client computer that uses a shared ICS connection.
-
DSL Internet Connection on PAUL This is the Internet gateway that connects this computer to the DSL Internet Connection on the ICS host, a computer named PAUL in this example.
-
Local Area Connection This icon represents the connection to the network. That is, it’s the connection that runs from the computer’s NIC to the network hub.
From the Network Connection window, you can modify your network settings in the following ways:
-
Running the Network Setup Wizard If you want to make major changes to the network configuration, these are most easily accomplished by running the Network Setup Wizard again. Click the Set Up A Home Or Small Office Network link.
Note If you want to change your computer or workgroup name, you can either run the Network Setup Wizard or change these values directly. To do the latter, launch Control Panel’s System icon and select the Computer Name tab. Click Change, enter the computer name and/or workgroup, and then click OK.
-
Renaming a connection Windows XP supplies connections with generic names such as “Local Area Connection.” To assign a more descriptive name to a connection, select the name of the connection, press F2, type the new name, and press Enter.
-
Installing a networking client, service, or protocol You shouldn’t need extra networking components in a small peer-to-peer network. Just in case you do, you can install them by right-clicking the network connection, selecting Properties, and then clicking Install.
-
Disabling a connection If you have multiple NICs and want to disable one that you don’t use, right-click its connection and then select Disable. You can enable this connection in the future by right- clicking it and then selecting Enable.
EAN: 2147483647
Pages: 126