Recovering from a Problem
Ideally, solving a problem will require a specific tweak to the system: a registry setting change, a driver upgrade, a program uninstall. But sometimes you need to take more of a “big picture” approach that reverts your system to some previous state in the hope that you’ll leap past the problem and get your system working again. Windows XP offers four tools that enable you to try this approach: Last Known Good Configuration, System Restore, Recovery Console, and reinstalling Windows XP, which should be used in that order. The next four sections discuss these tools.
Booting Using the Last Known Good Configuration
Each time Windows XP starts successfully in normally mode, the system makes a note of which control set (the system’s drivers and hardware configuration) was used. Specifically, it enters a value in the following registry key:
HKLM\SYSTEM\Select\LastKnownGood
For example, if this value is 1, it means that control set 1 was used to start Windows XP successfully:
HKLM\SYSTEM\ControlSet001
If you make driver or hardware changes and then find that the system won’t start, you can have Windows XP load using the control set that worked the last time (that is, the control set that doesn’t include your most recent hardware changes). This is called the Last Known Good Configuration, and the theory is that by using the previous working configuration, your system should start since it’s bypassing the changes that caused the problem. Here’s how to start Windows XP using the last known good configuration:
-
Restart your computer.
-
When the OS Choices menu appears, press F8 to display the Windows Advanced Options menu. (If your system doesn’t display the OS Choices menu, press F8 immediately after your system finishes the Power-On Self Test, which is usually indicated by a single beep.)
-
Select the Last Known Good Configuration option.
Recovering Using System Restore
The Last Known Good Configuration is most useful when your computer won’t start and you suspect that a hardware change is causing the problem. You might think that you can also use the Last Known Good Configuration if Windows XP starts but is unstable, and you suspect a hardware change is causing the glitch. Unfortunately, that won’t work because once you start Windows XP successfully in normal mode, the hardware change is added to the Last Known Good Configuration. To revert the system to a previous configuration when you can start Windows XP successfully, you need to use the System Restore feature.
We show you how to use System Restore to set restore points in Chapter 12. Remember, too, that Windows XP creates automatic restore points each day and when you perform certain actions (such as installing an uncertified device driver). To revert your system to a restore point, follow these steps:
-
Select Start, All Programs, Accessories, System Tools, System Restore.
-
Make sure the Restore My Computer To An Earlier Time option is selected and click Next. The Select A Restore Point window appears, as shown in Figure 13-2.
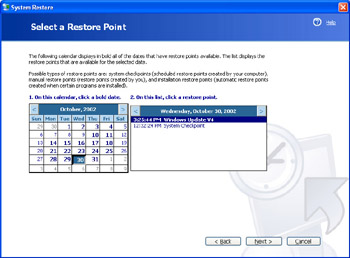
Figure 13-2: Use the Select A Restore Point window to choose the restore point you want to revert to. -
Use the calendar to click the date on which the restore point was made. System Restore displays that day’s restore points in a box to the right of the calendar.
-
Click the restore point you want to restore. (Note that the System Checkpoint items are the restore points created automatically.)
-
Click Next. System Restore asks you to close all open programs and warns you not to do anything with your computer until the restoration is done.
-
Click Next. System Restore begins reverting to the restore point. When it’s done, it restarts your computer and displays the Restoration Complete window.
-
Click OK.
Insider Secret System Restore is available in safe mode. So if Windows XP won’t start properly, and if using the Last Known Good Configuration doesn’t work, perform a safe mode startup and run System Restore from there.
Recovering Using the Recovery Console
If Windows XP won’t start normally, your first troubleshooting step is almost always to start the system in safe mode. Once you make it to Windows XP, you can then investigate the problem and make the necessary changes (such as disabling or rolling back a device driver). But what if your system won’t even start in safe mode?
Your next step should be booting with the Last Known Good Configuration. And if that doesn’t work either? Don’t worry, there’s still hope in the form of the Recovery Console, a command-line tool that enables you to launch recovery tools, stop and start services, access files, and replace corrupted system files. Here’s how to use it:
-
Insert the Windows XP Professional CD-ROM.
-
Restart your computer. If your system prompts you to boot from the CD, press the required key or key combination.
Tip If your system won’t boot from the Windows XP CD, you need to adjust the system’s BIOS settings to allow this. Restart the computer and look for a startup message that prompts you to press a key or key combination to modify the BIOS settings (which might be called Setup or something similar). Find the boot options and either enable a CD-based boot or make sure the option to boot from the CD comes before the option to boot from the hard disk. Note that many Intel motherboards designed for the P4 processor require that you open the computer and move a jumper to enable access to the BIOS settings. (However, most of these machines will allow you to choose a boot device from a list of supported devices if you hold down the F8 key during the BIOS self-check during boot.)
-
When the Windows XP Professional Setup, Welcome To Setup screen appears, press R to choose the To Repair A Windows XP Installation Using Recovery Console option. The Recovery Console displays a list of the Windows installations on your computer.
-
Type the number that corresponds to your main Windows XP installation and press Enter. The Recovery Console prompts you to enter the Administrator password.
-
Type the password and press Enter. The Recovery Console command-line prompt appears.
The Recovery Console is similar to the Windows XP command prompt, but it offers only limited access to the files and folders: the %SystemRoot% folder; the root folder of any partition; and the contents of any floppy disk, CD-ROM, or other removable disk.
Here are some troubleshooting notes to bear in mind when working at the Recovery Console:
-
You have a large but limited set of commands at your disposal. To see a list of those commands, type Help and press Enter.
-
If Windows XP won’t start because the Boot.ini file is corrupted or improperly configured, you can repair it by running the BOOTCFG/REBUILD command.
-
To repair bad sectors on the hard disk, run the CHKDSK command. Note, however, that CHKDSK only has two switches when you run it from the Recovery Console: /P and /R. In most cases, you’ll use /R (which also implies /P) to repair any bad sectors. Be aware that the /P switch is available only in the Recovery Console; there is no equivalent in the normal command-line version of CHKDSK.
-
If Windows XP won’t start because a system file is corrupted, use the COPY command to copy the file from the Windows XP CD’s I386 folder to the appropriate folder in the %SystemDrive%. This works for both regular and compressed files. If the file exists within a compressed cabinet (.cab) file, use the EXPAND command, instead.
-
If another operating system has taken over the partition boot sector, or if you suspect the partition boot sector is corrupt, you can fix the problem by running the FIXBOOT command.
-
If you suspect that your computer won’t start because the Master Boot Record is corrupted, you can repair it by running the FIXMBR command.
-
You can display a list of all the available device drivers and services by running the LISTSVC command. If a driver or service is preventing Windows XP from starting, you can work around this by disabling the driver or service. You do this by running the DISABLE servicename command, where servicename is the name of the driver or service. Run ENABLE servicename to enable the driver or service.
-
When you’re finished working with the Recovery Console, type exit and press Enter.
Insider Secret If you run the SET command in the Recovery Console, you’ll see a list of four environment variables that control your ability to access and copy data while in the Recovery Console:
-
AllowWildCards This variable determines whether you can use the ? and * wildcard characters in Recovery Console commands.
-
AllowAllPaths This variable determines whether you can use the CD command to change to any folder on the hard disk.
-
AllowRemovableMedia This variable determines whether you can copy files from the hard disk to a removable disk.
-
NoCopyPrompt This variable determines whether the Recovery Console warns you when the COPY command will overwrite an existing file.
Each variable is set to FALSE, by default. Unfortunately, if you attempt to use SET to change the value of any variable, the Recovery Console tells you that the SET command is disabled. To enable this command, you need to adjust a group policy setting. (Of course, if you can’t start Windows XP, this won’t do you much good now. However, we’re letting you know about it just in case you need it for future troubleshooting missions.) In the Group Policy Editor, open the Computer Configuration, Windows Settings, Security Settings, Local Policies, Security Options branch. Select the Recovery Console: Allow Floppy Copy And Access To All Drive And All Folders policy. Note, too, that you can also select the Recovery Console: Allow Automatic Administrative Logon policy. Doing this prevents you from being prompted for a password when you start the Recovery Console. (This is quite dangerous, of course, so select this policy only if you’re sure no one else has access to your computer.)
-
Reinstalling Windows XP
If you can’t get Windows XP back on its feet using the Recovery Console, you may be able to fix things by reinstalling Windows XP over the existing installation. This won’t affect your data or any personal settings you’ve adjusted, but it may cure what’s ailing Windows XP either by reverting the system to its default settings or by installing fresh copies of corrupted system files. Here are the steps to follow to reinstall Windows XP:
-
Insert the Windows XP Professional CD-ROM.
-
Restart your computer. If your system prompts you to boot from the CD, press the required key or key combination.
-
When the Windows XP Professional Setup, Welcome To Setup screen appears, press Enter to choose the To Set Up Windows XP Now option.
-
When the Licensing Agreement appears, press F8 to accept it. Setup then displays a list of Windows XP installations on your computer.
-
If you have more one Windows XP installation, select the one you want to fix.
-
Press R to choose the To Repair The Selected Windows XP Installation option.
Recovering Using Automated System Recovery
If nothing can get Windows XP up and running again, you have no choice but to start with a clean slate. This means either formatting the %SystemDrive% partition or, if hard disk errors are the culprit, replacing your hard disk. This will be less catastrophic if you followed our advice and used the Automated System Recovery Preparation Wizard to make backups of your system files (see Chapter 12). If so, here are the steps to follow to recover your system:
-
Insert the Windows XP Professional CD-ROM.
-
Restart your computer. If your system prompts you to boot from the CD, press the required key or key combination. Watch the bottom of the screen for the following prompt:
Press F2 to run Automated System Recovery (ASR)...
-
Press F2. Setup asks you to insert the ASR disk.
-
Insert the disk and then press any key. Setup continues the Windows XP installation. Note that, along the way, Setup automatically formats the %SystemDrive% partition.
From here, the Setup program proceeds normally, except that it uses the information on the ASR disk to restore your system files and settings from the backup you made using the ASR Preparation Wizard. If you also backed up your application and data files, use the Backup Utility to restore those now.
EAN: 2147483647
Pages: 126