| By far the easiest way to create a command macro is to use the Macro Recorder. With this method, you start the recorder and then run through the task you want to automate (including selecting text, running menu commands, and choosing dialog box options). The Recorder translates everything into the appropriate VBA statements and copies those statements to a command macro in a module. You can then use the recorded macro to replay the entire procedure any time you like. This section shows you how to record a command macro in Word, Excel, or PowerPoint. (The other programs in the Office suite don't have macro recording capabilities.)  | To begin, set up the application so that it's ready to record. In Word, for example, if you want to record a series of formatting options, select the text you want to work with. When that's done, either select Tools, Macro, Record New Macro or click the Record Macro button in the Visual Basic toolbar. You'll see the Record Macro dialog box appear. Figure 11.2 shows the Excel version. |
Figure 11.2. Use the Record Macro dialog box to name and describe your macro. 
The application proposes a name for the macro (such as Macro1), but you can use the Macro Name text box to change the name to anything you like. However, you must follow a few naming conventions: no more than 255 characters, the first character must be a letter or an underscore (_), and no spaces or periods are allowed. Word and Excel enable you to assign shortcuts to the macro: In Word, either click Toolbars to assign a toolbar button to the macro, or click Keyboard to assign a shortcut key to the macro. In Excel, enter a letter in the text box labeled Shortcut Key: Ctrl+.
Use the Store Macro In drop-down list to specify where the macro will reside: In Word, you can store the macro in any open template (which makes the macro available to any document that uses the template), or in any open document (which makes the macro available only to that document). In Excel, you can store the macro in the current workbook, a new workbook, or in the Personal Macro Workbook. If you use the latter, your macros will be available to all your workbooks.
The Personal Macro Workbook The Personal Macro Workbook is a hidden workbook named Personal.xls that opens automatically when you start Excel. This means that any macros contained in this file will be available to all your workbooks, which makes them easy to reuse. If you want to see this workbook, you have to unhide it. To do this, select Window, Unhide, select PERSONAL.XLS in the list of hidden files, and then click OK. Note, however, that this file is not created until you use it to store at least one recorded macro. |
Finally, enter an optional description of the macro in the Description text box. When you're ready to go, click OK. The application returns you to the document, displays Recording or REC in the status bar, and displays the Stop Recording Macro toolbar. Now perform the tasks you want to include in the macro. Because the macro recorder takes note of nearly everything you do (except mouse movements and clicking the buttons in the Stop Recording Macro toolbar), be careful not to perform any extraneous actions or commands during the recording.  | When you finish the tasks, select Tools, Macro, Stop Recording, or click the Stop Macro button. |
Viewing the Resulting Module  | To see your macro, select Tools, Macro, Macros, or click the Run Macro button (you can also press Alt+F8) to display the Macros dialog box. In the Macro Name list, select the macro you just recorded and then click the Edit button. The application opens the Visual Basic Editor window and then opens the module and displays the macro. As you can see in Figure 11.3, the application (Excel, in this case) translates your actions into VBA code and combines everything into a single macro. |
Figure 11.3. A sample recorded macro. 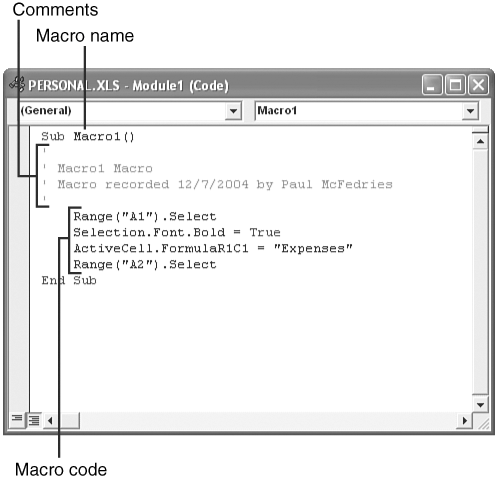
A typical macro has the following features: Sub/End Sub These keywords mark the beginning (Sub) and end (End Sub) of a command macro. The Sub keyword is the reason why command macros also are called Subprocedures (sub is short for subroutine). Macro name After the Sub keyword, Excel enters the name of the macro followed by a left and right parenthesis (the parentheses are used for input values [arguments], as you'll see later). Comments The first few lines begin with an apostrophe ('), which tells VBA that these lines are comments. As the name implies, comments are for show only; they aren't processed when you run the macro. In each recorded macro, the comments display the name of the macro and the description you entered in the Record New Macro dialog box. (In Excel, the comments also display the keyboard shortcut if you entered one.) Macro code The main body of the macro (in other words, the lines between Sub and End Sub, not including the initial comments) consists of a series of statements. These are the application's interpretations of the actions you performed during the recording. In the example, four actions were performed in Excel: 1. | Cell A1 was selected.
| 2. | The cell was formatted as boldface.
| 3. | The string Expenses was typed into the cell.
| 4. | The Enter key was pressed (which moved the selection down to cell A2).
|
Editing a Recorded Macro As you're learning VBA, you'll often end up with recorded macros that don't turn out quite right the first time. Whether the macro runs a command it shouldn't or is missing a command altogether, you'll often have to patch things up after the fact. The lines within a VBA module are just text, so you make changes the same way you would in a word processor or text editor. If your macro contains statements that you want to remove, just delete the offending lines from the module. If you want to add new recorded actions to the macro, VBA doesn't give you any way to record new statements into an existing macro. Instead, you should first record a new macro that includes the actions you want, and then display the macro. From here, you can use the standard Windows cut-and-paste techniques (including drag-and-drop) to move the statements from the new macro into the other macro. |