| As with Word, Excel offers three levels of collaboration: comments, tracking changes, and sharing a file among multiple users. Although these features are implemented slightly differently in Excel, the underlying concepts are basically the same, as you'll see in this section. Inserting Comments in Cells The simplest level of collaboration with an Excel workbook is the comment that doesn't change any worksheet data, but offers notes, suggestions, and critiques of the worksheet content. In Excel, you associate comments with individual cells (not ranges) by following these steps: 1. | Select the cell in which you want to insert the comment.
| 2. |  Select Insert, Comment, or click the New Comment button in the Reviewing toolbar. Excel displays an empty comment balloon. Select Insert, Comment, or click the New Comment button in the Reviewing toolbar. Excel displays an empty comment balloon.
| 3. | Type the comment text.
| 4. | When you're done, click outside the comment balloon.
|
Excel indicates the inserted comment by adding a small red triangle to the upper-right corner of the cell. To view the comment, hover the mouse pointer over the cell. Removing the Comment Indicator If you don't want to see the comment indicators, you can turn them off by selecting Tools, Options, displaying the View tab, and activating the None option in the Comments section. |
After you've added one or more comments to a worksheet, use the following Reviewing toolbar techniques to navigate, display, and work with the comments:  Click Next Comment to move to the next comment. Click Next Comment to move to the next comment.
 Click Previous Comment to move to the previous comment. Click Previous Comment to move to the previous comment.
 Click Show/Hide Comment to toggle the comment in the current cell on and off. Click Show/Hide Comment to toggle the comment in the current cell on and off.
 Click Show All Comments to toggle all the worksheet's comments on and off. Click Show All Comments to toggle all the worksheet's comments on and off.
Showing All Comments Activating the Show All Comments button is the same thing as selecting Tools, Options, displaying the View tab, and activating the Comment and Indicator option in the Comments section. |
 Click Delete Comment to remove the comment from the current cell. Click Delete Comment to remove the comment from the current cell.
Tracking Worksheet Changes If you want other people to make changes to a workbook, it's a good idea to keep track of those changes so you can either accept or reject them. Like Word, Excel has a Highlight Changes feature that enables you to do this. When you turn on Highlight Changes, Excel monitors the activity of each reviewer and stores their cell edits, row and column additions and deletions, range moves, worksheet insertions, and worksheet renames. You can also filter the changes by date, reviewer, or worksheet location. Highlight Changes Limitations When you activate Highlight Changes, Excel doesn't track formatting changes. Also, Excel doesn't allow a number of operations, including the insertion and deletion of ranges and the deletion of worksheets. For a complete list of disallowed operations, see "Sharing a Workbook," later in this chapter. |
Here are the steps to follow to activate and configure Highlight Changes: 1. | Select Tools, Track Changes, Highlight Changes to display the Highlight Changes dialog box.
| 2. | Activate the Track Changes While Editing check box, as shown in Figure 7.6. (The check box text mentions that this also shares the workbook. See "Sharing a Workbook," later in this chapter.)
Figure 7.6. Use the Highlight Changes dialog box to activate revision tracking for the current workbook. 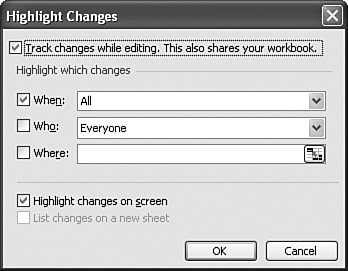
| 3. | Use the following controls to specify which changes Excel displays:
WhenUse this list to filter the displayed changes by time. To specify a date, select Since Date and then edit the date that Excel displays (the default is the current date).
WhoUse this list to filter the displayed changes by reviewer. At first, this list contains Everyone and Everyone but Me. Later, when other users have made changes, the list will include the name of each reviewer.
WhereUse this range box to select the range in which you want changes displayed.
| 4. | Click OK. Excel displays a dialog box letting you know that it will save your workbook.
| 5. | Click OK.
|
Now, when you make changes to the workbook, Excel displays a blue triangle in the upper-left corner of the cell. (If you delete a row or column, Excel displays a blue line between the cells where the row or column used to be.) Hover the mouse pointer over the cell to see the change, as well as who made it and when, as shown in Figure 7.7. Figure 7.7. With change tracking turned on, hover the mouse pointer over any cell that shows the change indicator to see a balloon specifying the change. 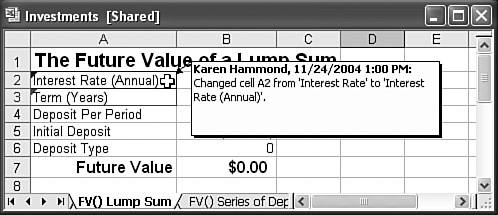
If you want to review the history of changes to the workbook, select Tools, Track Changes, Highlight Changes, activate the List Changes on a New Sheet check box, and click OK. Excel adds a History tab to the workbook and adds data about all the tracked changes. Modifying the Change History Length By default, Excel keeps track of changes made for the past 30 days. (The exception is if you turn off change tracking; in that case, Excel deletes the history of changes.) To change the number of days of history that Excel tracks, select Tools, Share Workbook, display the Advanced tab, and then change the Keep Change History for X Days spin box. |
To accept or reject the workbook changes, follow these steps: 1. | Select Tools, Track Changes, Accept or Reject Changes. (If Excel tells you it will save the workbook, click OK.) Excel displays the Select Changes to Accept or Reject dialog box.
| 2. | Use the When, Who, and Where controls to filter the changes, as needed.
| 3. | Click OK. Excel displays the Accept or Reject Changes dialog box and displays a change.
| 4. | Click Accept or Reject. (You can also click Accept All or Reject All to take care of all the changes at once.) Excel moves to the next change.
Multiple Cell Changes If the reviewers made two or more changes to a cell, the Accept or Reject Changes dialog box displays the Select a Value for cell Cell list (where Cell is the address of the cell), which shows the original value and the changes. Select the value you want to keep and then click Accept. |
| 5. | Repeat step 4 until you have reviewed all the changes.
|
Sharing a Workbook As you saw in the previous section, activating change tracking also activates workbook sharing, the Excel feature that enables two or more users to collaborate on a workbook at the same time. This is a powerful tool because it enables you to share the burden of building a workbook. For example, if you're coordinating a budget model, you might want to share the workbook and assign a different tab to a user in each department. I should point out here that although turning on change tracking also turns on workbook sharing, the opposite is not the case. That is, you can share a workbook without also displaying changes. Follow these steps to share a workbook: 1. | If another person is currently using the workbook, ask that person to close the file.
| 2. | Select Tools, Share Workbook. Excel displays the Share Workbook dialog box.
| 3. | Activate the Allow Changes by More Than One User at the Same Time check box, as shown in Figure 7.8.
Figure 7.8. Use the Share Workbook dialog box to activate workbook sharing and allow multiple users to collaborate on the workbook at the same time. 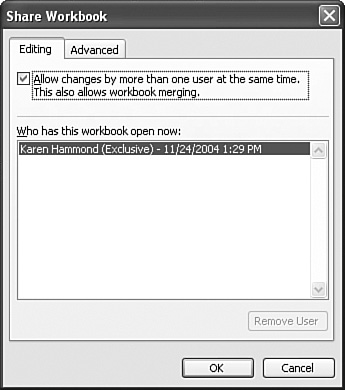
| 4. | Click OK. Excel tells you it will save the workbook.
| 5. | Click OK.
|
Excel displays [Shared] in the document title bar to remind you that the workbook is shared. You and your collaborators are now free to work on the file at the same time. Note, however, that Excel doesn't allow the following operations while a workbook is shared: Inserting and deleting ranges (although you can insert and delete entire rows and columns) Merging cells Creating lists Creating or modifying PivotTables Deleting or moving worksheets Applying conditional formatting Working with scenarios Subtotaling, validating, grouping, and outlining data Inserting charts, symbols, pictures, diagrams, objects, and hyperlinks Checking for formula errors
Updating a Shared Workbook  | To ensure that you're always working with the most up-to-date version of the file, save the workbook. This tells Excel to display other reviewers' changes in your view of the workbook. If any changes were added, Excel displays a dialog box to let you know. Note, too, that you can also see other users' changes by clicking the Update File button in the Reviewing toolbar (although with this method, Excel doesn't let you know if any changes were added to the workbook). |
To control when Excel updates a shared workbook, follow these steps: 1. | Select Tools, Share Workbook to display the Share Workbook dialog box.
| 2. | Display the Advanced tab.
| 3. | Select one of the following options:
When File Is SavedWhen you activate this option, Excel updates the workbook automatically when you save the file.
Automatically Every X MinutesWhen you activate this option, Excel updates the workbook using the interval you specify (the minimum is 5 minutes; the maximum is 1,440 minutes). You can also elect to have Excel save your changes at the same time or just see the changes made by other users.
| 4. | Click OK.
|
Working with Reviewers If you want to know who is currently using the workbook besides yourself, select Tools, Share Workbook. As you can see in Figure 7.9, the Who Has This Workbook Open Now list displays all the current users. If you want to prevent a reviewer from using the workbook, click the user and then click Remove User. Note, however, that you should use this technique only as a last resort because it could easily cause the user to lose unsaved changes. It's safer (and friendlier) to ask the person directly to save his or her changes and close the workbook. Figure 7.9. Select Tools, Share Workbook to see a list of the workbook's current reviewers. 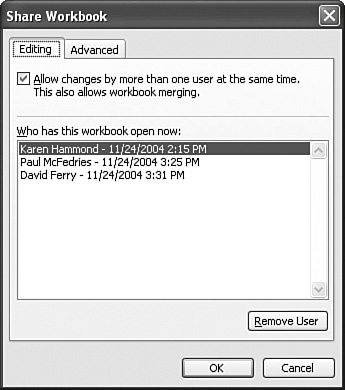
Handling Conflicts What happens if another user changes a cell, saves his or her changes, and then you change the same cell before updating? This creates a conflict in the workbook versions that must be resolved. To do this, Excel displays the Resolve Conflicts dialog box, shown in Figure 7.10. You have two choices: click Accept Mine to accept your change; click Accept Other to accept the other user's change. Figure 7.10. Use the Resolve Conflicts dialog box to choose between a change made by you and one made by another user. 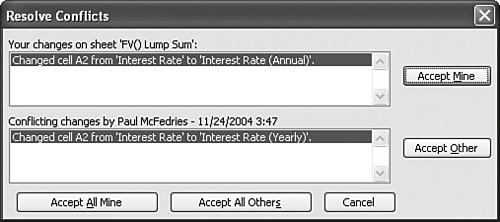
To control how Excel handles conflicts, follow these steps: 1. | Select Tools, Share Workbook to display the Share Workbook dialog box.
| 2. | Display the Advanced tab.
| 3. | Select one of the following options:
Ask Me Which Changes WinWhen you activate this option, Excel displays the Resolve Conflicts dialog box.
The Changes Being Saved WinWhen you activate this option, Excel automatically accepts your changes.
It's Better to Resolve Conflicts Collaboration is all about cooperation, so it's always good practice to display conflicts in the Resolve Conflicts dialog box so that you can make an intelligent choice about which change to accept. Therefore, only activate The Changes Being Saved Win option as a last resort. |
| 4. | Click OK.
|
|


