| Now that your form is set up with the design-time properties you need, you can get down to the brass tacks of form design. In other words, you can start adding controls to the form, adjusting those controls to get the layout you want, and setting the design-time properties of each control. I discuss the unique characteristics of each type of control later in this chapter (see the section "Types of Form Controls"). For now, though, I'll run through a few techniques that you can apply to any control. Inserting Controls on a Form The new form object is an empty shell that doesn't become a useful member of society until you populate it with controls. As with the form-building tools in Word and Access, the idea is that you use this shell to "draw" the controls you need. Later, you can either link the controls directly to other objects (such as Excel worksheet cells ) or create procedures to handle the selections. The Toolbox contains buttons for all the controls you can add to a form. Here are the basic steps to follow to add any control to the form: -
Click the button you want to use. -
Move the mouse pointer into the form and position it where you want the top-left corner of the control to appear. -
Click and drag the mouse pointer. VBA displays a gray border indicating the outline of the control. -
When the control is the size and shape you want, release the mouse button. VBA creates the control and gives it a default name (such as CheckBox n, where n signifies that this is the n th check box you've created on this form). tip  | If you want to add multiple instances of the same type of control, double-click the appropriate Toolbox button. The button will remain pressed, and you can draw as many instances of the control as you need. When you're done, click an empty part of the Toolbox to reset the control. |
Selecting Controls Before you can work with a control, you must select it. For a single control, you select it by clicking it. If you prefer to work with multiple controls, the Visual Basic Editor gives you a number of techniques: -
Hold down the Ctrl key and click each control. -
You also can "lasso" multiple controls by clicking and dragging the mouse. Move the mouse pointer to an empty part of the form, hold down the left button, and then click and drag. The VBE displays a box with a dashed outline, and any control that falls within this box (in whole or in part) will be selected. -
To select every control, make sure the form is active and then select Edit, Select All. (For faster service, you can also either press Ctrl+A or right-click an empty part of the form and choose Select All from the shortcut menu.) To exclude a control from the selection, hold down the Ctrl key and click inside the control. After you've selected multiple controls, you can set properties for all the controls at once. Note, however, that the Properties window will show only those properties that are common to all of the controls. (See "Common Control Properties" later in this chapter.) Not only that, but if you size, move, copy, or delete one of the selected controls (as described in the next few sections), your action will apply to all of the controls. Each control is surrounded by an invisible rectangular frame . When you select a control, the VBE displays a gray outline that represents the control's frame and this outline is studded with white selection handles at the frame's corners and midpoints, as shown in Figure 13.2. Figure 13.2. A selected control displays a frame and various selection handles. 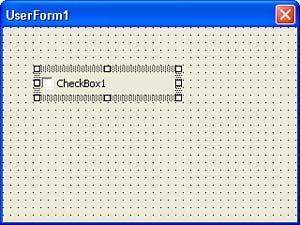 Sizing Controls You can resize any control to change its shape or dimensions. The following procedure outlines the steps to work through: -
Select the object you want to size. -
Position the mouse pointer over the selection handle you want to move. The pointer changes to a two-headed arrow. To change the size horizontally or vertically, use the appropriate handle on the middle of a side. To change the size in both directions at once, use the appropriate corner handle. -
Click and drag the handle to the position you want. -
Release the mouse button. The VBE redraws the object and adjusts the frame size.  | To size the form itself, click an empty part of the form and then click and drag the selection handles that appear around the form. |
Moving Controls You can move any control to a different part of the form by following these steps: -
Select the control you want to move. -
Position the mouse pointer inside the control. (You can also position the pointer over the control's frame, although you need to make sure the pointer isn't over a selection handle. In this case, the pointer changes to a four-headed arrow.) -
Click and drag the control to the position you want. As you drag the object, a dashed outline shows you the new position. -
Release the mouse button. The VBE redraws the control in the new position. Copying Controls If you've formatted a control and then decide that you need a similar control, don't bother building the new control from scratch. Instead, follow the steps outlined next to make as many copies of the existing control as you need: -
Select the control you want to copy. -
Hold down the Ctrl key, position the mouse pointer inside the control, and press the left mouse button. The pointer changes to an arrow with a plus sign. -
Click and drag the pointer to the position you want. As you drag the mouse, a dashed outline shows you the position of the copied control. -
Release the mouse button. The VBE copies the control to the new position. tip | | You also can right-click the control and select Copy from the control's shortcut menu. To paste the control, right-click an empty part of the form, and then click Paste. Alternatively, use Ctrl+C to copy a selected control and Ctrl+V to paste it. |
You also can use the Clipboard to copy controls. In this case, you click the control; select Edit, Copy; and then select Edit, Paste. The Visual Basic Editor will add a copy of the control to the form that you can then move to the appropriate position. Deleting Controls To delete a control, select it and then select Edit, Delete. The Visual Basic Editor deletes the control. tip | | To delete a control quickly, select it and press the Delete key. Alternatively, you can right-click the control and select Delete from the shortcut menu. |
Grouping Controls The Visual Basic Editor lets you create control groups . A group is a collection of controls you can format, size, and movesimilar to the way you format, size, and move a single control. To group two or more controls, select them and use any of the following techniques -
Select the Format, Group command. -
Right-click inside any one of the selected controls and select Group from the shortcut menu. -
Click the UserForm toolbar's Group button. The Visual Basic Editor treats a group as a single control with its own frame. To select an entire group, you just need to select one control from the group. | | The UserForm toolbar contains many useful one-click shortcuts for working with forms. To display this toolbar, either select View, Toolbars, UserForm or right-click the Standard toolbar and select UserForm from the shortcut menu. |
To ungroup controls, select the group and use one of these methods : Setting Control Properties Form controls are objects with their own sets of properties. A check box, for example, is a CheckBox object, and it has properties that control the name of the check box, whether it is initially checked, what its accelerator key is, and more. You can manipulate control properties during program execution (in other words, at runtime) either before you display the form or while the form is displayed. (For example, you might want to disable a control in response to a user 's action.) However, you can also set some control properties in the Visual Basic Editor (in other words, at design time) by using the Properties window. To display a particular control's properties in the Properties window, you have two choices: Common Control Properties Later in this chapter I'll run through each of the default controls and explain their unique features. However, a few properties are common to many of the controls. Most of these properties perform the same function as those I outlined for a form earlier in this chapter. These properties include the following: BackColor , ForeColor , SpecialEffect , Enabled , Font , Picture , PicturePosition , Height , Width , Left , and Top . (Note that the latter two are relative to the left and top edges of the form.) Here's a list of a few other properties that are common to some or all of the default controls: Accelerator This property determines the control's accelerator key. (In other words, the user will be able to select this control by holding down Alt and pressing the specified key.) The letter you enter into this property will appear underlined in the control's caption. tip | | Some controls (such as list boxes and text boxes) don't have a Caption property. However, you can still assign an accelerator key to these controls by using a Label control. I'll show you how this is done when I discuss labels in the section "Types of Form Controls." |
AutoSize If this property is set to True, the control resizes automatically to fit its text (as given by the Caption property). BackStyle Determines whether the control's background is opaque (use fmBackStyleOpaque ) or transparent (use fmBackStyleTransparent ). ControlSource In the Visual Basic Editor for Excel, this property specifies which cell will be used to hold the control's data. You can enter either a cell reference or a range name. Caption Sets the control's text. caution  | The value of a cell linked to a control changes whenever the value of the control changes, even when the user clicks Cancel to exit the form. It's usually better (and safer) to assign the value of a control to a variable and then, if appropriate, place the value in the cell under program control. |
ControlTipText Sets the "control tip" that pops up when the user lets the mouse pointer linger over the control for a second or two. Locked Set this property to True to prevent the user from editing the current value of the control. TabIndex Determines where the control appears in the tab order (in other words, the order in which VBA navigates through the controls when the user presses the Tab key). See the next section, "Setting the Tab Order." TabStop Determines whether the user can navigate to the control by pressing Tab. If this property is set to False, the user won't be able to select the control using the Tab key. Visible Determines whether the user can see the control (True) or not (False). Setting the Tab Order As you know, you can navigate a form by pressing the Tab key. The order in which the controls are selected is called the tab order . VBA sets the tab order according to the order you create the controls on the form. You'll often find that this order isn't what you want to end up with, so the Visual Basic Editor lets you control the tab order yourself. The following procedure shows you how it's done: -
Select View, Tab Order. (You can also right-click an empty part of the form and select Tab Order from the shortcut menu.) The Visual Basic Editor displays the Tab Order dialog box, shown in Figure 13.3. Figure 13.3. Use the Tab Order dialog box to set the order in which the user navigates the form when pressing the Tab key. 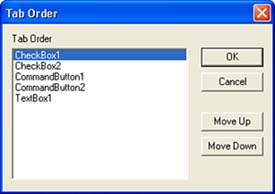 -
In the Tab Order list, highlight the control you want to work with. -
Click Move Up to move the item up in the tab order, or click Move Down to move the control down. -
Repeat steps 2 and 3 for other controls you want to move. -
Click OK. |