| If you want to interact with Outlook from another application, there are a few things you need to do differently. I'll use this section to explain what you need to do. Setting Up a Reference to Outlook In the other application's Visual Basic Editor, follow these steps to set up a reference to Outlook: -
In the Project Explorer, highlight the project you'll be using for the Outlook programming. -
Select Tools, References to display the References dialog box. -
In the Available References list, activate the check box beside the Microsoft Outlook 11.0 Object Library item, as shown in Figure 11.2. Figure 11.2. Use the References dialog box to activate the Microsoft Outlook 11.0 Object Library check box. 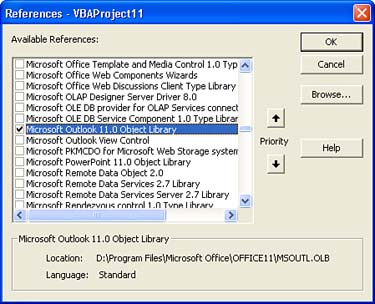 -
Click OK. Remember that this reference only works for the project you selected. If you want to program Outlook from another project (either in the same application or in a different application), you have to repeat these steps. Getting the NameSpace Object When you work with Outlook from another application, you need to start right at the top of the object hierarchy, at the Application object. You use this object to return information about the current Outlook session and to gain access to the rest of the Outlook hierarchy. To establish a connection with this object, you use the CreateObject function. For example, the following statements establish a connection to Outlook: Dim ol As Outlook.Application Set ol = CreateObject("Outlook.Application") Now you need to get a NameSpace object so you can log on and off, return information about the current user , and more. To return a NameSpace object, you use the GetNameSpace method with the "MAPI" argument: Dim ol As Outlook.Application Dim ns As NameSpace Set ol = CreateObject("Outlook.Application") Set ns = ol.GetNameSpace("MAPI") Logging On to an Outlook Session After you have the NameSpace object, you can log on to establish a MAPI session by invoking the Logon method: NameSpace .Logon( Profile, Password, ShowDialog, NewSession ) | NameSpace | The NameSpace object. | | Profile | (optional) The name of the Outlook profile to use in the MAPI session. If you omit this value, VBA logs on to the default profile. | | Password | (optional) The password used with the profile. | | ShowDialog | (optional) A Boolean value that determines whether or not Outlook displays the Logon dialog box. Use False to bypass the dialog box (this is the default); use True to display the dialog box. | | NewSession | (optional) A Boolean value that determines whether or not Outlook creates a new MAPI session. Set this argument to True to start a new session (this is the default); use False to log on to the current session. | In most cases, you'll use the Logon method without any arguments ( assuming that the current NameSpace is represented by a variable named ns ): ns.Logon  | To add, edit, or delete profiles, open the Windows Control Panel and launch the Mail icon. |
If you have multiple profiles set up, however, then you need to specify which one you want to use. For example, the following statement logs on to an Outlook session using the "Personal E-Mail" profile: ns.Logon "Personal E-Mail" Logging Off an Outlook Session When you've completed your labors in an Outlook session, you can log off by running the NameSpace object's Logoff method: NameSpace .Logoff | NameSpace | The NameSpace object. | Listing 11.6 shows a procedure that logs on to a MAPI session, runs through the items in the default Inbox folder, and records the SenderName , SenderEmailAddress , Subject , Size , ReceivedTime , and the first 100 characters of the Body onto a worksheet. To try this code, open Chaptr11.xls from the CD. Listing 11.6. A Procedure That Reads Inbox Data into a Worksheet Sub ReadInboxData() Dim ol As Outlook.Application Dim ns As NameSpace Dim folder As MAPIFolder Dim ws As Worksheet Dim i As Integer ' ' Establish a connection and log on ' Set ol = CreateObject("Outlook.Application") Set ns = ol.GetNamespace("MAPI") ns.Logon ' ' Get the default Inbox folder ' Set folder = ns.GetDefaultFolder(olFolderInbox) ' ' Set the Receive Mail worksheet ' Set ws = Worksheets("Receive Mail") ' ' Run through each item in the Inbox ' For i = 1 To folder.Items.Count With folder.Items(i) ' ' Record the sender, subject, size, ' received time, and some of the body ' ws.[A1].Offset(i, 0) = .SenderName ws.[A1].Offset(i, 1) = .SenderEmailAddress ws.[A1].Offset(i, 2) = .Subject ws.[A1].Offset(i, 3) = .Size ws.[A1].Offset(i, 4) = .ReceivedTime ws.[A1].Offset(i, 5) = Left(.Body, 100) End With Next 'i ' ' Log off the session ' ns.Logoff Set ol = Nothing End Sub | | You'll find Listing 11.6 in the file named Chapter11.xls on my Web site: http://www.mcfedries.com/ABGVBA/Chapter11.xls |
The Absolute Minimum This chapter showed you how to use Outlook's built-in VBA capabilities to program the Outlook object model. You began by understanding how the object hierarchy in Outlook is different than the object hierarchies in the other applications you've programmed. (For example, you start not with the Application object but with the NameSpace object.) From there, you learned quite a few techniques for working with folders, including how to specify folders and how to copy, move, and delete folders. In the rest of the chapter you learned about email messages, particularly how to extract data such as the sender's name and address, the subject line, and the body of the message. You also learned how to send messages (new messages as well as replies and forwards) and work with attachments. I finished by showing you how to access Outlook remotely from other applications. For related information, check out the following chapters: -
Excel's VBA techniques were the subject of Chapter 8, "Programming Excel." -
For another example of working with data remotely, see Chapter 10, "Programming Access Databases." -
To learn more about the useful Immediate window, see Chapter 15, "Debugging VBA Procedures." |
|