Section 4.4. Linking Within a Web Page
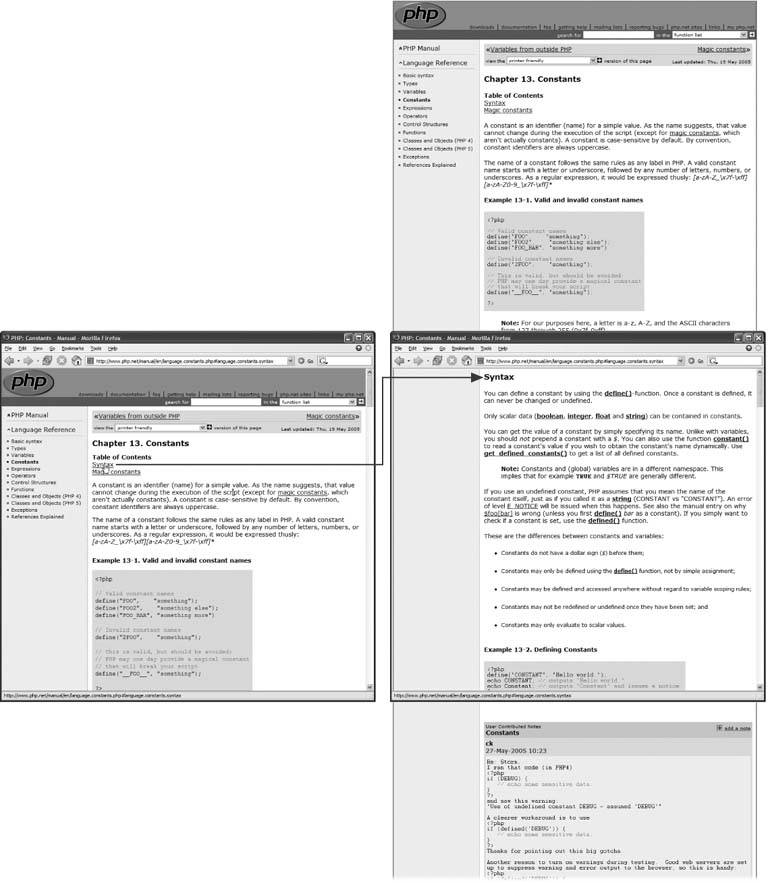
Clicking a link usually loads a Web page into the browser window. But what if you want to link not only to a Web page, but to a specific spot on the page? See Figure 4-8 for an example.
Introducing the named-anchor link , a special link type that's designed to autoscroll to a particular spot on a particular page.
| FREQUENTLY ASKED QUESTION The Mysterious Triple Slashes |
| Why do my links start with file:///? Links that begin with file:/// ( file:///D:/missingmanual/book_site/national_ex/subscribe.html , for example) aren't valid links on the Web. Rather, they're temporary addresses that Dreamweaver creates as placeholders for links to be rewritten later. (A file:/// path tells Dreamweaver where to look on your computer for the file.) You'll spot these addresses when you add document-relative links to a page that hasn't been saved, or when working with files that are outside of your site's local root folder. Suppose you're working on a Web page that will contain your company's legal mumbo-jumbo, but you haven't yet saved it. After adding a document-relative link to your home page, you notice that the path displayed in the Property inspector's Link field begins with file:/// . Since your legal page hasn't yet been saved and therefore doesn't yet have a folder location, Dreamweaver can't create a link telling a browser how to get from it to the home page. So Dreamweaver creates a temporary link, which helps it keep track of what page to link to. Once you save the page somewhere in the site, Dreamweaver rewrites the link in proper document-relative format, and the file:/// disappears. Likewise, when you work with files that are outside of the local root folder, Dreamweaver can't write a proper link. (Any folder outside of the local root folder isn't part of the Web site, and there's no way to write a correct link from nowhere to somewhere.) So, if you save a page outside of the local root folder, Dreamweaver writes all document-relative links on that page as file paths beginning with file:/// . To avoid this invalid link problem, always save your Web pages inside the local root folder or a folder inside of the local root folder. To learn more about root folders and Web sites, see Chapter 13. When you link to a pageor add an image (Chapter 5)that's stored outside of the local root folder, Dreamweaver has the same problem. However, in this instance, Dreamweaver gives you the option of copying the out-of-bounds file to a location of your choosing within the root folder. |
4.4.1. Phase 1: Creating a Named Anchor
Creating a named-anchor link is a two-step process: First add and name an anchor on the page that you're linking to, thus identifying the destination for the link; then, add a link that goes to that named anchor. For instance, in the Table of Contents page example shown in Figure 4-8, you would place a named anchor at the beginning of each chapter section.
Figure 4-8. Some pages may have a lot of information that you'd prefer not to break up into several different Web pages. To make it easy for visitors to jump to a location farther down on the page, you might have a list of contents for that page, which, when clicked (left), jumps down the page to the appropriate section (right).
To create a named anchor:
-
In the document window, click where you want to insert the named anchor .
The named anchor is the place where you want the link to jump to.
-
Insert a named anchor .
You can do so using any of three methods : Choose Insert
 Named Anchor; press Ctrl+Alt+A ( -Option-A); or from the Insert bar, select the Common tab and click the Named Anchor icon (see Figure 4-6).
 -
Type the name of the anchor in the Insert Named Anchor dialog box .
Each anchor on a page should have a unique name, something short and easy to remember. No spaces or punctuation marks are allowed. If you violate any of these rules, Dreamweaver will remind you with an error message and strip out any of the offending characters .
-
Click OK to insert the named anchor .
You'll see a gold shield with an anchor on it at the point where you created the anchor. Click this icon to show the name of the anchor in the Property inspector. (If you don't see it, see Section 4.4.3 for details on hiding and showing anchors.)
The Named Anchor icon (the gold shield) is the key to removing or editing the anchor later: just click the icon and press Delete to get rid of it, or click it and change its name in the Property inspector. (Deleting the name in the Property inspector deletes the anchor from the page.)
| FREQUENTLY ASKED QUESTION Adding Objects to the Favorites Tab |
| Help! I'm tired of wading through so many tabs to find all my favorite Dreamweaver objects. How can I see all of my most used objects in one place? Dreamweaver includes a marvelous productivity tool: the Favorites tab. It lets you collect all of your most used objects into a single place, without any interference from HTML tags and objects you never use. Maybe you use the Email link object on the Insert bar all of the time, but never touch the Named anchor object. To add objects to the Favorites tab, right-click (Control-click) anywhere on the Insert bar. From the shortcut menu, choose Customize Favorites to open the Customize Favorite Objects window. All of the objects available in all of the Insert bar categories appear in the left-hand list. Select an object and click the << button to add it to your Favorites. (You can view the objects for just one category by selecting the category from the "Available objects" menu.) Repeat with other objects, if you like. 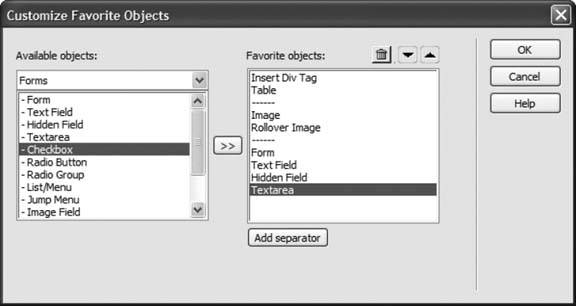 To rearrange the order of the toolbar buttons, click one and then click the up or down arrow to move it left or right on the toolbar. (Buttons at the top of the list appear on the left side of the Insert bar.) You can even use the Add Separator button to insert a thin gray line between buttons on the Insert barto separate one group of similar objects (graphic- related objects, say) from another (such as form objects), for example. Unfortunately, you can't group Favorite objects into submenus. Each item you add is a single button on the Insert bar. To delete a button or separator from the list, select it and then click the Trash icon. Click OK to close the window and create your new list of Favorite objects, which are now available under the Favorites tab of the Insert bar. After you've created your Favorites tab, you can always add more objects (or delete ones you no longer need) by right-clicking (Control-clicking) the Insert bar and choosing Customize Favorites from the shortcut menu. |
4.4.2. Phase 2: Linking to an Anchor
Creating a link to a named anchor isn't all that different from linking to a Web page. Once you've created and named an anchor, you can link to it from within the same Web page, or from a different page.
To link to an anchor on the same page:
-
In the document window, select the text or image you want to make into a link .
For example, drag across some text, or highlight a graphic.
-
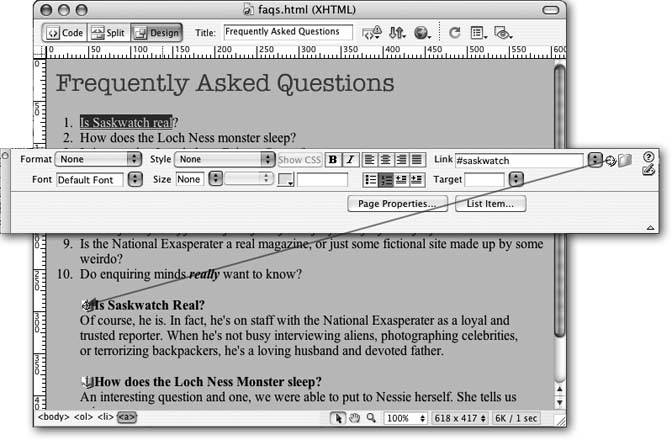
In the Property inspector's Link field, type #, followed by the anchor name. (Alternatively, use the Point-to-File icon, as shown in Figure 4-9.)
The # sign indicates that the link goes to a named anchor. In other words, if you wish to link to an anchor named directions , the link would be #directions .
Figure 4-9. You can use the Property inspector's Point-to-File icon to link to a named anchor on a page. Simply select some text or an image in an open page. Then drag the Point-to-File icon to an anchor on any other open document to set the link. If you can't see the shield icons that mark anchors, see Section 4.4.3 for instructions on how to make them visible.
You can also link from one Web page to a particular location on another Web page in your site. The process is the same as linking to an anchor on the same page, except that you have to specify both the path to the Web page and the name of the anchor:
-
In the document window, select the text or image you want to turn into a link. In the Link field of the Property inspector, type or choose the URL or path of the page you wish to link to .
You can use any of the methods described above: browsing, point-to-file, or typing the path. Unfortunately, if you browse to select the linked file, Dreamweaver doesn't display any anchors on that page, so you need to perform one extra step.
-
Click at the end of the URL or path. Type #, followed by the anchor name .
The Link field should look something like this: contact.html#directions .
4.4.3. Viewing and Hiding Anchors
A named anchor isn't visible in a Web browser; it appears in Dreamweaver as an anchor-on-a-gold-shield icon. Like other invisible elementsline breaks, for instanceyou can hide named anchors in Dreamweaver by choosing View Visual Aids Invisible Elements, or choosing Visual Aids Invisible Elements from the Visual Aids menu in the toolbar (see Figure 8-8 on Section 8.5). (If anchors still dont appear, visit the Preferences window, pictured in Figure 1-8, and in the Invisible Elements category, make sure the Anchor box is turned on.)
| FREQUENTLY ASKED QUESTION Anchors Away |
| When I click a link to an anchor, the Web browser is supposed to go to the page and display the anchor at the top of the browser window. But sometimes the anchor appears in the middle of the browser. What's that about? Web browsers can't scroll beyond the bottom of a Web page, so an anchor near the bottom of a page sometimes can't move to the top of the browser window. If one of your own Web pages exhibits this problem, the fix is simple: just add a bunch of empty linespress the Enter key repeatedly below the last item on the page. You've just added space at the bottom of the page, so the browser can scroll the page all the way to the anchor. |