21.8. Tutorial: Displaying Database Info In this tutorial, you'll continue the work you started in the last chapter. The National Exasperator's online store requires two dynamic pages. The first displays a list of all products available on the site. From that page, visitors can jump to a detailed description of an item for sale by clicking its name . You'll learn how to create both basic and advanced recordsets, and take advantage of some of Dreamweaver's built-in application objects. To get started, download the files and complete the tutorial in Chapter 20. If you haven't yet done this, turn to Section 20.2.1 and follow the instructions for preparing the application server, database, and Dreamweaver for this project.
Note: A PHP/MySQL version of this tutorial is available at www.sawmac.com/dw8/.
21.8.1. Creating a Recordset You'll start by opening an existing page and adding a recordset to it: -
Open products.asp in the root folder of the local site you defined in the previous chapter . Either choose File  Open and navigate to and select products.asp , or doubleclick the file name in the Site Files panel. Open and navigate to and select products.asp , or doubleclick the file name in the Site Files panel. The basic structure of this page is already complete. It was built using tables, image rollovers, Cascading Style Sheets, and the other HTML features you've already learned. There's nothing dynamic about this page yet, so you'll need to create a recordset and insert database information into the page. -
Choose Insert Application Objects Recordset . You can also click the Insert Recordset button on the Application tab of the Insert bar (see Figure 21-1), or click the + button on either the Bindings panel or Server Behaviors panel, and select a recordset from the menu that appears. In any case, the Recordset box should now be on the screen. (Make sure you're using the simple modeyou should see a button labeled Advancedas described on Section 21.1.2.) Next , select the information you want to retrieve. -
Type rsProducts into the Name box . Since Dreamweaver lets you connect to more than one database, you must now indicate which database connection it should use. -
From the Connections pop-up menu, select "connNationalEx." This is the name of the connection you created in the last chapter. The National Exasperator database contains several tables. At this point, you're interested in the Products table and the Vendors table. For this page, you'll create an index of all products for sale. That information is in the Products table. -
From the Tables menu, choose "products." Click Selected . You don't need to retrieve all the information from the Products table. Since this dynamic page will present a listing of all of the products, you need only basic information, like the name of the product, its price, and its inventory status. More details about each product will appear on a second page, to be created later in this tutorial. -
In the Columns list, Ctrl-click (  -click) "prodName," "prodPrice," and "prod-Inventory." -click) "prodName," "prodPrice," and "prod-Inventory." These are the columns of data you want to get from the database. You don't have to filter this recordsetyou can ignore these controls in the dialog boxbut it would be nice if the product names appeared in alphabetical order. -
From the first Sort pop-up menu, choose "prodName." From the second one, choose Ascending . The Ascending option makes certain the records start with products whose names begin with A and end with names that begin with Z. -
Click OK to close the Recordset dialog box. In the Bindings panel (Ctrl+F10 or -F10), click the + icon next to the Recordset icon . The Bindings panel should look like Figure 21-22. -
In the document window, click inside the table cell directly below the one labeled Item for Sale . In this cell, you'll add the name of the item for sale. Figure 21-22. The Bindings panel provides a list of a page's recordsets and data fields. You can use these fields to add dynamic text to a page. 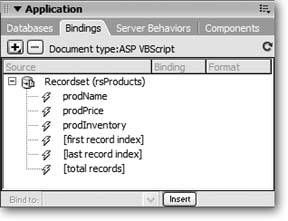 -
In the Bindings panel, click "prodName" and then click Insert . You've just added dynamic data to the page. For the moment, it looks like {rsProducts.prodName}. -
Repeat steps 9 and 10, this time inserting "prodPrice" and "prodInventory" into the remaining two cells . You can also drag an item from the Bindings panel onto the page. At this point, your page should look like Figure 21-23. Figure 21-23. After you add dynamic information to a page, it appears with a blue background. Here, three pieces of dynamic data are added to the page from the rsProducts recordset: rsProducts.prodName, rsProducts.prodPrice, and rsProducts.prodInventory. To change this background color , choose Edit Preferences (Dreamweaver Preferences). Click the Highlighting category and change the Live Data View colors at the bottom of the window. 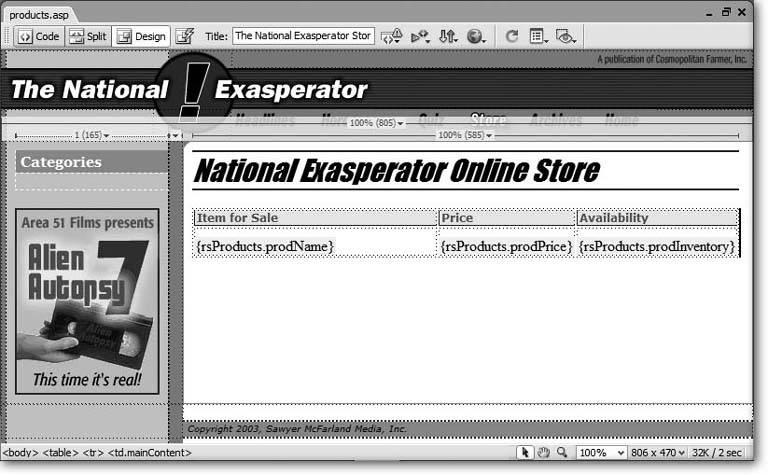
21.8.2. Formatting Dynamic Information Once you've added dynamic data to a page, you can format it so it looks like other text on your page. Dreamweaver lets you apply all the available formatting options that you can to regular text, including Cascading Style Sheets. In addition, Dreamweaver includes some formatting options specific to dynamic information, such as multiple formatting options for dates, currency, and numbers . You'll start by adding some CSS formatting to the page: -
In the document window, click the product name data ({rsProducts.prodName}) . You've just selected the data you want to format. -
In the Property inspector, select ProductInfo from the Style menu . The text is formatted in bold green. -
Repeat steps 1 and 2 for the other two data items, using the ProductInfo style in the Property inspector . Dreamweaver also includes special dynamic-text formatting options for dollar amounts, percentages, and more. That comes in handy now. -
Click the price data ({rsProducts.prodPrice}) on the Web page . Before you proceed, make sure that the Bindings panel is open (Ctrl+F10 or -F10). Notice that the price is highlighted under the recordset. -
In the Bindings panel, click the down-pointing arrow in the Format column. In the shortcut menu that appears, choose Currency 2 Decimal Places (see Figure 21-24) . You've just added a $ sign to the beginning of the price, and ensured that the price always appears with two decimals, like this: $100.00. You can also pick from a variety of different formats for presenting dates. Unfortunately, you can't see the effect of this formatting choice; you see only that cryptic {rsProducts.prodPrice} on the page. You'll get to see the actual formatted price in the next section. Figure 21-24. Data in a database isn't always stored in a format that's attractive. Monetary values are usually stored as numbers9, for example. To get dynamic data into a more understandable format ($9.00, for example), use the formatting options available from the Bindings panel. 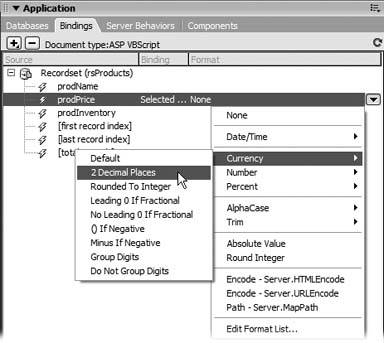
21.8.3. Live Data View and Creating Repeating Regions When you add dynamic data to a page, it doesn't look like much. All you see is the recordset and column name between braces ({rsProducts.prodName}, for example). Not only can this interfere with your design, it certainly doesn't give you a clear picture of what your page looks like. Thank goodness for Dreamweaver's Live Data view: -
Click the Live Data View button in the document window's toolbar (circled in Figure 21-25) . Dreamweaver connects to the testing server and database to retrieve the data requested by the recordset (this may take a few seconds). For the first time, you get to see the page as it will appear on the Web (Figure 21-25). Notice the price formatting; it's just what you specified. Figure 21-25. When you click the Live Data View button (circled) in the document toolbar, Dreamweaver pulls data from the database and displays it in the document window. In addition, a second toolbar appears, between the document and the document toolbar, that lets you control various Live Data view settings. 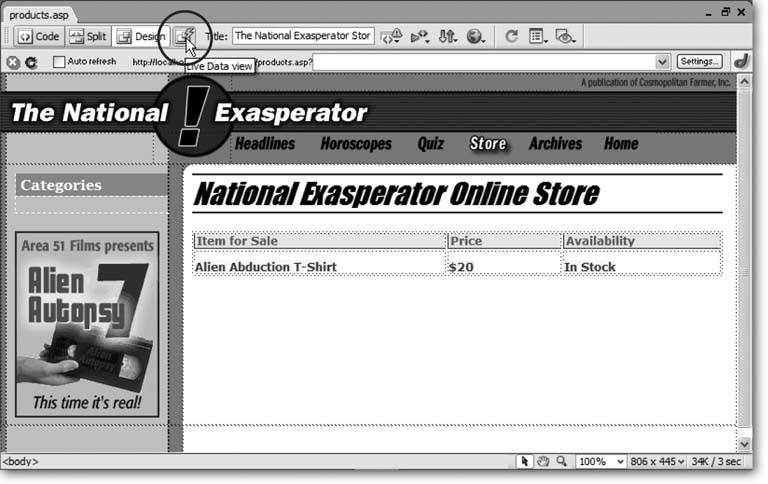
Note: If, when you try the Live Data view, you get an error saying that the page can't be displayed, it's probably because the Web server doesn't have permission to access the database file. For troubleshooting help with this problem, visit www.sawmac.com/dw8/trouble.
But there's a problem: only one item's listed. This page is meant to show listings for all products. You have yet to create a repeating regiona part of the page that repeats for each record in a recordset. -
Move your cursor to the left of Alien Abduction T-Shirt until the right-pointing arrow appears, and then click . That's how you select the bottom row of the table. (For other methods of selecting a table row, see Section 7.5.) Since this row displays the info for a single product, it's a perfect candidate for a repeating region, where an additional row appears in the table for each product. -
On the Application tab of the Insert bar, click the Repeated Region button (see Figure 21-1) . The Repeat Region dialog box (Figure 21-12) appears, so that you can select which recordset to use (if the page has more than one) and how many records to display. In this case, since you have only one recordset, you just have to tell Dreamweaver how many records to show. -
In the Records at a Time box, type 9 . Click OK . You don't know how many products the National Exasperator offers at any time. If it were a lot, you wouldn't want to show them all on a single pagea thousand listings would make a pretty long Web page. In this case, just list nine records at a time. If the database has more than nine products, you need to provide a way for people to see the other items. You'll do that next. -
Click to the right of the table that lists the products and press Enter to create a new paragraph. Then, in the Application tab of the Insert bar, click the Recordset Paging button and select Recordset Navigation Bar from the menu (see Figure 21-14) . The Recordset Navigation dialog box appears. There's only one thing to do here. -
Make sure the Text button is selected; click OK . Dreamweaver plops a table containing four columns onto the page. The columns contain links that let visitors navigate the product listings. The table will look better if it's aligned to the left side of the page. -
In the document window, select the table. From the Align pop-up menu in the Property inspector, choose Default. Set the width of the table to 200 pixels . For techniques on selecting a table, see Section 7.5. (Tables are left-aligned by default, which is why you chose Default.) -
Click directly above the new table Dreamweaver just inserted; click the Recordset Navigation Status button (see Figure 21-1) . Dreamweaver inserts something that looks like this: Records {rsProducts_first} to {rsProducts_last} of {rsProducts_total} . That's placeholder code for this notation: "Records 1 to 9 of 21." Now for a touch of formatting. -
Select the paragraph Dreamweaver just inserted. In the Property inspector, select ProductInfo from the Style Menu . You've just formatted the paragraph with the ProductInfo CSS style. (While you're at it, apply the same style to the four parts of the Recordset Navigation BarFirst, Previous, Next, and Last, if you like.) -
Press F12 to preview the page in your Web browser . The page opens in a Web browser displaying nine records (see Figure 21-26). Figure 21-26. Building dynamic Web pages in Dreamweaver is easy. In just a few short stepsall right, 27 stepsyou can create pages for viewing database records. (You can click the Next link at the bottom of the page to jump to the next set of product listings.) 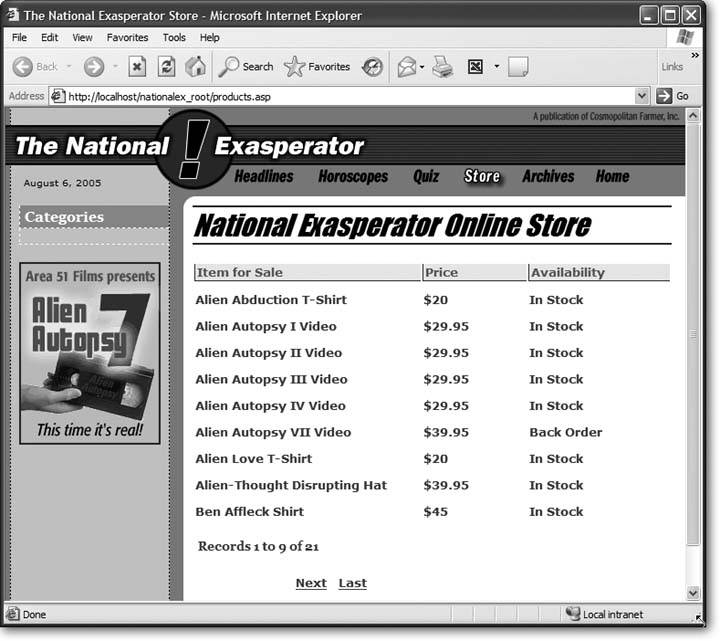
21.8.4. Editing a Recordset and Linking to a Detail Page Now that the main Products listings page is complete, you need to create a link to the name of each product that, when clicked, opens a page with the details for that item: -
Open the Server Behaviors panel by pressing Ctrl+F9 ( -F9), or clicking the Server Behaviors tab in the Application panel group . A list of all the different server behaviors appears; these were added when you created a recordset, put dynamic text on the page, and used Dreamweaver's other dynamic-page-creation tools. (Server behaviors are discussed in depth in Chapter 23.) Instead of adding another server behavior at this point, you can edit one you've already created: the recordset. When you first added this recordset, an important piece of information was missingthe product's ID number. (Actually, it was omitted from the tutorial intentionally, so that you'd now have this engaging educational opportunity to learn how to edit a recordset.) Each product has its own ID number, which you'll use to tell the Details page which item to display. -
Double-click "Recordset (rsProducts)" in the Server Behaviors panel to open the Recordset dialog box . -
Ctrl-click ( -click) "prodID" in the columns list, and then click OK . You've just added one additional column (prodID) to the recordset. Now the recordset not only retrieves the name, price, and posted dates for each product, but also its unique ID number. -
In the document window, select the dynamic data containing the product's name: "{rsProducts.prodName}." A simple link to an already created Web page doesn't work here. Since the page containing a product's details is dynamicit changes based on which product is being viewedyou need one of Dreamweaver's server behaviors. -
From the Application tab of the Insert bar, choose Go To Detail Page (see Figure 21-1) . The Go To Detail Page dialog box appears (Figure 21-27). This window lets you create a special link to a dynamic page. Although each item listed on the main products page links to the same Details page, each link includes additional information telling that page which product to display. Figure 21-27. The Go To Detail Page server behavior makes it easy to create a link that passes URL parameters, Form data, and other necessary information to detail page. This behavior is discussed in depth in Chapter 23. 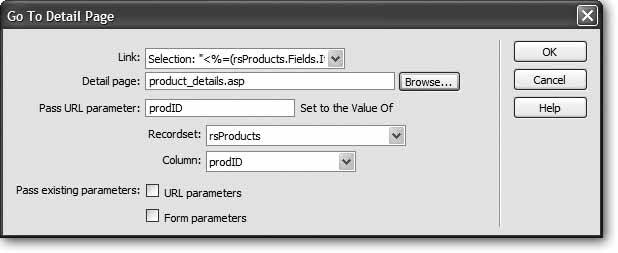 -
Click the Browse button. Select the file product_details.asp . This is the page that displays the detailed records of each product. All the other settings should already be filled out and should resemble Figure 21-27. -
Click OK to close this window . And now to make sure everything works: -
Press the F12 key to preview the page in your Web browser. Click the Alien Thought-Disrupting Hat link . The detail page loadswithout any details! You'll get to that step in a moment. In the meantime, look at the URL in the Web browser's Address bar. It should look something like this: http://localhost/nationalex_root/product_details.asp?prodID=12 . Notice the ?prodID=12 tagged onto the page product_details.asp . That's the information the details page needs to retrieve the proper product information. The two pieces of informationprodID and 12are what's called a key/value pair. The key, prodID, tells the details page which field to look in, while the value, 12, identifies a particular product with a product ID of 12. -
Save and close this page . 21.8.5. Building the Detailed Product Page In this part of the tutorial, you'll build a detail page that displays all the details for a particular product. In addition, you'll create an advanced recordset that combines information from two separate database tables: -
Open the file called product_details.asp in the root folder of the site . Either choose File Open and navigate to and select product_details.asp , or double-click the file name in the Files panel. Since this page displays the details for a product, it must retrieve data from the database. To set this up, start by creating a recordset. -
Click the Insert Recordset button on the Application tab of the Insert bar (see Figure 21-1) . You can also choose Insert Application Objects Recordset. Or click the + button on either the Bindings panel or Server Behaviors panel, and then select recordset from the pop-up menu. In any case, the Recordset dialog box should now be open. The National Exasperator database contains several database tablesone for product information, one for vendor information, one that lists the different product categories, and one that contains user information ( user names and passwords). The detail page incorporates information from the Products table and the Vendors table, so that it can reveal both the description of the product and information about its manufacturer. Because the basic panel of the Recordset dialog box doesn't let you retrieve information from more than a single database table, you must use the advanced setting. -
Click the Advanced button on the right side of the Recordset window . The Advanced Recordset dialog box appears. Unfortunately, this isn't one of the areas in which Dreamweaver is particularly user-friendly. It helps to understand SQL (see Section 21.1.6.1)or you can just take the following steps. -
In the Name field, type rsDetails . From the Connection menu, choose "connNationalEx." In the next few steps, you'll create an SQL queryessentially a line of programming code that asks the database for particular information that matches specific criteria. In this case, it's the information for a particular product. -
Click the + icon (flippy triangle) next to the word Tables in the Database Items list (at the bottom of the dialog box) . It expands to reveal the four tables of the database: Category, Products, Users, and Vendors. -
Click the + icon (flippy triangle) to expand the Products table . Your job is to select the information from this table that you want to display on the page. -
Select "prodID"; click the Select button to the right . Notice that Dreamweaver writes SELECT prodID FROM products in the SQL box. This is SQL code for selecting a particular column of data from a table. You can now choose the other pieces of information. -
Repeat step 7 for the following items in the Products table: prodName, prodPrice, prodInventory, prodDesc, imagePath . These are all the items you need to retrieve from the Products table. Now you can choose data from the Vendors table.
Note: Once you understand SQL, you can bypass this point-and-click approach and simply write a SQL query directly in the SQL box.
-
Click the + icon (flippy triangle) to expand the Vendors table. Repeat step 7 for the vendorName item in that table . The dialog box should now look like Figure 21-28. Congratulations, you've just created a basic SQL query. But there's a problem here: Because of this query's structure, it retrieves all the records for both tables. To remedy the situation, you must do two things: first, combine information from two tables so that you get the vendor information for the corresponding product; and second, retrieve only the information for the particular product specified by the link you created in the last part of this tutorial. Figure 21-28. The Advanced option of the Recordset window lets you use a data tree to build an SQL statement. By selecting a column name and clicking either the SELECT, WHERE, or ORDER BY buttons , you can get Dreamweaver to do some of the heavy lifting . Unfortunately, you still need to understand a little bit of SQL to create functioning database queries using these advanced options. See Section 21.1.6.1 for a brief introduction to SQL. 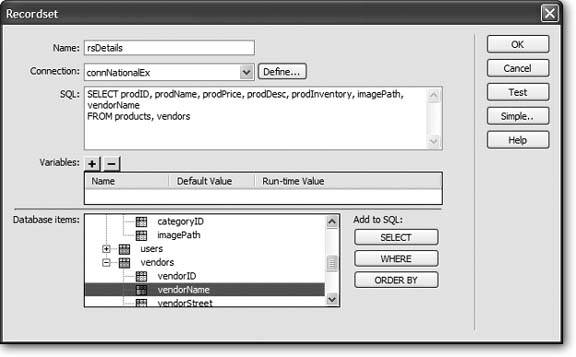 -
Click inside the SQL box after the word "vendors." Press Enter or Return . You'll have to dive into typing out SQL code. -
Type WHERE (products.vendorID = vendors.vendorID) . This little bit of code is called a WHERE clause , and it helps filter information in a database. In this instance, you've created what's called a join a statement that joins two or more tables together. When you retrieve product information, you also want to retrieve the name of the vendor who manufactures that product. By matching the vendor ID from the Products table to the identical vendor ID in the Vendors table, the database can produce the proper vendor name. If your eyes are glazing over, go get a cup of coffee before plunging ahead. -
Click the + button to the right of the word Variables . You've just created a new SQL variable. You're about to expand on the WHERE clause you just wrote. Not only do you need to get the details of a product (plus the vendor's name), you also want to retrieve just a single recordthe particular product whose details the visitor wants to review. -
Click in the Name column and type product . Type 1 for Default Value. And, type Request.QueryString("prodID") for the Runtime Value . Look back to step 8 in "Editing a Recordset and Linking to a Detail Page" (see Section 21.8.5). Remember that the ID number for the product is embedded in the URL. In other words, when someone clicks a link on the main product listings page, the ID number for the product is passed along like this: product_details. asp?prodID=12 . In this step, you're retrieving that information from the URLthat's the Request. QueryString("prodID") partand storing it in a variable that you'll use in the rest of the SQL query. -
Return to the SQL box. At the end of the WHERE clause (after the closing parenthesis), type AND (products.prodID = product ) . The Recordset window should now look like Figure 21-29. Figure 21-29. In the Advanced settings of the Recordset window, you can create more detailed SQL queries that can retrieve and merge information from multiple database tables. 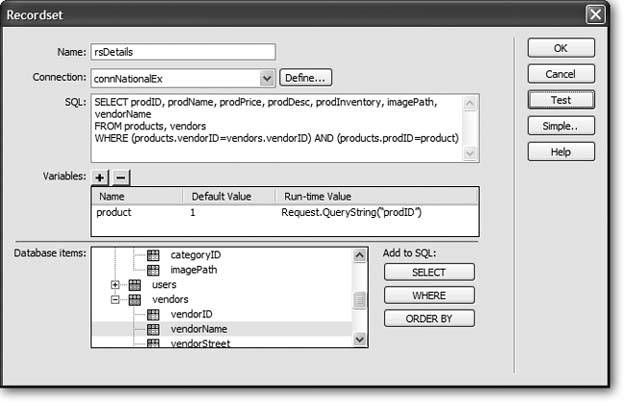 -
Click the Test button . A Test SQL Statement window opens, containing a single record. Hallelujah: It includes not only product details but also the vendor's name. -
Click OK to close the window. Choose File Save to save your changes . 21.8.6. Filling in the Details Now all you need to do is add the information retrieved in the recordset to the page: -
In the document window, click in the empty space directly above the word Price . You'll add the name of the "for sale" item here. -
Open the Bindings panel . Either press Ctrl+F10 or click the Bindings tab in the Application panel group. -
In the Bindings panel, click the + icon (flippy triangle) next to the recordset to display all the columns retrieved in the recordset. Select "prodName," and then click Insert . That data appears in the document window. Next, you'll try the drag-and-drop method of inserting dynamic data. -
In the Bindings panel, drag "prodPrice" into the document window, just to the right of the text Price : At this point, you might want to format the price, as you did in step 5 on Section 21.8.3. -
Continue adding content to this page using these same steps . Add the description, inventory status, and vendor name in the appropriate places in the document window. To finish off this page, add a photo in the area to the left of the product info. -
Click in the empty table cell that's to the left of the cell with the product information. In the Common tab of the Insert bar, click the Image button or choose Insert Image . The Insert Image window appears. You've encountered this dialog box many times before when you inserted a graphic (see Chapter 5). However, in this case, you'll retrieve the path to the image from the database. -
Select the Data Sources radio button . The window should now look like Figure 21-30. A list of all of the different data items from the recordset appears. See the item labeled "imagePath?" The database stores the path to an image for each product in the database. This is the path that the page uses when it displays the graphic. -
Select "imagePath"; click OK. (If the Image Tag Accessibility Attributes window appears, just click OK to dismiss it.) A little square icon appears in the document window. -
Click the Live Document View button. If everything looks good (Figure 21-31), choose File Save . To see the results of your hard work, open the products.asp page in Dreamweaver and press the F12 key (option-F12) to preview the page in a browser. Now click a link to see the details for that product.
Note: If your local root folder isn't the same as your testing server, you need to move your files from the root folder to the testing server to preview these dynamic pages. See Section 15.2 for more details on transferring files.
Figure 21-30. Paths for links and images needn't be hardwired into a Web page. You can retrieve paths for images and links from a database source. In this case, depending on which product's currently on display, a different product image appears on the page. 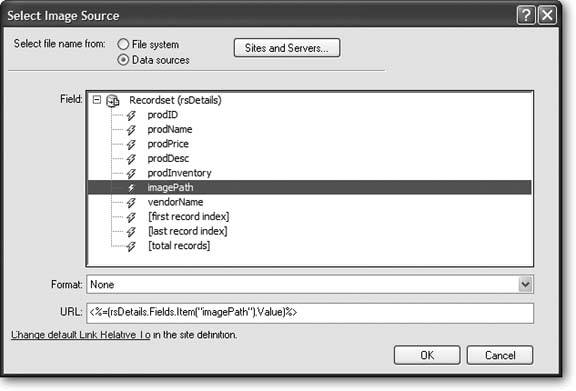
Figure 21-31. You can preview additional records by modifying the URL that appears just below the document toolbar (circled). In the box just to the right of product_details.asp?, type: prodID=12. The information for the product with ID number 12 appears. Try other numbers to view other products. 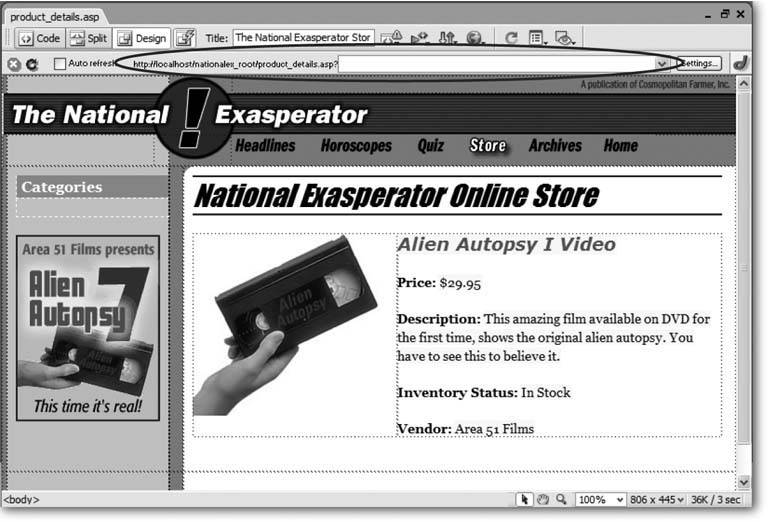
21.8.7. Operators Standing By One final touch would make the products page perfect. Each product sold at the National Exasperator online store belongs to a categoryshirts, videos , books, weird stuff, and so on. Shoppers might find it useful to view a list of just what they're looking forjust the books, for instance. Since category information is stored in the database, you can use this info to create such a feature. In this final part of the tutorial, you'll add a category navigation bar along the left side of the products page, so that when a visitor clicks a category name, a list of the products within that category appears: -
Open the products.asp page . This is the page to which you add the category links. The first step is to add a new recordset that retrieves all of the category names from the database. -
Click the Insert Recordset button on the Insert bar's Application tab (see Figure 21-1) . You can also choose Insert Application Objects Recordset. Or click the + button on either the Bindings panel or Server Behaviors panel, and then select Recordset from the pop-up menu. In either case, the Recordset dialog box opens. (You may need to click the Simple button to switch the Recordset dialog box out of advanced mode.) -
From the Connections pop-up menu, select "connNationalEx." This is the same connection you've used throughout this tutorial. In this case, you're going to retrieve information from a different table in that database. -
Select Category from the Table menu . The Category table is very basic: just a name and ID number. The Products table identifies a category by using a Category ID numberthe table's categoryID field. You may wonder why a separate table's even necessary. Why not just store the category name with the product information? This design has two advantages. First, because the table's just a list of category names, you can easily retrieve an alphabetized list of those names by creating a recordset. That ability's useful, for example, when you want to add a list of categories to a pageas in these tutorial steps. In addition, the separate category table makes changes to categories easier. If you decide you want to change a namesay "Strange stuff" to "Rare and unique"you need to update it only in one record in the Category table. If "Strange stuff" were stored in the Products table, you would then have to change the name to "Rare and unique" in potentially hundreds of records. -
Make sure the All radio button is selected, and then choose "categoryName" from the Sort box . At this point, the dialog box should look like Figure 21-32. Figure 21-32. By storing all the product category names in a single table, you can build a dynamic category navigation bar with the help of a simple recordset. 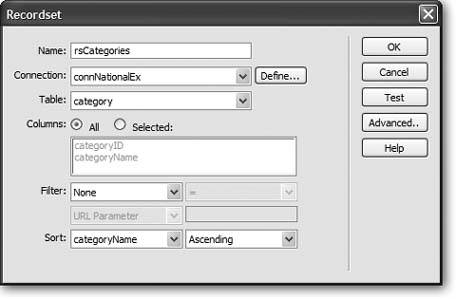 -
Click OK to apply the recordset to the page . Now the page has two recordsetsone to retrieve product info, the other to retrieve the list of categories. You'll add the category name to the page next. The Bindings panel should look like Figure 21-33 (if the Bindings panel isn't open, press Ctrl+F10 ( -F10). Figure 21-33. The Bindings panel displays all recordsets currently applied to a page. To hide the recordset's field names, click the sign (arrow on the Mac) to the left of the recordset icon. 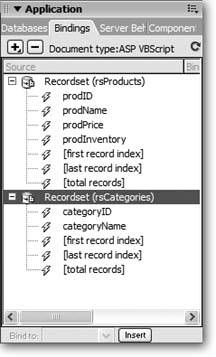 -
From the Bindings panel, drag "categoryName" to the empty space just below the word "Categories" in the Document window . This adds the dynamic text for the category name to the page. Next, you'll add a repeating region so that all the category names appear.
Note: You'll probably notice that step 8 makes the sidebar bump out into the main area of the page. This happens because Dreamweaver is currently using the long-winded placeholder name rsCategories. categoryName . When the real category names (which are much shorter) appear on the real Web page, the sidebar returns to its normal width.
-
Make sure the dynamic text you just added is still selected in the Document window, and then, on the Application tab of the Insert bar, click the Repeated Region button (see Figure 21-1) . The Repeat Region dialog box (Figure 21-12) appears, so that you can select which recordset to use. Since there are now two recordsets on this page, you need to pick the appropriate one. -
Select "rsCategories" from the menu. Click the All records radio button, and then click the OK button to create the repeating region . If you preview the page at this point, you see a list of categories along the left side of the page. To make this list a functional navigation bar, you'll add a Go To Detail Page server behavior. -
If the dynamic text you added in step 8 isn't still selected in the document window, click to select it . You'll add a link to this text using the Go To Detail Page server behavior. -
From the Application tab of the Insert bar, choose Go To Detail Page (see Figure 21-19) . The Go To Detail Page dialog box appears. This window lets you create a special link to another dynamic pagein this case a page that lists all the products in a particular category. -
Click the Browse button. Select the file categories.asp , and then select "rsCategories" from the Recordset menu . Dreamweaver fills out all the other settings (Figure 21-34). -
Click OK to close this window . And now you'll preview the page to make sure everything's working. -
Press F12 (Option-F12). When the page opens, click any of the category names at the left side of the page . A new page should open, listing all of the products within a particular category, as shown in Figure 21-35. Figure 21-34. The categories.asp page, linked to in this case, is a dynamic page that's already been created. Essentially it's built just like the products.asp pagethe only difference is that the products recordset has an added filter that only retrieves records that match a particular category ID. 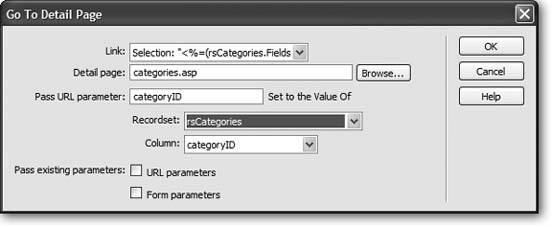
Figure 21-35. The Go To Detail Page server behavior isn't limited to linking a page that lists just one record. It can provide the information necessary to retrieve any number of database records that meet certain requirementsin this case, all records that match a particular category. 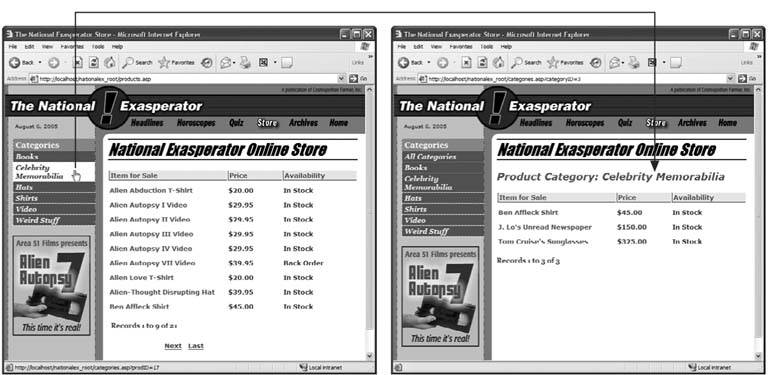
Congratulations! You've just built two powerful, complex, dynamic Web pages (and probably watched three presidential administrations pass). As you can see, Dreamweaver has an impressive array of tools for building dynamic pages. And even though there were some twists and turns to negotiate, you never once had to resort to the dreaded Code view. |