Section 21.6. Master Detail Page Set
When you build a database-driven Web site, you often want to give your visitors both an overview and a detailed view of information. Usually, it takes two separate Web pages to do the job: one that lists limited information about all the records in a recordset, and one that links to a second page with detailed information about a single record. Dreamweaver calls these master and detail pages and gives you a tool for making quick work of this task. Figure 21-17 shows you how these pages work together.
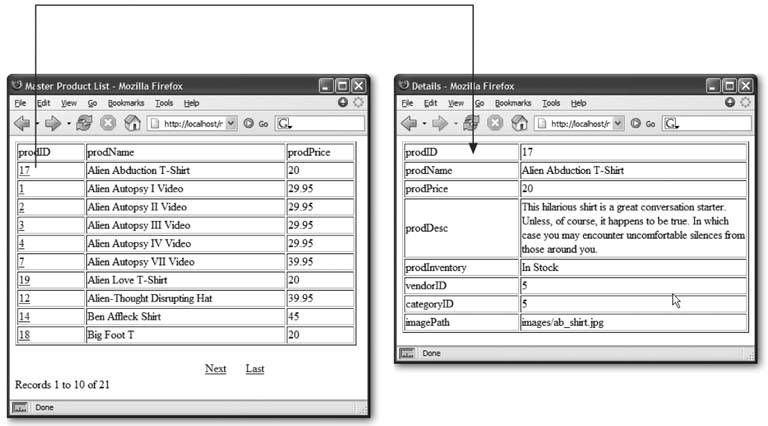
Figure 21-17. An example of Dreamweaver's Master Detail Page Set. The screen on the left represents a master pagea list of items retrieved from a recordset. Clicking a link on this page opens a detail page (right), which displays the details of a single record.
The Master Detail Page Set object automates the process of creating dynamic tables and recordset navigation bars, as well as adding many different server behaviors to your pages. In fact, there's nothing this tool does that you can't do (albeit more slowly) with the other tools you've learned about in this chapter.
Note: The Master Detail Page Set object isn't available for the ASP.NET server model.
To create a Master Detail Page set, follow these steps:
-
Create two Web pagesone for the master page and another for the detail page .
They can be new, blank pages or existing pages that require the dynamic information from the database. It helps to use descriptive names for these pages, such as productIndex.asp and productDetails.asp . (Save each page with an extension appropriate for the server model you're using: .asp, .cfm, .php, or .jsp.)
-
Open the master pagethe one listing all the recordsand add a recordset to it .
This recordset must include not only all the columns to be displayed on the master page, but also all the columns to appear on the detail page. Both pages use the same recordset, so this one recordset must retrieve all the information you want on both pages.
-
In the Application tab of the Insert bar, click the Master Detail Page Set button (see Figure 21-1) .
You can also choose Insert
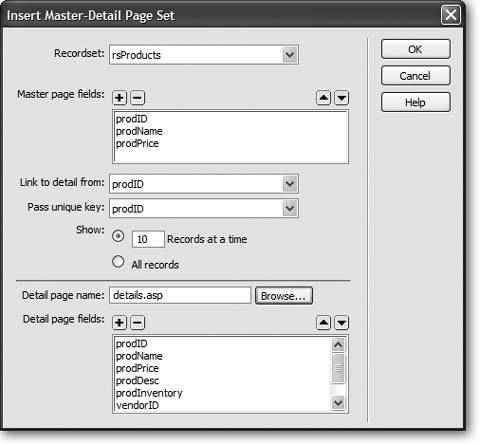
 Application Objects Master Detail Page Set. Either method opens the Insert Master-Detail Page Set window (see Figure 21-18).
 Figure 21-18. The Insert Master-Detail Page Set window lets you quickly create two common types of dynamic pages: one that lists many records in a database, and another that shows detailed information about a single database record. Unfortunately, this tool is not available in the ASP.NET server model in Dreamweaver.
-
From the Recordset pop-up menu, chose the name of the recordset you created in step 2 .
-
Select the fields (database columns) you wish to appear on the master page .
You'll probably remove a bunch of columns from the "Master page fields" box, since most of the information's reserved for the detail page. To remove a column, click its name to select it and then click the button. (If you accidentally delete a column, click the + button to add it back.) You can also change the order of the columns by selecting a column name and then clicking the up or down arrow buttons . The order the fields are listed in the box dictates the order in which they appear on the master page.
-
From the "Link to detail from" pop-up menu, choose a column .
Here you're determining which item on the master page is linked to the detail page. In Figure 21-17, each product's ID number has a link to the detail page. If you're creating a staff directory, you might select the column that contains each staff member's name. In this way, visitors can click a name to see a page with that staff person's details.
-
Using the "Pass unique key" field, select a column .
Choose a column that uniquely identifies a single record in the database, such as a product identification number or Social Security number. In most cases, this is the primary key in a database table (see Section 20.3.2 for more on primary keys).
-
Select how many records you wish to show .
You can either type a number into the "Records at a time" box or select "All records."
-
Click Browse. Select the detail page you created in step 1 .
In this step and the next , you're defining the detail page and what information appears on it.
-
Select the fields you wish to display on the detail page .
The process is the same as step 5, but in this case, you'll probably include most, if not all, of the columns. After all, the detail page is where most of the information for an individual record shows up.
-
Click OK to close the window and create the pages .
It may take a few moments for Dreamweaver to complete this step. It's adding a lot of code to both the master and detail pages.
Once completed, you can (and should) modify the tables, format the dynamic items, and design the page to your liking. Because the Master Detail Page Set tool just automates the process of adding repeating regions , recordset navigation bars, and other server behaviors, you must edit those items individually on the page. In other words, you can't return to the Insert Master-Detail Page Set window (Figure 21-18) to alter items on either page. For example, if you decide to remove a piece of dynamic information from the detail page, you must make this change on the detail page itself.
While the Master Detail Page Set tool makes building these types of pages a snap, it does have its drawbacks. The primary problem is that Dreamweaver uses the same recordset for both the master and detail pages. This can slow down the works, because even though you may want to display only a few columns of data on the master page (the prodName, prodID, and prodPrice fields in Figure 21-17), the recordset added to the page must retrieve all of the information the detail page needs. The database server is doing a lot of extra work retrieving unused data. However, there is a workaround: after creating the master and details pages, return to the master page , edit the recordset, and then select only the fields that that page uses. (Editing recordsets is described on Section 21.1.8.)
Although the Master Detail Page Set makes quick work of creating these types of pages, you can do all the same tasks using the tools you've already learnedrepeating regions, recordset navigation bars, and so onwith the added benefit of greater design flexibility. For an example of creating a more complex master and detail page set by hand, complete the tutorial at the end of this chapter.