12.2. Flash Elements Flash elements are essentially prebuilt Flash movies that you can customize within Dreamweaver. Dreamweaver comes with only one Flash element (Image Viewer), but the Insert bar has an entire tab dedicated to this feature.
Note: If you'd like to build your own Flash elements, check out this useful tutorial: www.macromedia.com/devnet/mx/dreamweaver/articles/flash_elements.html.
Image Viewer is essentially a Flash slideshow. You can add your own photos to the Flash movie; add titles, captions, and links; and choose from a variety of groovy transition effects to make the change from photo to photo more entertaining (see Figure 12-4). Sorry to say, unlike most aspects of Dreamweaver, Flash Elements don't have a user -friendly dialog box. You have to use Dreamweaver's Tag inspector to set the various properties of the Image Viewer, as shown in Figure 12-5: -
Click the page where you'd like to insert the Flash slideshow . The viewer's factory-set size is 400 pixels wide by 325 pixels tall, so you should place it in an open space like a table cell . Alternatively, you could dedicate an entire page to the slideshow and adjust the size settings. Since the Image Viewer is just a Flash movie, you can use the Property inspector to change any of its basic Flash properties as described on Section 12.1.2.1. -
Choose Insert  Media Image Viewer . Media Image Viewer . Or, from the Flash Elements tab of the Insert bar, select Image Viewer (it's the only button there). The Save Flash Element dialog box appears. You'll create a new Flash movie in the next step, so you need to provide a name and choose where you'd like to save this new movie. Figure 12-4. The Image Viewer is the only example of Flash elements that comes with Dreamweaver. This tool lets you create a Flash-based slideshow from your own photos. It includes VCR-like controls for starting, stopping, and stepping through the slideshow. 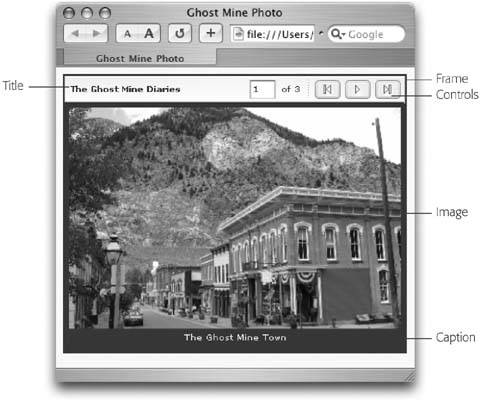 -
Navigate to the folder in your site where you'd like to save this file, enter a name, and then click Save . This process is just like creating any new file in Dreamweaver, like an external CSS file. (Although the names of Flash movie files end in .swf, you don't have to type the extension: Dreamweaver adds it automatically.) After you save the file, you'll see a gray rectangle with the Flash logo in the centerthe generic "Flash on your page" icon. -
Set the properties of the Image Viewer using the Tag inspector (Figure 12-5) . There are a variety of options for controlling the display of the Image Viewer, as described next. Figure 12-5. The Tag inspector temporarily turns into the "Flash element" panel whenever you select a Flash element on the page. It's the only way to set properties for Flash elements. The property names appear in the left column, while the values you give those properties are on the right. You can directly edit any text in this column (type a hexadecimal color code, like #333333 in this example) or use the basic widgets provided (like color boxes and pop-up menus ). 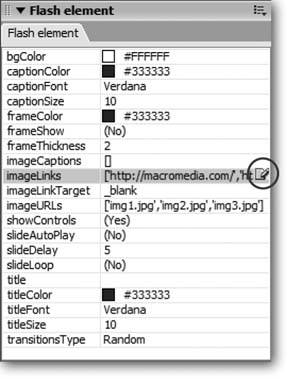
12.2.1. Image Viewer Properties You can control many aspects of the Image Viewer, not just the photos you want to display. The properties fall into three basic categories, and you set them using a variety of methods . Some options have familiar pop-up menus or color boxes; others use pop-up boxes that accept multiple entries (for adding more than one photo to the slideshow, for example). 12.2.1.1. General Image Viewer properties You have the power to determine many visual properties of the Image Viewer, including background color, whether it has a frame around it, and the color of the frame. Here's the rundown: -
bgColor lets you set a background color for the areas of the slideshow outside of the photo. Click the color box to the right and select a color, just as you would elsewhere in Dreamweaver (see Section 1.3.3). -
frameShow offers a simple yes or no choice. Choose Yes if you want a frame around the viewer, No if you don't. -
frameThickness is the thickness of the frame, in pixels. Just click in the box to the right of the property name and type a number. This property (and the next one) works only if frameShow is set to Yes. -
frameColor works just like the bgColor option, except it sets the color for the frame. -
title lets you give your slideshow a name, which appears in the upper-left corner of the viewer (see Figure 12-4). Just click in the box and type a name. Some of the title may get cut off in your final presentation, depending on how long the title is and what font and size you use. -
titleColor, titleFont , and titleSize all have to do with the format of the title. With the titleColor box, you can use any of Dreamweaver's color tools to choose a text color. The titleFont pop-up menu lists all the fonts installed on your computer. Since Flash movies can embed fonts, you can use any of these fontsnot just the select handful normally used on Web pages. For titleSize, specify one in pixels. 12.2.1.2. Image options Of course, the heart of Image Viewer consists of the pictures you add to it. You can choose which JPEG images to use, add captions below each image, and even add individual links to each photo. The viewer comes sized to 400 pixels wide by 325 pixels tall; however, not all of this space is available to your images. Because a small border appears on all four edges of the image, each picture gets only 386 x 259 pixels' worth of space. If your image is wider than this, the viewer shrinks it to fit the available width, and extra space is added to the top and bottom of the view screen. If the photo is taller than 259 pixels, extra space appears on each side of the shrunken image.
Tip: Although the Image Viewer can't use GIF images or "Progressive" JPEG files (a special JPEG that most Web graphics programs can create), you can include Flash movies (.swf files). You could even build a portfolio viewer to display your most interesting Flash animations one by one.
You're not stuck with the default size of 400 x 325, however. You can resize the Image Viewer using the Property inspector just as you would any Flash movie (see Section 12.1.2.1) and give yourself the freedom to include larger images if you want. Note, however, that while the Image Viewer shrinks an image to fit its screen, it won't scale an image up beyond its original dimensions. In other words, if you scale the Image Viewer up to 600 x 400 pixels and include a 100 x 100 pixel image in your slideshow, you won't get an enlarged image filling the larger available space. That's a good thing, since scaling the image larger would cause it to distort and pixellate.
Note: If you plan to keep the Image Viewer at its dainty 400 x 325 pixel size, make sure your images aren't any bigger than that. Although the Image Viewer shrinks larger images to fit, Web browsers still have to download those images, causing unnecessary delays.
There are a variety of settings for adding and controlling images: -
imageURLs specify the paths to the images (JPEG or .swf files). Here's where you specify which images to display. To add images, click the area to the right of the imageURLs label; the Edit Array Values button appears (circled in Figure 12-5). Click this button to open the Edit 'imageURLs' Array window (Figure 12-6). To add an image, click the + button, and then click the folder icon. When the Select File window appears, navigate to and select a JPEG or .swf file, and then click OK. The path to the file appears in the window. You can add more photos by repeating this procedure. To remove a picture or movie from the list, select a URL and click the minus sign () button. To later edit the list of images, just click the Edit Array Values button again. -
imageLinks let you add a link to each image in the slideshow. This feature is optional but could be useful if, for instance, you're a Web designer and use the Image Viewer to display images of your clients ' sites. You could link each image to the actual site on the Internet, creating a live "portfolio." You add links the same way you add images: click to the right of the imageLinks label, and then click the Edit Array Values button; the Edit 'imageLinks' Array window opens. You can add, edit, and delete links just as you did images. But how do you know which link goes with which image? The order of the links in the list corresponds to the order of the images in the imageURLs list. For example, say the second link you add is http://www.myclients_site.com/ and your list of images matches the one in Figure 12-6; in this case, the link would go with the first image summer_vacation.jpg . Figure 12-6. The Edit 'imageURLs' Array window lets you specify which images to add to the Image Viewer. Click the folder icon to open the now familiar Select File dialog box and navigate to the image file on your computer. You can also specify an image using an absolute path like this: http://www.somewebserver.com/somepicture.jpg. Unfortunately, there are no controls for changing the order of the images, so plan carefully . 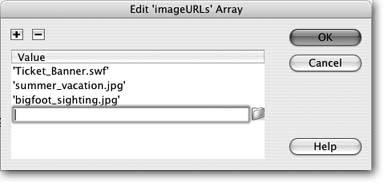 Unfortunately, there are no controls for rearranging these lists. Accordingly, if you want to move an image's position in the slideshow or move its link, you pretty much have to rebuild both lists .
Tip: You can edit the list directly in the Tag inspector, without using the Edit Array Values window. Just click in the area to the right of the property label to highlight the text so that you can edit it.
-
imageLinkTarget lets you specify where links open. For example, you can make it so that when a visitor clicks on an image, the link (which you specified in the imageLinks property) opens in a new browser window. The options are the same as those described on Section 4.2.3. -
imageCaptions lets you add text descriptions that appear below each image (see Figure 12-4). Like imageLinks and imageURLs, imageCaptions are stored in a list, the order of which must match the order of the images. You add captions by clicking in the area to the right of the imageCaptions label and then clicking the Edit Array Values button. You can then add, edit, and remove captions. -
captionColor, captionFont , and captionSize work just like their title counterparts, as described on Section 12.2.1.2. 12.2.1.3. Playback options You can also specify different options for playing back your slideshow: -
showControls lets you show or hide the VCR-like controls that appear at the top of the Image Viewer by choosing Yes or No from the pop-up menu. If you choose No here, the viewer's title (see Section 12.2.1.2) won't appear either. -
slideAutoPlay determines whether the slideshow begins automatically or whether the visitor must push the Play button (see showControls, above) to start it. Yes means the show starts immediately; No means your audience must start it.
Note: If you hide the controls in the showControls setting, you should set the slideAutoPlay option to Yes; otherwise , visitors won't see beyond the first image.
-
slideDelay specifies how long in seconds each slide remains on the viewer screen before the next image appears. -
slideLoop lets the show loop that is, return to the first slide after it reaches the last slide. If you set this option to No, the slideshow simply stops at the last slide. -
transitionsType indicates what kind of transition effect governs the change from image to image. If you're familiar with PowerPoint presentations or basic film-editing software, you've probably encountered such favorites as Wipe, Zoom, and Fade. Try different settings until you find a transition that suits your presentation, or choose Random to have the Image Viewer apply a different transition at random as each slide changes to the next. The Image Viewer is simply a Flash movie. Once you've inserted it, you can change any of its generic Flash properties (see Section 12.1.2.1) using the Property inspector. To delete an Image Viewer, simply select it in the document window and then press the Delete key. |