Section 10.2. Styling Tables
10.2. Styling TablesYou can use many of the CSS properties you've read about to dress up the appearance of a table and its contents. The color property, for example, sets a table's text color, just like anywhere else. You'll find a few properties, however, that are particularly useful with tables, as well as a couple aimed specifically at formatting tables. Because tables are composed of several HTML tags, it helps to know which tag to apply a particular CSS property to. Applying padding to a <table> tag has no effect. The next few sections cover CSS properties for formatting tables and which HTML tags they get along with. 10.2.1. Adding PaddingAs you read in Section 7.2, padding is the space between an element's border and its content. You can use padding to provide a little space between the edges of a paragraph's text and its border. When it comes to tables, the borders are the edges of a cell, so padding adds space around any content you've placed inside of a table cell (see Figure 10-2). It works a lot like the <table> tag's cellpadding attribute, with the added benefit that you can individually control space between a cell's content and each of its four edges. You apply padding to either a table header or a table cell tag, but not to the <table> tag itself. So, to add 10 pixels of space to the inside of all table cells , you'd use this style: td, th { padding: 10px; } You can also control the spacing separately for each edge. To add 10 pixels of space to the top of each table data cell, 3 pixels to the bottom of that cell, and 5 pixels on both the left and right sides, create this style: td { padding-top: 10px; padding-right: 5px; padding-bottom: 3px; padding-left: 5px; } Tip: If you place an image into a table cell using the <img> tag, and notice that there's unwanted space below the image, then set its display property to block (see Section 7.2.4). For more information, see http://developer.mozilla.org/en/docs/Images,_Tables,_and_Mysterious_Gaps . 10.2.2. Adjusting Vertical and Horizontal AlignmentTo control where content is positioned within a table cell, use the text-align and vertical-align properties. Text-align controls horizontal positioning, and can be set to left, right, center , and justify (see Figure 10-3). It's an inherited property. (See Chapter 4 for more on inheritance.) When you want to right align the contents of all table cells, create a style like this: table { text-align: right; } This property comes in handy with <th> tags, since browsers usually center align them. A simple style like th { text-align: left; } makes table headers align with table cells. Figure 10-3. When applied to table cells, the CSS text-align property works like the <td> tag's align attribute. Use the CSS approach, however, since it lets you store the style information in an external style sheet. That way, if you decide you need to change alignment in your table cells from right to left, then you need to update only the external style sheet, not 10,000 individual <td> tags.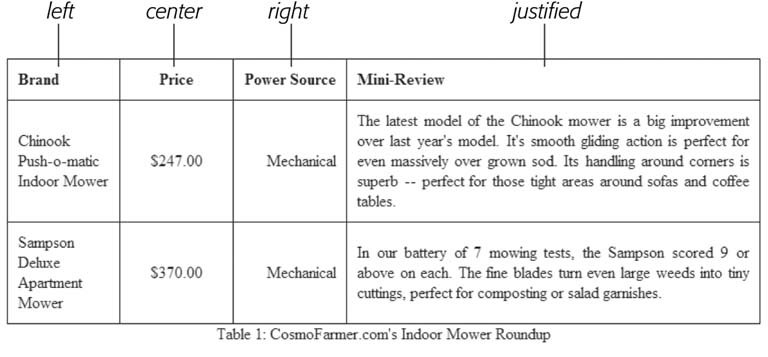 Table cells have a height as well. Web browsers normally align content vertically in the middle of a table cell (see "middle" example in Figure 10-4). You can control this behavior using the vertical-align property. Use one of these four values: top, baseline, middle , or bottom. Top pushes content to the top of the cell, middle centers content, and bottom pushes the bottom of the content to the bottom of the cell. Baseline works just like top , except the browser aligns the baseline of the first line of text in each cell in a row (Figure 10-4). (Unless you're a real perfectionist, you won't even notice the subtlety of the baseline option. More importantly, neither will your visitors .) Unlike text-align, the vertical-align property isn't inherited, so you can use it only on styles that apply directly to <th> and <td> tags. Figure 10-4. The vertical-align property is the CSS equivalent of the <td> tag's align attribute. When padding is applied to a cell, the content never actually aligns to the bottom or top border lines: There's always a gap equal to the padding setting. You can control the size of the padding (see Section 10.2.1).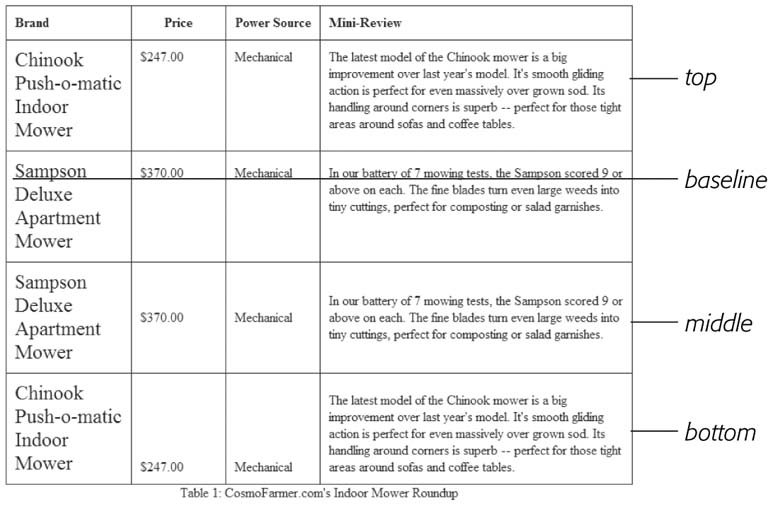 Tip: So far, the table formatting you've learned applies to all your tables. When you want to style individual tables (or table cells), change the selector you use. To apply a special design to a certain table, give it a class name <table class="stocks"> and create descendent selectors like .stocks td , or stocks th to uniquely format individual cells. If you want to style a particular cell differently than other cells in a table, then apply a class to the tag <td class=" subtotal "> and create a class style to format that cell. 10.2.3. Creating BordersThe CSS border property (Section 7.3) works pretty much the same with tables as with other elements, but you need to keep a couple of things in mind. First, applying a border to a style that formats the <table> tag outlines just the table, not any of the individual cells. Second, applying borders to cells ( td { border: 1px solid black; } ) leaves you with a visual gap between cells, as shown in Figure 10-5, top. To gain control of how borders appear, you need to understand the <table> tag's cellspacing attribute and the CSS border- collapse property.
table { border-collapse: collapse; } Note: HTML tags that are used to build tables include attributes that accomplish a lot of the same tasks as CSS. The border attribute can add a border to the table and each cell. In general, you should avoid these attributes: CSS can do a much better job with less code. 10.2.4. Styling Rows and ColumnsAdding stripes , like the ones in Figure 10-6, is a common table design technique. By alternating the appearance of every other row of data, you make it easier for people to spot the data in each row. Unfortunately, CSS (at least at this point) doesn't offer a way to say, "Hey browser, make every other row look this way!" The basic solution's to apply a class (like < tr class="odd" >) to every other row, and then create a style to format that row: tr.odd { background-color: red; } Figure 10-5. Browsers normally insert space between each table cell. (You probably won't notice this extra space unless you've added a border, as shown here, at top.) If you use the <table> tag's cellspacing attribute to remove the extra space, you're left with double border lines where adjoining borders touch (middle). The border-collapse property solves both dilemmas (bottom).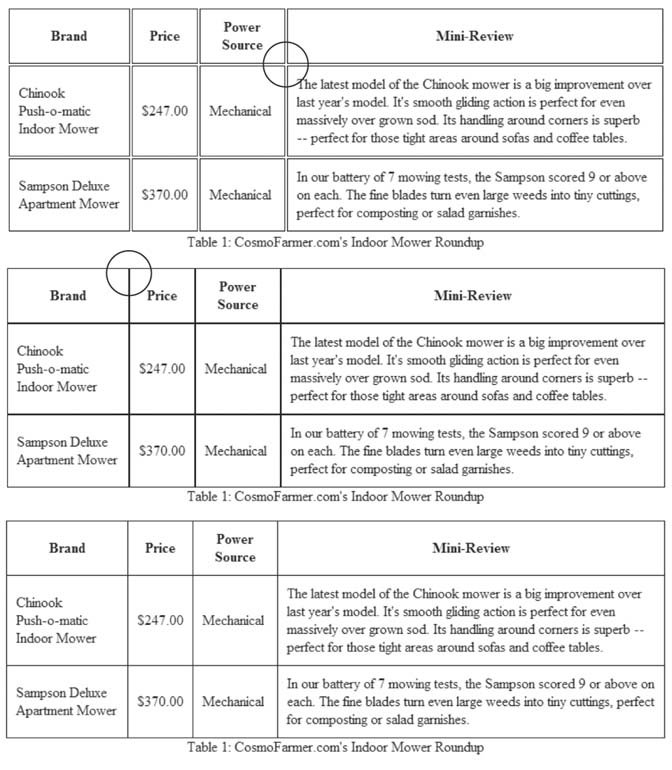 You're not limited to colors either. You can use background images (see Section 8.2) to create more sophisticated looks like the slight gradation in the table header row of Figure 10-6. (You'll see a similar example of this in the tutorial in Section 10.4.) You can use a descendent selector to target cells in that row as well. This technique's great for when you style all of the cells in one column with their own class and look: <td class="price"> , for example. To create a unique look for that cell when it appears in an odd row, create a style with this selector: tr.odd td.price . Tip: For a quicker, JavaScript-driven approach to striping tables, check out www.alistapart.com/articles/zebratables/ . Formatting columns is a bit trickier. HTML provides the <colgroup> and <col> tags to indicate groups of columns and individual columns, respectively. You include one <col> tag for each column in the table and can identify them with either a class or ID. (See the HTML code in Section 10.1.) Only two sets of properties work on these tags: width and the background properties ( background-color, background-image , and so on). But they can come in mighty handy. When you want to set the width of all of the rows in a column, you can skip any HTML attributes and just style the columns using the <col> tag: col#price { width: 200px; } Figure 10-6. Alternating the background color from row to row in a table makes it easier to quickly identify the data for each row. Of course, don't forget to add a class or ID to the <col> tag, like #price in this example. Likewise, the <colgroup> tag groups several columns together. When you set a width for that tag, a Web browser automatically applies the specified width to each column in the group . A table displaying airline schedules might have several columns displaying the different dates a plane travels from Boston to Chicago. You can use <colgroup> to organize those columns and apply an ID to the tag to identify it: <colgroup id="dates"> . Then, to set each date column to a set width of 10ems, you can create this style: colgroup#dates{ width: 10em; } Even though the width property here applies to the <colgroup> tag, a browser actually applies the value 10em to each column in the group. To highlight a column, you can use the background properties: col#price { background-color: #F33; } Keep in mind, however, that backgrounds for columns appear under table cells, so if you set a background color or image for <td> or <th> tags, then a column's background won't be visible. |
EAN: 2147483647
Pages: 154