| In Dreamweaver, you can build forms with one-click ease using the Forms tab of the Insert bar (see Figure 11-2). To begin, you need to insert a <form> tag to indicate the boundaries of a form. -
In the document window, click where you wish to insert the form. You might decide to place it after a regular paragraph of introductory text, for example. -
Select the Forms tab on the Insert bar. The tab reveals fourteen form-building tool icons. -
Click the Form icon on the Insert bar (the far-left square). Alternatively, if you're a menu-driven person, choose Insert  Form Form instead. Form Form instead. Either way, a red, dashed-line rectangle appears in the document window, indicating the boundaries of the form. (If you don't see it, choose View Visual Aids Invisible Elements.) The top line represents the opening <form> tag; the bottom represents the closing tag. Make sure you always insert form objects, like buttons and menus , inside these lines. Otherwise , Dreamweaver will think you're trying to create a second form on the page. (It's perfectly valid to include more than one form per page, but your visitor can only submit one form ”and its data ”at a time.) Since you can place so many other HTML elements inside of a form, it's often easier to insert the form first, adding tables, graphics, text, and form objects later. The Forms tab on the Insert bar gives you one-click access to all of the different form elements ”buttons, text fields, checkboxes, and more. 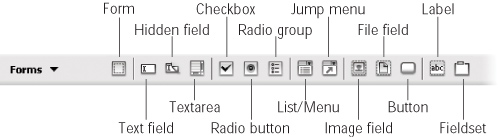 -
If it isn't already selected, click anywhere on the dotted red line to select the form. Unlike other objects, like images, the red line of the form doesn't change its appearance when selected. The only way you know you've selected the form is by checking the Property inspector. If it displays the Form Name label at the upper-left corner, as shown in Figure 11-3, you've done it correctly. You'll generally want the POST method of posting data to the server.  -
If you like, type a name for your form into the "Form name" field. This step is optional. A form doesn't need a name to work, but a name is useful if you use JavaScript or a Dreamweaver Behavior (see the next chapter) to interact with the form or any of its fields. -
Type a URL into the Action field, or select a file by clicking the tiny folder icon. Your mission here is to specify the location of the program that will process the form. If someone else is responsible for the programming, ask that person what to enter here. It will be a standard Web path ”either an absolute URL (one that begins with http:// ) or just the path to the server's form-processing program. (See Section 4.1 for more on these different kinds of links.) If you're using Dreamweaver MX 2004's dynamic page-building tools, you'll most often leave this field blank. When you apply a server behavior ”the programming code that makes the page "dynamic" ”Dreamweaver inserts the correct URL. Either way, the file name doesn't end in .html. The path might be, for example, ../cgi-bin/forms.pl. In this case, . pl is the extension used to indicate a program written in the Perl programming language. Other common file extensions for Web programs include . asp (for an Active Server Page), . cfm (for a Cold Fusion Markup Language page), . jsp (for Java Server Pages), . php (for PHP pages), or . cgi (for a CGI program). -
Using the Method pop-up menu, specify how you want the form data transmitted to the processing program (see Figure 11-3). Basically, forms can transmit data to a Web server in either of two ways. The more common method, called POST, is the one you'll use most often. (It's what browsers use unless you tell them otherwise.) It sends the form data in two steps: first, the browser contacts the form program at the URL you specified in the previous step; then it sends the data to the server. This method gives a bit more security to your data, and it can easily handle forms with lots of information. The GET method, on the other hand, transmits the form data in the URL like this: http://search.yahoo.com/bin/search?p=dogs . The characters following the ? in the address represent the form data. This code submits a single form field ”named p , with the value dogs ”to the server. As you can see, such a URL could get extremely long. Because some servers can't handle very long URLs, the GET method is inappropriate for forms that collect a lot of data. -
If you're using frames , select a target option. The target option lets you specify a particular frame for displaying the results of the form submission. You can also choose the _blank option to open a new browser window to display the results. (See Section 4.2.2 for more on the Target property.) -
Select an encoding type, if you like. You usually don't have to select anything from the Enctype menu. The default value ” empty ”is almost always correct and is the same as selecting the much more long-winded "application/x-www-form-urlencoded" option. But if you're using the File Field button (Section 11.3.6) to let visitors upload files to your site, you should use the "multipart/form-data" option. In fact, Dreamweaver automatically selects this option when you add a File Field to a form. NOTE In some cases, you may find that the server generates errors or doesn't process your forms correctly. One cause may be the form's encoding method. If you add a File Field button to a form (Section 11.3.6), Dreamweaver sets the form's encoding method to "multipart/form-data." For this method to work, the Web server must be set up to receive files ”and many Web servers have this option turned off for security reasons. So when you attempt to send a form ”even one with a file attachment ”using this encoding method, the Web server spits back a nasty error. Now then: If you delete this button from your form, Dreamweaver doesn't reset the encoding method to the original setting of "application/x-www-form-urlencoded." If your Web server is programmed to not allow form submissions using this setting, you'll receive a nasty "Method not allowed" error. You must remedy the situation manually by selecting the form and using the Property inspector to change the encoding method back to "application/x-www-form-urlencoded." You've laid the foundation for your form. Now you're ready to add the input controls to it ”menus, checkboxes, and so on ”as described in the next section. |