| When you build a Web site, you probably spend hours providing your visitors with carefully planned links, helpful labels, and clear, informative navigation tools. You want your site architecture to make it easy for them to understand where they are, where they can go, and how to return to where they came from (see Figure 14-1). Behind the scenes, it's equally important to organize your site's files with just as much clarity and care, so that you can find your way around when updating or modifying the site later. And, as on your home computer, a Web site's main organizational tool is the humble folder. A good site has an easy-tounderstand structure. Content is divided into logical sections, and a prominent navigation barthe column of white buttons on the left in this imagegives visitors quick access to information. When building a site, this "information architecture" provides a useful model for naming and creating the folders that will hold the site's files. 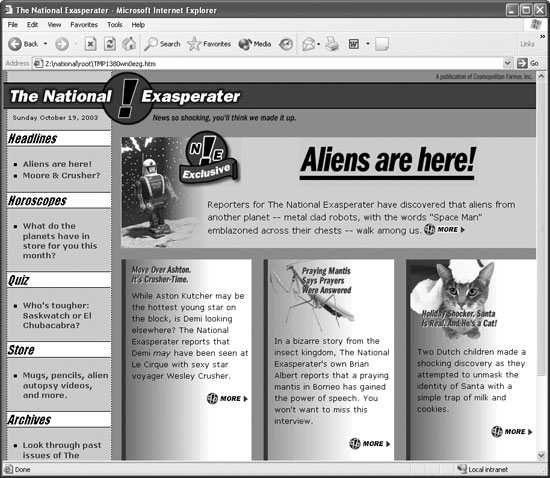 You organize files on your computer every day, creating, say, a folder called Personal, within which are folders called Financial Planning and Vacation Pictures. Inside the Vacation Pictures folder, you have separate folders for your memories of Maui, Yosemite, and the Mall of America. The same principle applies to the folders that make up a Web site: All Web sites have one primary folderthe root folder that holds all of the site's Web pages, graphics, and other files used in the site. The root folder usually contains additional folders for further subdividing and organizing the site's files. A good structure (see Figure 14-2) speeds up the production and maintenance of your site by providing quick access to whatever graphic, style sheet, or Flash movie you're looking for. But don't fall into the trap of becoming so obsessed that you put every graphic or Web page you create in its own separate folder; creating a structure for the files in a site should make your job easier, not harder.  | If you already have a Web site that suffers from lack of organization, it's not too late. Dreamweaver can help you reorganize your files quickly and accurately. Take the following rules to heart and then turn to "Organizing Site Files" in Section 14.1.4, to learn how Dreamweaver can knock your current site into shape. | |
Here, then, are some guidelines for effective site organization: Here's a sample structure for a Web site. The root (main) folder, cosmo, holds all of the pages in the site. The home page, index.html, is in the root folder, while other pages are in subfolders one folder for each section.
The home page uses lots of graphics that don't appear anywhere else on the site; a folder named images_home helps keep those in order. In addition, since many pages share the same navigation elements, logos, and other graphics, there's a folder called images_global. Also notice that the Classifieds folder (like the folder for each section of the site) has its own default page, here called index.html, and can contain additional subfolders (see the box in Section 14.1). 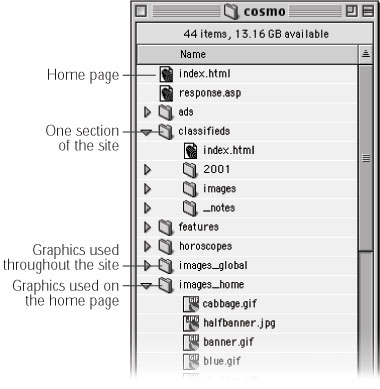 -
Plan for future growth. Like ever-spreading grapevines, Web sites grow. Today you may only have enough words and pictures for ten Web pages, but tomorrow you'll put the finishing touches on your new 1,000-page online catalog. It may seem like overkill to create a lot of folders for a small site, but better to start with a solid structure today than find yourself knee-deep in files tomorrow. For instance, it's useful to create additional folders for graphics files that appear within each section of the site. If a section of your site is dedicated to promoting your company's products, create a folder called Products for storing product Web pages. Create an additional folder called Images to store the pictures of those products. Then, when you add more products or images, you know right where to put them. NOTE While you can start with no organization plan and later use Dreamweaver to bring it all into shape (Section 14.1.4), you may run into unforeseen problems that way if your site is already on the Internet. If your site's been up and running for a while, search engines may have indexed your site, and other Web sites may have linked to your pages. If you suddenly rearrange the pages of your site, those cherished links from the outside world may no longer work, and people who try to access your site from a search engine may be foiled. -
Follow the site's architecture. Take advantage of the work you've already done in organizing the content on your site. For instance, the National Exasperater's site content is divided into five main sections: Headlines, Horoscopes, Quiz, Store, and Archives, as shown in Figure 14-1. Following this architecture, it makes sense to create foldersheadlines, horoscopes, and so onin the site's root folder for each section's respective Web pages. If one section is particularly large, add additional subfolders. -
Organize files by type. After you create folders for each section of your site, you'll probably need to add folders for storing other types of files like graphics, Cascading Style Sheets, external JavaScript files, and PDF files. Most sites, for instance, make extensive use of graphics, with several graphics on each page. If that's the case for you, then you need to file those images neatly and efficiently . One way to organize your graphics is to create a folder for images that appear on your home page and another for images that appear elsewhere in the site. Often, the home page is visually distinct from other pages on the site and contains graphics that are unique to it. You can create a folder images_home, for examplein the root folder for images that only appear on the home page. Create another folder images_global, for exampleto store graphics that all or most of the pages use, such as the company logo, navigation buttons, and other frequently used icons. When you add images to other pages of your site, you'll know to look for them in this folder. UP TO SPEED
Naming Your Files The rules for naming files in Windows and Macintosh are fairly flexible. You can use letters , numbers , spaces, and even symbols like $, #, and ! when naming folders and files on these operating systems. Web servers, on the other hand, are far less accommodating . Because many symbolssuch as &, @, and ?have special significance on the Web, using them in file names can confuse Web servers and cause errors. The precise list of no-no's varies from Web server to Web server, but you'll be safe if you stick to letters, numbers, the hyphen (-), and the underscore (_) character when naming files and folders. Stay away from spaces. File names like company logo.gif or This company's president.html probably won't work on most Web servers. Replace spaces with underscores or inner caps company_logo.gif or companyLogo.gif and remove all punctuation marks. Sure, some operating systems and Web servers permit strange naming conventions, but why take the chance? Someday you may need to move your site to another, less forgiving Web server. Play it safe: keep your file names simple. |
-
Use understandable names. While file names like 1a.gif, zDS.html, and f.css are compact, they aren't very explanatory. Make sure file names mean something. Clear, descriptive names like site_logo.gif or directions.html will make it a lot easier for you to locate files and update pages. This principle is especially important if you work as part of a team. If you're constantly explaining to your coworkers that 345g.gif is the banner for the home page, changing the file name to home_banner.gif could save you some aggravation. There's a tradeoff here, however, as long file names can waste precious bytes. For instance, a name like this_is_the_image_that_goes_in_the_upper_right_corner_ of_the_home_page.gif is probably not a good idea. It's also helpful to add a prefix to related files. For example, use nav_ at the beginning of a graphic name to indicate that it's a navigation button. In this way, you can quickly identify nav_projects.gif, nav_quiz.gif, and nav_horoscopes.gif as graphics used in a page's navigation bar. As a bonus, when you view the files on your computer or in Dreamweaver's Files panel (see Figure 14-5), they'll appear neatly sorted by name; in other words, all the nav_ files will cluster together in the file list. Likewise, if you have rollover versions of your navigation graphics (Section 5.5), give them names like nav_projects_over.gif, or nav_horoscopes_high.gif, to indicate that they are the highlighted (or over) state of the navigation button. (If you use Fireworks, its button creation tools automatically use names like nav_projects_f1.gif and nav_projects_f2.gif to indicate two different versions of the same button.) FREQUENTLY ASKED QUESTION
All Those Index Pages Why are so many Web pages named index.html (or index.htm)? If you type a URL like www.missingmanuals.com into Web browser, the Missing Manuals home page opens on your screen. But how did the Web server know which page from the site to send to your browser? After all, you didn't ask for a particular Web page, like www.missingmanuals.com/about.html . When a Web server gets a request that doesn't specify a particular Web page, it looks for a default Web pageoften named index.html or index.htm. It does the same thing even when the URL you've typed specifies (with a slash) a folder inside the site root, like this: www.missingmanuals.com/cds/ . In this case, the Web server looks for a file called index.html inside the cds folder, andif it finds the filesends it to your Web browser. If the Web server doesn't find an index.html file, two things can happen, both undesirable: The Web browser may display either an ugly error message or a listing of all the files inside the folder. Neither result is user -friendly. While your site will still function without this step, it's good form to give the main Web page inside each folder in your site the proper default page name. Web servers use different names for these default pages index.html or default.html, for exampleso check with your Web server's administrator or help desk. In fact, any page name can be used as a default page, as long as you set up your Web server to look for the correct default name. So if you're creating a dynamic site like those discussed in Part VI, you can set up a server to look for a dynamic page like index.asp , or index.php as the default page. On many Web servers, multiple default page names are specified, so if it doesn't find a file named index.html, it might then look for a file called index.php. |
| | If you use a Mac, you might not be familiar with the three or four letters that follow Web file names. These letters, or file name extensions , tell Windows computers what program should open the file. They're used universally as part of all Web files' names. The trick is that Windows and Macintosh computers use slightly different extensions. For example, in Windows, Web page names are often followed by .htm , whereas the Mac uses .html . In most cases, the Windows and Macintosh extension versions are interchangeable. The one exception is JPEG files: Some Windows computers don't understand the Mac extension .jpeg , so it's best to stick to the Windows extension, .jpg . When you save a page, Dreamweaver proposes adding .htm, but you can manually change the extension to .html. If you want Dreamweaver to use .html automatically instead, see the box below. | |
-
Be consistent. Once you've come up with a system that works for you, follow it. Always. If you name one folder images, for instance, don't name another graphics and a third pretty_pictures. And certainly don't put Web pages in a folder named images , or Flash movies in a folder named style_sheets. In fact, if you work on more than one Web site, you may want to use a single naming convention and folder structure for all of your sites, so that switching among them will go more smoothly. If you name all your graphics folders images , then no matter what site you're working on, you already know where to look for GIFs and JPEGs. POWER USERS' CLINIC
Getting a New Extension When you create a new Web page in Dreamweaver and then save it, Dreamweaver automatically adds the file extension .htm (if you don't specify one yourself). For example, if you create a new page, choose File  Save and type about in the file name box of the Save As dialog box, Dreamweaver saves the file as about.htm . If you prefer .html, because you've always done it that way or you don't like the Windows-centric three-letter extension names, you can bend Dreamweaver to your will. It just takes a little extra work. Save and type about in the file name box of the Save As dialog box, Dreamweaver saves the file as about.htm . If you prefer .html, because you've always done it that way or you don't like the Windows-centric three-letter extension names, you can bend Dreamweaver to your will. It just takes a little extra work. Your best bet is to launch a text editor other than Dreamweaver, such as BBEdit, Homesite, Notepad, or Text Edit. Then use that program to open a file called Dreamweaver MX 2004 Configuration Document Types MMDocumentTypes. xml. (On Windows, you'll probably find your Dreamweaver MX 2004 in the Program Files Macromedia folder; on a Mac, try Applications Macromedia Dreamweaver MX 2004.) Before you go any further, close Dreamweaver and, in your text editor, make a backup of the MMDocument- Types.xml file to be on the safe side. On the third line of the documentit begins with <documenttype id="HTML" internaltype="HTML"look for the word winfileextension or macfileextension (depending on your operating system). You'll see something like this: winfileextension="htm,html ,shtml,shtm,stm,tpl,lasso,xhtml". This code indicates which extensions Dreamweaver recognizes as HTML pages. Reverse htm and html in the list like this: html,htm,shtmland so on. Save and close the file. Launch Dreamweaver and create a new HTML document. Save the file without adding an extension to it. Voila. Dreamweaver adds .html to the end. |
| | Put only files that will go on your Web site in the root folder and its subfolders. Keep your source filesthe original Photoshop, Fireworks, Flash, or Word documents where you created your contentstored elsewhere on your computer. This way, you're much less likely to accidentally transfer a 14.5-megabyte Photoshop file to your Web server (a move that would not gain you friends in the IT department). But if you insist on keeping all those files together with your Web site files, check out Dreamweaver's cloaking feature. Using it, you can prevent certain file types from being transferred to your Web server when using Dreamweaver's FTP feature. | |
14.1.1 Defining a Site Organizing and maintaining a Web sitecreating new folders and Web pages; moving, renaming and deleting files and folders; and transferring pages to a Web servercan require going back and forth between a couple of different programs. With Dreamweaver's site management features, however, you can do it all from within one program. But in order to take advantage of these features, you must first define the site; in other words, give Dreamweaver some basic information about it. Defining the site involves showing Dreamweaver which folder contains your Web site files (the root folder ) and setting up a few other options. You've already learned how to do this site-building using Dreamweaver's Site Definition Wizard (Section 1.3.1). But for fine-tuning your settings, it's time to get to know the advanced Site Definition window. Start by choosing Site Manage Sites to open the Manage Sites window (Figure 14-3). This window lets you create, edit, duplicate, delete, export, and import your Dreamweaver sites. (It was called the Edit Sites window in earlier incarnations of Dreamweaver.) When you click the New button to create a new site, a small menu appears (also new in Dreamweaver MX 2004). It lets you choose either Site or FTP & RDS Server (see Figure 14-3). The Site option, which is the choice you'll use most often, lets you define a traditional Dreamweaver sitea site where working files reside on your computer. The FTP & RDS Server option lets you create a connection to a live Web server either using FTP or Cold Fusion's RDS (Remote Development Services). Neither of these methods , though, lets you take advantage of Dreamweaver's excellent site management tools (discussed in this and the following chapters). In addition, since you're working on live files on the server, you run the risk of making a serious and all-too-visible mistake on a live Web page visited by thousands of people a day. The Manage Sites window (known as the Edit Sites window in earlier version of Dreamweaver) includes two new options for creating a new site. In addition to the traditional setup where the site files you're working on reside on your computer, you can also set up FTP or RDS server sites. This feature lets you work directly on live files via FTP or Cold Fusion's RDS (Remote Development Services). 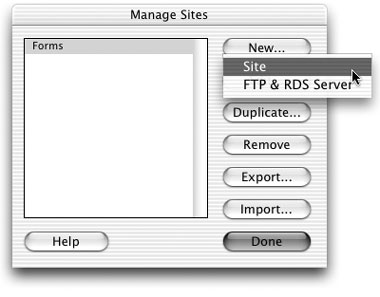 NOTE If you do want to use FTP or RDS to work directly on live site files, choose the FTP & RDS Server option when creating a new site. You then enter the same information you would when creating a connection to a remote FTP or RDS server, as discussed in Section 16.1.1. For setting up a regular Dreamweaver site, choose Site from the New menu. The Site Definition window appears (see Figure 14-4). Click the Advanced tab to access Dreamweaver's advanced settings. There are eight categories of information for your site, but to get up and running, you need to provide information only for the first category: Local Info . (The remaining categories are discussed in Chapters 15 and 16.) The Basic tab of the Site Definition window provides a simple method for new users to set up a Web site. But experienced users can take advantage of the greater options available under the Advanced tab shown here. The eight categories listed on the left side of the window are discussed in this and the next two chapters.  Here are the options on the Local Info tab: 14.1.1.1 Site name Into the Site Name field, type a name that briefly identifies the site for youand Dreamweaver. This is the name that appears, among other places, on the Site pop-up menu on the Files panel (Figure 14-6 and Figure 14-7), so that you can tell what site you're working on. 14.1.1.2 Local root folder Identify your site's local root folderthe folder that contains all files belonging to your siteby clicking the folder icon to the right of the "Local root folder" field. The procedure is described in Section 1.3.1. (Also see the box in Section 14.1.2 for more information on local root folders.) All of Dreamweaver's tools for managing your sites' files rely on the local root folder. Once you've defined a site, you see all of its files listed in the Files panel. Make sure to turn on the "Refresh local file list automatically" checkbox so that new filesgraphics, Web pages, and so onautomatically appear in the Files panel as you add them. Alternatively, click the Refresh button (Figure 16-7) each time you want to see your recent changes in the site files list. 14.1.1.3 Default images folder For a graphic image to work properly on the Web, you can't just add it to a Web page (Chapter 5); you also have to store a copy of the graphics file in the local root folder or one of its subfolders. In other words, if you link to a graphic that's sitting on your computer's hard drive outside of the root folder, the Web browser will never find it. Dreamweaver offers a feature that puts images in the right place even if you forget. When you add a stray graphics file to a page in your site, the program automatically copies the file into your default images folder. In fact, even if you drag a graphic from your desktop onto a Web page in progress, Dreamweaver copies the file to the default images folder without missing a beat. The process of choosing the default images folder is the same as selecting a local root folder. Click the folder icon and select the proper folder, which can be an existing folder in your local root or a new one you create on the spot. (If you're following the process described in Section 14.1, select the images_global folder here.) FREQUENTLY ASKED QUESTION
Bringing Your Own Web Site I already have a Web site. Will Dreamweaver work with it? Yes. In fact, Dreamweaver's site management features are an invaluable aid in organizing the files of an existing site. As you can read in "Organizing Site Files" in Section 14.1.4, you can use Dreamweaver to rearrange, rename, and reorganize files tasks that are extremely difficult and time-consuming to do by hand. Furthermore, Dreamweaver lets you clean up and reorganize a site without breaking links. So Dreamweaver can be just as useful for working with a completed site as it is for creating one from scratch. To work on an existing site, first save a copy of all site files on your computer, all in one folder. When defining the site (see Section 14.1.1), choose this folder for the local root folder. |
14.1.1.4 HTTP address If you use absolute URLs to link to pages within your site (Section 4.2.3), you must fill out the "HTTP address" field in order for Dreamweaver's link management features to work properly. Type your site's full URL beginning with http:// . Dreamweaver uses this address to check for broken links within your site and to correctly rewrite links if you move pages around. NOTE This step is necessary only if you use absolute URLs to link to pages, graphics, or other supplemental files within your site. For example, maybe your Web master directs you to link a form to http://www.yourdomain.com/cgi/formscript.php instead of using a document relative link. In this case, you'd type http://www.yourdomain.com/ in the HTTP Address box. In most cases, if you're doing all the development with Dreamweaver, you won't run into this situation, and you can leave the HTTP address field empty. 14.1.1.5 Cache The cache is a small database of information about the files in your site. It helps Dreamweaver's site management features work more efficiently; leave this checkbox turned on. Once you've provided the local information for your site, click OK to close the Site Definition window and begin working. 14.1.2 Editing or Removing Defined Sites Sometimes you need to edit the information associated with a site. Perhaps you want to rename the site, or you've reorganized your hard drive and moved the local root folder to a different location, and you need to let Dreamweaver know what you've done. UP TO SPEED
Local vs. Remote Root Folders A root folder is the main hold-everything folder for your site. It contains every piece of the site: all Web page documents, graphic images, CSS style sheets, flash movies, and so on. The word "root" implies that this is the master, outer, main folder, in which there may be plenty of subfolders. Remember that, in most cases, your Web site exists in two locations: on your computer as you work on it, and on the Internet where people can enjoy the fruits of your labor. In fact, most Web sites in the universe live in two places at onceone copy on the Internet, the original copy on some Web designer's hard drive. The copy on your own computer is called the local site or the development site. Think of the local site as a sort of staging ground, where you build your site, test it, and modify it. Because the local site isn't on a Web server, and the public can't see it, you can freely edit and add to a local site without affecting the pages your visitors are viewing, meanwhile, on the remote site. The root folder for the version of the site on your computer, therefore, is called the local root folder. When you've added or updated a file, you move it from the local site to the remote site. The remote, or live, site mirrors the local site. Because you create it by uploading your local site, it has the same organizational folder structure as the local site and contains the same polished, fully functional Web pages. However, you leave the half-finished, typo-ridden drafts on your local site until you've perfected them. Chapter 16 explains how to use Dreamweaver's FTP features to define and work with a remote site. |
To edit a site, open the Manage Sites dialog box (choose Site Manage Sites or, in the Files panel, choose Manage Sites from the Site pop-up menu) and double-click the name of the site you want to edit. The Site Definition window opens (Figure 14-4). Now you can type a new name in the Site Name box, choose a new local root folder, or make any other changes. Click OK to close the dialog box when you're done. | | If you want to edit the current site's information, there's a shortcut. In the Files panel (Figure 14-6), just double-click the name of the site in the Site menu. (Mac users need to click once to select the name in the menu, then double-click to open the Site Definition window.) | |
Once you've finished a site and are no longer working on it, you may wish to remove it from Dreamweaver's list of sites. To delete a site from the list, open the Manage Sites dialog box as described above, click to select the site you wish to delete, and click Remove. A warning appears telling you that this action can't be undone. Don't worry; deleting the site here doesn't actually delete the site's images, Web pages, and other files from your computer. It merely removes the site from Dreamweaver's list of defined sites. (You can always go back and define the site again, if you need to, by following the steps in Section 14.1.1.) Click Done to close the Manage Sites window. | | If you do, in fact, want to delete the actual Web pages, graphics, and other site components , you can either switch to the desktop (the Finder or Windows Explorer, for example) and delete them manually, or delete them from within Dreamweaver's Files panel, described in this chapter. | |
14.1.3 Exporting and Importing Sites When you define a site, Dreamweaver stores that site's information in its own private files. If you want to work on your site using a different computer, therefore, you must define the site again for that copy of Dreamweaver. In a design firm where several people might be working together on many different sites, that's a lot of extra setup. In fact, even if there's just one of you working on two computers, duplicating your efforts is a pain. So that you can put your time to better use, Dreamweaver MX lets you import and export site definitions. For example, you can back up your site definition filesin case you have to reinstall Dreamweaveror export a site definition for others to use. NOTE Unfortunately, you can only import or export one site at a time. So if you have a lot of sites and want to back up their information, grab some coffee and get clicking. (Windows users have another option; see the Note in Section 14.1.3.) To export a site definition: -
Choose Site Manage Sites. The Manage Sites window appears listing all the sites you've defined. -
Select a site from the list, and then click Export. If the site definition includes remote site information (Section 16.1.1), you'll see a panel called Export Site (Figure 14-5). If you're simply making a backup of your site definition because you need to reinstall Dreamweaver, select the "Back up my settings" radio button. (The other option, "Share settings," is useful when, for example, your local root folder is on the C: drive, but it's on the E: drive on someone else's computer, so your setup information doesn't apply to them. It's also handy when you don't want to give someone else your user name and password to the Web server.) This dialog box lets you back up your settings, or share them minus your login information) with other people.  -
Click OK. The Export Site panel appears. -
In the Export Site panel, specify where you want to save the file and give it a name. If you're merely making a backup, saving the file to that site's local root folder is a good choice. NOTE If you use Windows, a helpful utility called DW-Exporter can let you export all of your site definitions at oncea great timesaver when backing up your site. In fact, this utility can back up lots of important data, including serial numbers and Dreamweaver's configuration folder. As of this writing, a version for MX 2004 isn't available, but the developer promises one soon. For more information, visit mm-exporter.joexx.de/index_en.php . Once you have a site definition file, you can import it into any version of Dreamweaver MX as follows : -
Choose Site Manage Sites. The Manage Sites panel appears. -
Click Import. The Import Site panel appears. Navigate to a site definition filelook for a file ending in .ste. Select it, and then click OK. If you're importing the site definition to a computer other than the one you used to export the site, you may need to perform a few more steps. If Dreamweaver can't locate the local root folder in the site definition file, it will ask you to select a local root folder on the new computer, as well as a new default images folder. 14.1.4 Organizing Site Files Once you've defined your local site, Dreamweaver helps you organize your files, create folders, and add new Web pages to your site using the Files panel as your command center. To open the Files panel, choose Window Files, or just press F8. In its most basic incarnation, the Files panel displays the files in the current site's local root folder. This list looks and acts just like Windows Explorer or the Macintosh Finder; you see names, file sizes, and folders. You can view the files inside a folder by clicking the + (  ) symbol next to the folder (or simply by double-clicking the folder). Double-click a Web page to open it in Dreamweaver. ) symbol next to the folder (or simply by double-clicking the folder). Double-click a Web page to open it in Dreamweaver. | | You can open certain types of files in an outside program of your choice by defining an external editor for that file type. For example, you can tell Dreamweaver to open GIF files in Fireworks, Photoshop, or another image editor. (See "Setting Up an External Editor" in Section 5.3.2 for more on this feature.) | |
You can view your site's files in four different ways using the View pop-up menu (shown in Figure 14-6): -
Local View shows the files in your local root folder. -
Map View shows a map of your site (see Section 14.2). -
Remote View shows files on the Web server in the remote root folder (Section 14.1.2). Of course, before you've posted your site on the Web, this list is empty. Information appears here only after you've set up a connection to a remote root folder (pageSection 16.1.1) and connected to a Web server. -
Testing Server view is useful when you're creating the dynamic database-driven sites discussed in Part VI of this book. No files appear in this view until you've set up a testing server (Section 21.3) and connected to it. FOR WINDOWS PCS
The Windows Files Panel If you choose to expand the Files panel, so you can see a sideby- side view of both the remote site files and local site files, click the Expand/Collapse button (see Figure 14-7). The Files panel fills the screen. The obvious drawback is that you can't work on a Web page while the Site window is maximized, because you can't even see it. Click the Expand/Collapse button again to minimize the Files panel and gain access to your document window. To get around this limitation, you can undock the Files panel: Grab the Files panel group by its gripthe column of dots to the left of the word Filesand drag it toward the middle of the screen. (Stay away from the edges of the screen. This may simply redock the panel group.) The panel group then becomes a floating panel. You're now free to resize the Files panel even after expanding it. |
| | In Windows, you can quickly hide and show the panel groups by clicking the Show/Hide Panels button at the left edge of the panel groups (see Figure 14-6). On small monitors , hiding panels can give you breathing room to work on your Web pages. You can also resize the panel groups by dragging this button left or right. And pressing F4 hides (or shows) all panels including the Property inspector and Insert bar. | |
The Files panel, logically enough, lists files in the currently active Web site. A list of all the Web sites you've defined in Dreamweaver appears in the Sites pop-up menu; to work on a different site, select its name.
You can use the Files panel to transfer files back and forth between your local and remote site, as described in Section 16.2. 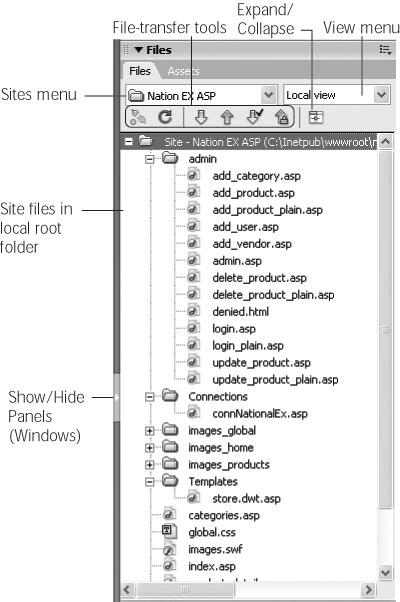 14.1.5 Adding New Folders and Files The Files panel provides a fast way of adding blank Web pages to your site. With one click, you can create a new page in any folder you like, saving several steps you'd otherwise have to perform using the File menu. 14.1.5.1 Adding files To create a new, blank Web page, open the Files panel using one of the methods described in Section 14.1.4, then right-click (Control-click) a file or folder in the Files panel. In the contextual menu that appears, choose New File. Dreamweaver creates a new, empty Web page. (Actually, the page doesn't have to be empty; you can edit the file Dreamweaver uses as its default new page, as described in the box below.) NOTE The type of file Dreamweaver creates depends on the type of site you're creating. For a plain HTML site, Dreamweaver creates a blank HTML page. However, if you're building a dynamic database-driven site like those described in Part VI, Dreamweaver creates a blank page based on the type of server model you've selected. For example, if you're building a site using PHP and MySQL, the page will be a blank PHP page (named untitled.php ). The new file appears in the Files panel with a highlighted naming rectangle next to it; type a name for the page here. Don't forget to add the appropriate extension (.htm or .html) to the end of its name. The Expand/Collapse button maximizes the Files panel to fill the monitor and lets you display two views simultaneously . This way, you can look at both a map of the site and the files in the local root folder, say, or view both the remote and local sites at the same time.
Local Files always appear on the right. Which view appears on the left sideRemote, Testing, or Site Mapdepends on which view you selected before clicking the Expand button. 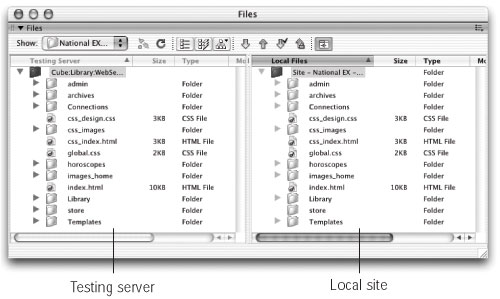 POWER USERS' CLINIC
Changing the Default New Page Whenever you make a new Web pagefor example, by choosing File New or by right-clicking (Control-clicking) an existing file in the Files panelDreamweaver gives you a blank, white document window. But what if you always want your pages to have gray backgrounds, or you always want to include a link to the same external style sheet? Every new Web page you create is actually an untitled copy of a default template document called Default.html. (You'll find it in the Macromedia Dreamweaver MX 2004 Configuration DocumentTypes NewDocuments folder.) You can open this file within Dreamweaver and edit it however you like: change its background color, margins or text color , or whatever, so that all subsequent new pages you create inherit its settings. Consider making a backup of this file before editing it, however, so that you can return to the factory settings if you accidentally make a mess of it. You'll also notice lots of other files in this folder. Since Dreamweaver MX can create lots of different file typesCascading Style Sheets, Active Server pages, and so onyou'll find a default blank file for each. You can edit any of thesebut don't, unless you're sure of what you're doing. You can easily damage some of the more complex file types, especially those that involve dynamic Web sites. |
14.1.5.2 Adding folders You can add folders to your site directly in Dreamweaver using the Files panel. Just right-click (Control-click) a file or folder in the local files list. If you click a file, Dreamweaver creates the new folder in the same folder as that file; if you click a folder, you get a new folder inside it. From the contextual menu, choose New Folder. If you crave variety, you can add a folder another way. Select a file or folder in the Files panel and then click the contextual menu button (see Figure 14-6) and select File New Folder. Finally, in the naming rectangle that appears in the Files panel, type a name for the new folder. 14.1.5.3 Moving files and folders Because the Dreamweaver Files panel looks and acts so much like the Windows Explorer and Macintosh Finder, you may think it does nothing more than let you move and rename files and folders on your computer. You may even be tempted to work with your site files directly on the Mac or Windows desktop, thinking that you're saving time. However, when it comes to moving the files and folders in your site, Dreamweaver does more than your computer's desktop ever could. In your Web travels , you've probably encountered the dreaded "404: File Not Found" error. This "broken link" message doesn't necessarily mean that the page doesn't exist, just that your Web browser didn't find the page at the location (URL) specified by the link you just clicked. In short, someone working on that Web site probably moved or renamed a file without updating the link. Because Web site files are interrelated in such complex wayspages link to other pages, which include paths to graphics, which in turn appear on other pagesan action as simple as moving one file can wreak havoc on an entire Web site. That's why you shouldn't drag Web site files around on your desktop or rename them in Windows Explorer or the Macintosh Finder. In fact, moving and reorganizing Web site files is so headache -ridden and error-prone that some Web designers avoid it altogether, leaving their sites straining under the weight of thousands of poorly organized files. But you don't have to be one of them: Dreamweaver makes reorganizing a site easy and error-free. When you use the Files panel to move files, Dreamweaver looks for actions that might break your site's links and automatically rewrites paths of links, images, and other media. NOTE Note to programmers: If your custom JavaScript programs include paths to images, Web pages, or other files in your site, Dreamweaver can't help you. When you reorganize your site with the Files panel, the program updates links it created, but not paths you've included in your JavaScript programs. Just be sure to do your moving from within Dreamweaver, like this: In the Files panel, drag the folder or file into its new folder (see Figure 14-8). To move multiple files, Ctrl-click (  -click) each of the ones you want to move, then drag them as a group; to deselect a selected file, Ctrl_click or -click it again. You can also select one folder or file and Shift-click another to select all files and folders in the list between the two. -click) each of the ones you want to move, then drag them as a group; to deselect a selected file, Ctrl_click or -click it again. You can also select one folder or file and Shift-click another to select all files and folders in the list between the two. NOTE Close all of your Web documents before reorganizing your files in this way. Dreamweaver doesn't always correctly update links in open files. But if you do end up with malfunctioning links, you can always use Dreamweaver's Find Broken Links tool (Section 15.4) to ferret out and fix any broken links. When you release the mouse button, the Update Files dialog box appears (Figure 14-8); just click Update. Dreamweaver updates all the links for you. | | If you accidentally dragged the file or folder to the wrong location, click Don't Update. Then drag the file back to its original location and, if Dreamweaver asks, click Don't Update once again. | |
Top left: You can move files and folders within the Files panel just as you would in Windows Explorer or the Macintosh Finder. Simply drag the file into (or out of) a folder. But unlike your computer's file system, Dreamweaver constantly monitors the links between Web pages, graphics, and other files.
Bottom right: If you move a file using Windows Explorer or the Finder, you'll most likely end up breaking links to that file, or, if it's a Web page, links in that file. By contrast, Dreamweaver is smart enough to know when moving files will cause problems. The Update Files dialog box lets you update links to and from the file you're moving, so that your site keeps working. 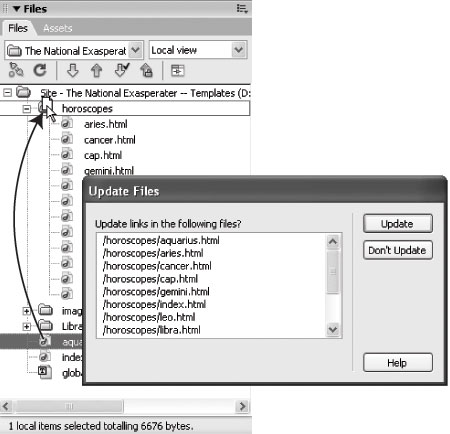 14.1.5.4 Renaming files and folders Renaming files and folders poses the same problems as moving them. Because links include file and folder names, altering a file or folder name can break a link just as easily as moving or deleting the file or folder. For example, say you've created a new site with a home page named home.html. You cheerfully continued building the other pages of your site, linking them to home.html as you went along. But after reading this chapter and checking to find out what default file name your Web server requires (see Section 14.1), you found that you need to rename your home page file index.html. If you were to rename the file index.html using Windows Explorer or the Macintosh Finder, every link to home.html would result in a "File not found" error. Dreamweaver, on the other hand, handles this potential disaster effortlessly, as long as you rename the file in the Files panel instead. To do so, just click the file or folder in the Files panel. Pause a moment, and click the name of the file or folder. (The pause ensures that Dreamweaver won't think you just double-clicked the file for editing.) A renaming rectangle appears; type the new name. Be sure to include the proper extension for the type of file you're renaming. For example, GIFs end with .gif, Cascading Style Sheets end with .css. Although Dreamweaver lets you name files without using an extension, the extensionless files won't work when you move them to a Web server. Finally, in the Update Files dialog box (Figure 14-8), click Update. Dreamweaver updates all the links to this file or folder to reflect the new name. It bears repeating: never rename or move files and folders outside of Dreamweaver. If you use Windows Explorer or the Macintosh Finder to reorganize the files in your site, links will break, images will disappear from your pages, and the earth will open underneath your feet. (Well, actually, that last thing won't happen, but it might feel that way when your boss comes in and says, "What's happened to our Web site? Nothing works!") If you've edited files outside of Dreamweaver by accident , see Section 15.4 to learn how to find and fix broken links. 14.1.5.5 Deleting files and folders It's a good idea to clean up your site from time to time by deleting old and unused files. Just as with moving and renaming files, you delete files from the Files panel. To delete a file or folder, just click to select it in the Files panel and press Backspace or Delete. (To select multiple files or folders, Ctrl-click [ -click] them as described in Section 14.1.5.3.) If the doomed file or folder isn't referenced by any other page on the site, a simple "Are you sure you want to delete this file?" warning appears; click Yes. When you delete files in the Files panel, Dreamweaver warns you if other pages reference (link to) the file. If you click Yes, you'll need to go back and repair the links. Dreamweaver gives you a convenient way to do itthe Change Links Sitewide command (see Section 15.4.5)and reminds you of it in this dialog box. 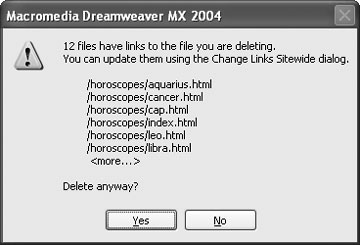 However, if other files link to the fileor to files within the folderthat you're deleting, then a warning dialog box (Figure 14-9) appears informing you that you're about to break links on one or more pages in your site. The message even lists the first few pages that use the file. If you've made a mistake, click No to leave your site untouched. If you're sure you wish to delete the file, click Yes. And yes, this move does break links in all the pages listed. Repairing those links, which usually means linking them to a new page, requires a separate step: using the Site Change Links Sitewide command, as described in Section 15.4.5. |