Versioning Assemblies
| Assemblies also need to be versioned. You specify the version number for your application by adding an AssemblyInfo attribute to a code file in your application. If you create your applications using Visual Studio .NET, you automatically have a file named AssemblyInfo.vb that contains several of these attributes, which enable you to set all the information you see in the Properties window when examining a compiled executable or DLL, including a brief description, the relevant company and copyrights, and so on. A typical AssemblyInfo.vb file might look like this: <Assembly: AssemblyTitle("Sample Database Component")> <Assembly: AssemblyDescription("Example of a service provider " & _ "and information package")> <Assembly: AssemblyCompany("ProseTech")> <Assembly: AssemblyProduct("Sample Database Component")> <Assembly: AssemblyCopyright("Copyright(C) 2001 ProseTech")> <Assembly: AssemblyVersion("1.0.*")> The version is the most important piece of information. All .NET version numbers are made up of four components. The first two represent the major and minor version numbers and are always set manually. The last two represent revision and build numbers. If you use the asterisk, as shown above, Visual Studio .NET automatically increments a sequential number for these values, ensuring that each compile generates a unique version number. However, you need to modify the code file when you want to specify a change to the major or minor version number. If you're using a private assembly that doesn't have a strong name, version numbers have no effect. In other words, .NET will try to use the assembly in the current directory (or the indicated subdirectory) regardless of whether it is the same version that the original client was compiled with. This attempt will fail if the required types have changed (for example, if they have new methods or methods with different signatures). This is a major departure from COM programming and a significant convenience. However, programmers will have to keep this behavior in mind when introducing significant changes. As with COM programming, you can introduce new versions of a method by adding a new interface to your component so as not to disturb existing clients. Shared Assemblies and the GACNow that I've criticized global assemblies, you might wonder who would use them. However, shared assemblies and the GAC also include some features that distributed programmers might require, including the following:
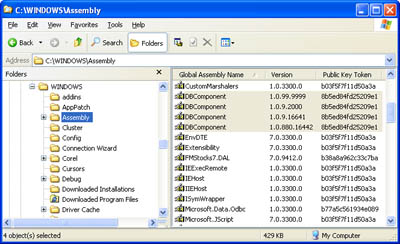
Generally, if you're certain that a component will be required on only one computer or if you need to enforce strict versioning, shared assemblies might make sense. For example, you can share a component with all the ASP.NET applications and Web services on a single Web server by placing it in that Web server's GAC. Note The distinction between strong-named assemblies and shared assemblies is important. Shared assemblies are assemblies that are placed in a central component registry called the GAC. Strong-named assemblies are digitally signed, cannot be tampered with or impersonated, and strictly enforce versioning policies. To be placed in the GAC, an assembly must have a strong name. However, you can create a strong-named private assembly that goes in the application directory. In this case, you still benefit from the increased security and version enforcement. This distinction is a source of much confusion for many new .NET programmers, and it's often misstated. Installing a component into the GAC takes three steps, which the following sections summarize. The first two steps involve creating a strong name, which prevents naming conflicts in the GAC and ensures that your assemblies are uniquely identified. The final step is copying the assembly to the GAC. Note that these steps require a little command-line work. Currently, you cannot create a new key file or install a global assembly using Visual Studio .NET's graphical interface. Step 1: Creating the KeyThe first step is to use the sn.exe command-line utility included with the .NET Framework (typically in a directory such as C:\Program Files\Microsoft Visual Studio .NET\FrameworkSDK\Bin). The sn.exe utility, also called the strong-name tool, enables you to create a .snk file. Each .snk file contains a private and a public key. To create a key, you use the -k parameter and specify the filename: sn -k MyKey.snk Private and public keys provide a time-honored form of encryption. Anything encrypted with a private key can be read only with the corresponding public key. Anything encrypted with a public key can be read only with the corresponding private key. In .NET, the private key is used to compile the assembly and should be carefully guarded. The public key is embedded inside the assembly. When an application uses the component, the CLR uses the public key to decode information from the assembly manifest. No one else can create an update to your assembly because others would need to have your original private key to encrypt it. Step 2: Adding the Key to a ProjectTo add the key to a control project, you need to add an Assembly attribute to the AssemblyInfo.vb file that identifies the file: <Assembly: AssemblyKeyFile("MyKey.snk")> The next time you compile the project, the key information will be added to the assembly. Step 3: Installing the Assembly in the GACYou can install a signed assembly to the GAC using a dedicated setup program or the GACUtil.exe utility. You can even drag and drop the assembly to the C:\WINNT\Assembly directory in Windows Explorer, which installs it automatically (although you can't use the cut-and-paste approach). The Windows Explorer shell extension provides all the GACUtil.exe functionality, enabling you to view the list of assemblies in the GAC, the supported versions, and their public key tokens (which are required for specifying new binding policies in the configuration file). Figure 2-5 shows the GAC shell extension with multiple versions of the DBComponent assembly. Figure 2-5. Multiple component versions in the GAC Delayed SigningIf you decide to use strong-named assemblies, your key is your identity. In other words, any individual who has the private key can create "official" assemblies under your name. For that reason, many organizations guard their key pair carefully and won't distribute it even to developers. Of course, this can create countless development headaches. If a component isn't usable until it's signed and the key pair isn't readily available, testing and debugging will grind to a halt. The solution is to use delayed signing. With delayed signing, only the public key is provided to developers. The public key can be retrieved from a key pair file using the following syntax: sn -p MyKey.snk MyPublicKey.snk The developers must now add a special attribute to the source code to indicate that delayed signing will be used, and they must reference the public key file: <Assembly: AssemblyDelaySign(True)> <Assembly: AssemblyKeyFile("MyPublicKey.snk")> When this assembly is built, the compiler adds the public key and reserves space for the private key. A trusted party can sign the assembly before it is released using the sn.exe utility with the -R parameter: sn -R MyComponent.dll MyKey.snk Of course, this doesn't solve the development problem because .NET still won't enable you to execute an assembly that lacks a proper signature. Fortunately, the sn.exe utility provides a -Vr option that enables you to disable signature verification for an assembly. Here's how you might disable verification for the MyComponent.dll file: sn -Vr MyComponent.dll Now when you use this assembly in a project, the verification process will be skipped. Because the public name is still present in the file, however, you can develop a client that will support the final, signed version. (As you'll see later in this chapter, clients store a hash of the public key of dependent assemblies in their manifest.) This command doesn't actually modify the assembly. Instead, it just registers the assembly for verification skipping on the current computer. To reenable verification, use the -Vu option: sn -Vu MyComponent.dll Note You can add one more step to the assembly deployment process, and add an Authenticode signature using a certificate. This step is typically taken by software publishers who want to give third-party clients the ability to verify the publishers identity. Unlike a strong name, an Authenticode signature requires that an organization provide some sort of credentials to a third-party Certificate Authority (like VeriSign). Authenticode signatures are beyond the scope of this book, but for more information refer to the MSDN documentation and the signcode.exe utility. Authenticode signatures are always applied after an assembly has been given a strong name. |
EAN: 2147483647
Pages: 174