Securing Clients and Hosts
While you should take the time to secure your access point with the techniques previously mentioned, you should also understand that your access point is still vulnerable to a skilled cracker. A cracker with advanced skills can circumvent many of the steps you have taken, and using network tools such as wireless sniffers and analyzers, can recover MAC addresses, IP addresses, and even encryption keys from network traffic.
Because of this, you should next turn your attention to securing the individual computers on your network. This way, even if a cracker manages to compromise your access point, he won’t have access to the data on every computer connected to your network. This is not difficult to do and does not require you to have a great deal of networking skill.
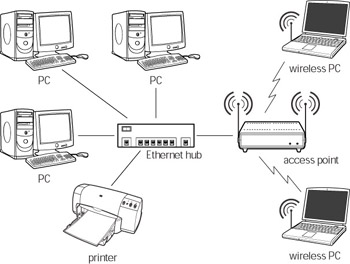
| Note | If you have a hybrid network composed of wired Ethernet segments and Wi-Fi segments (see Figure 11-19), you must also secure the computers on the Ethernet segment of your network, particularly if you do not have a firewall separating the wireless segment from the rest of your network. |
Locking down Windows XP
The first step in securing individual computers on your network is to lock down the operating system. Provided here are steps that you can use to lock down Windows XP, including XP Pro and XP Home and Media Center, but they are applicable to Windows 2000 as well. I do not provide instructions for Windows 95/ 98/Me. Those versions of Windows are very insecure and easy to compromise. If you are using one of these older versions of Windows, consider upgrading to Windows XP immediately.
When securing Windows XP, the first three steps you should take are:
-
Install and use a personal firewall.
-
Get the latest Windows updates and patches.
-
Install antivirus software and updates.
These are the three most important steps you can take, and following them will dramatically increase the security of your system.
Setting up personal firewalls
A personal firewall is a software application that resides on individual computers and monitors network connections. The firewall filters all incoming network traffic, blocking dangerous connections and unauthorized users. The better firewalls that are available also filter outgoing connections that originate from a machine. This is important because it can prevent malicious software like worms and Trojan horse programs from trying to spread to other machines on your network or to “phone home” to the hacker that sent them.
Windows XP comes with an Internet Connection Firewall (ICF) that you can enable to improve security on your machine. ICF is adequate for basic protection, but it doesn’t filter or block outbound connections. ICF is a stateful firewall, which means it inspects the source and destination addresses on incoming data packets. ICF only allows incoming data through if it is in response to a request sent from your machine.
Unfortunately, this does nothing to stop malicious software such as a Trojan horse program from communicating with a cracker and receiving instructions. For this reason, I recommend that you purchase a third-party firewall like ZoneAlarm Pro from Zone Labs, or Symantec’s Norton Personal Firewall that also filters outgoing connections.
| Note | Don’t enable ICF on any connection that doesn’t connect directly to the Internet. Because of the way it operates, ICF may interfere with local network connections between clients if you activate it on Ethernet cards or Wi-Fi adapters. You can use third-party firewalls like ZoneAlarm to protect individual computers on a network. ZoneAlarm is highly configurable and can be set up so that it won’t interfere with regular network functions. |
If you do decide to use ICF, follow these steps to activate it:
STEPS: Activating ICF on Windows XP
-
Left-click on the Start button. The Start Menu appears.
-
Under Pick a Category, click Network and Internet Connections.
-
In the Control Panel, click the Network Connections icon. The Network Connections window opens (see Figure 11-20).
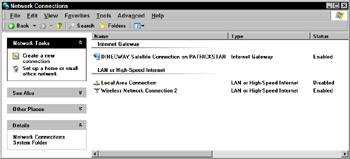
Figure 11-20: The Network Connections window -
Right-click your Internet connection, and select Properties from the menu that appears. The connection’s Properties dialog box opens.
-
Click the Advanced tab (see Figure 11-21).
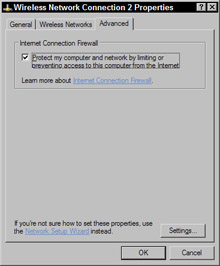
Figure 11-21: The Properties dialog box showing the Advanced tab -
Click the Protect my computer and network option. The Settings button in the lower-right corner of the window is no longer grayed out.
-
Click the Settings button and select the services in the Advanced Settings dialog box (see Figure 11-22) if you are running services like an FTP or Web server on your network and you want users to be able to access these from the Internet.
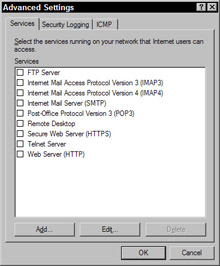
Figure 11-22: The Advanced Settings dialog box -
Click OK to close the windows and apply the settings.
Introducing the DMZ
Because wireless networks are more vulnerable than wired networks, a wireless segment connected to an Ethernet network may present a weak point that is vulnerable to attack. One method of reducing the risk to the wired segment of your network is to set up a demilitarized zone (DMZ) for the wireless connections.
A DMZ effectively isolates the Wi-Fi segment from the rest of your network by placing it outside a firewall (see Figure 11-23). The firewall between the WLAN and the LAN prevents unauthorized persons from connecting to the LAN if they compromise the access point or a wireless client.
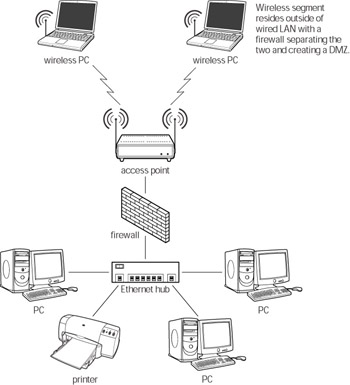
Figure 11-23: A WLAN setup in a DMZ
Setting up a DMZ doesn’t mean that you shouldn’t still run personal firewalls on your WLAN clients. A DMZ does nothing to protect your wireless clients, just your wired ones.
Get the latest Windows updates and patches
Researchers regularly discover new security vulnerabilities in operating systems and applications. Software bugs or oversight on the part of programmers causes these vulnerabilities. Occasionally the vulnerabilities arise due to unexpected results when different systems interact.
Crackers and virus writers regularly take advantage of known security flaws in the various Windows operating systems. They exploit these flaws to take control of computers or allow their viruses and worms to proliferate. MSBlaster, a worm that appeared in the summer of 2003, exploited a widely known security flaw in Windows operating systems.
Unfortunately, even though Microsoft had provided a patch to remedy the vulnerability weeks before the appearance of the worm, millions of users had not installed it. As a result, MSBlaster was able to spread quickly and cause millions of dollars in damage.
Software developers release patches and software updates to fix these vulnerabilities, and secure systems. Microsoft releases patches and updates for Windows XP and Windows 2000 on an almost weekly basis. It’s important that you check for new updates, and download and install them to ensure that your system stays stable and secure.
To ensure that you keep Windows XP patched, you can automate the process by using Windows Update. Simply follow these steps:
STEPS: Keeping Windows XP patched using Windows Update
-
Click the Start button. The Start Menu opens.
-
Click the Control Panel menu item.
-
Under Pick a Category, click Performance and Maintenance.
-
In the Control Panel, click the System icon. The System Properties window opens (see Figure 11-24).
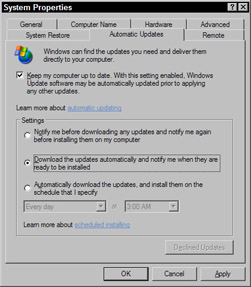
Figure 11-24: The System Properties window -
Click the Automatic Updates tab.
-
Click the Keep my computer up to date option.
-
Click the Download the updates automatically and notify me when they are ready to be installed option.
-
Click OK to close the window and apply the new settings.
Windows Update will now automatically check for updates and download them when they are available and then notify you that they are ready to be installed. Alternately, you can set Windows Update to simply check for updates and then notify you when they are available. You can choose whichever method you are comfortable using.
| On The Web | In addition to using Windows Update, I suggest that you periodically visit Security Focus (www.securityfocus.com). This is one of the most comprehensive security sites that you will find on the Web. Security Focus hosts a detailed vulnerability database pertaining to all operating systems and hardware devices that you can reference to help secure your own systems. |
Install antivirus software and updates
With the number of worms, viruses, and other malicious programs that appear each month, it’s imperative that you install a good antivirus program to protect your machine. There are many good commercial products available, and I recommend that you select one of them rather than using a freeware or shareware application.
Choose antivirus software that has an easy-to-use interface, and an efficient live update feature to keep the software current. This last feature is especially important because, like Windows, you need to update your antivirus software regularly to protect against new threats.
When selecting an antivirus program, consider the following points:
-
Choose products from a developer with proven expertise and a good record of accomplishment. My personal selections (in order of preference) are Norton Antivirus, McAfee, and Panda antivirus.
-
Choose a product with regular and free virus definition updates.
-
Select an antivirus program that has an automatic or live-update feature so that it’s easier for you to keep the software current.
-
Choose a product that scans incoming and outgoing e-mail for infection.
Don’t install and run more than one antivirus product at a time. This is definitely one case where more doesn’t equal better; multiple antivirus applications can interfere with one another’s operation, and may crash or slow your machine.
More steps to secure your XP machine
Once you have taken care of the three most important steps, you can consider implementing these remaining recommendations. They will help you lock down
Windows XP even tighter and further reduce the likelihood that your computer will be hacked.
-
Physically secure your machine. Prevent unauthorized users from tampering with your computer, and never leave your laptop unattended in public.
-
Format all hard drive partitions with NTFS. NTFS is more secure than the older FAT32 file system that older versions of Windows used (95/98/Me).
-
Use a router instead of Internet Connection Sharing (ICS) for shared Internet connections. This is faster and will add another layer of security between your network and the Internet.
-
Use strong account passwords. Refer to password best practices earlier in this chapter.
-
Disable unnecessary services. See the following section for more information.
-
Disable the guest account. You don’t need it, so just turn it off
-
Use an account lockout policy. You can set up Windows XP to lock your account after a certain number of failed attempts to connect. This helps prevent a cracker from trying hundreds of passwords to get into your account.
Disabling unnecessary services
Windows has many services enabled by default. Some of them are unnecessary, especially on stand-alone machines or machines on home networks. Leaving them running when they aren’t used wastes computer resources at best, and at worst, they may be a security risk.
-
Computer Browser. If you are on a stand-alone machine, you don’t need this service. This service maps network clients and shares so that you can browse them. It only needs to be running on one machine for you to be able to browse the network.
-
Telnet. Disable it. This is a terminal tool for connecting to remote computers, Ninety-nine percent of us will never use it, and it’s a popular target for crackers.
-
Universal Plug and Play Device Host. Not to be confused with Plug and Play (PnP), which is used for connecting devices such as video and sound cards to your machine (never disable PnP), UPnP is for connecting network devices. If you are using a Wi-Fi gaming adapter for a game console (Xbox, Gamecube, or PlayStation2) you may want to leave UPnP active if you encounter problems connecting with the game.
-
IIS. This is normally not installed (not available on XP Home Edition), and I don’t recommend that you do so unless you have to.
-
Netmeeting Remote Desktop Sharing. If you don’t use Netmeeting to hold meetings over the Internet, turn it off. If you use Netmeeting but don’t need to share your desktop, turn it off.
-
Remote Desktop Help Session Manager. This feature allows support personnel to connect to your computer. If you don’t want or need remote help with your computer, turn this off.
-
Remote Registry. Disable this if you don’t need it. Making your registry available to remote users is a big risk. (This service isn’t available on XP Home Edition.)
-
Routing & Remote Access. This service is disabled by default in XP Home Edition. XP Pro users should also disable this service unless they need to dial into their computer remotely (via the modem).
-
SSDP Discovery Service. This is used with UPnP. If you have UPnP disabled, turn this off as well.
-
Server Service. If you are on a stand-alone machine or do not need to share files and printers from your machine, you can disable this.
If you disable a service and discover that an application or device needs it, you can always reactivate it.
EAN: 2147483647
Pages: 145