Viewing Your Image On-Screen
As you become more accustomed to creating and editing images in Photoshop, you’ll find that working on small areas is very difficult if you can’t see what you’re doing. That’s why Photoshop offers many ways to view an image, including using the Navigator palette, and the Hand and Zoom tools, keyboard shortcuts, and the tiny Magnification box at the lower-left corner of the Photoshop window.
The Navigator palette
The Navigator palette, shown in Figure 3-12, is a great navigational aid. You can use the Navigator palette to quickly change the magnification of the image and move the view to another area of the image window for editing.
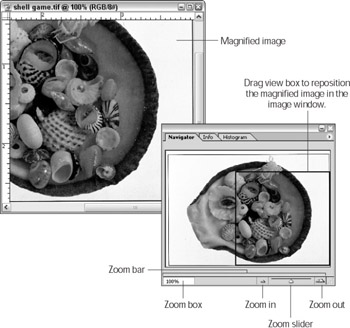
Figure 3-12: The Navigator palette lets you quickly zoom in and out. You can move the view to another area of the image.
By default, the Navigator palette is grouped with the Info and Histogram palettes at the right of the Photoshop window. If the Navigator palette is not displayed, choose Window→Navigator to open the palette.
With an image open, use the Navigator palette to try these features:
-
Zoom in and out: The Zoom bar at the bottom of the Navigator palette contains buttons, a slider bar, and a text box that are used for zooming. Move the Zoom slider bar right to magnify the image and right to decrease the magnification. Click the Zoom in button to magnify in increments. Click the Zoom out button to decrease the magnification in increments. Click in the Zoom percentage box, enter a magnification percentage, and then press Enter (Return on a Mac) to zoom to that magnification.
-
Navigate the nooks and crannies of a magnified image: If an image is magnified, a red View box appears on the image thumbnail, indicating that only part of the image is visible in the image window. To move around inside the image, just drag the View box around the thumbnail. Ctrl+drag (z+drag) the thumbnail, to see a red rectangle, or marquee. When you release the mouse button, the marquee turns into the View box, and that portion of the image is magnified in the image window.
Remember Changing the magnification of an image does not change the actual size of the image.
-
Manipulate the Navigator palette: Pull the Navigator palette out of its group with the Info and Histogram palettes, and then make the Navigator palette larger or smaller by dragging the size box.
Using the Zoom tool
![]() The Zoom tool works in a similar fashion to the items on the Navigator palette’s Zoom bar. You can use the Zoom tool to zoom in and out, and use specific magnifications.
The Zoom tool works in a similar fashion to the items on the Navigator palette’s Zoom bar. You can use the Zoom tool to zoom in and out, and use specific magnifications.
Open an image in Photoshop, then select the Zoom tool from the Toolbox, and give these zooming techniques a try:
-
Zoom: Click the image in the area you want to magnify, as shown in Figure 3-13.
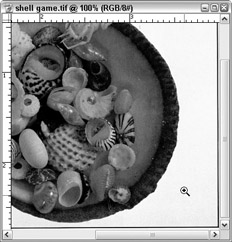
Figure 3-13: Clicking with the Zoom tool magnifies the image in preset increments. -
Zoom to a specific location: Drag the Zoom tool to create a marquee. When you release the mouse button, the image zooms to the area you selected.
-
Zoom out: Hold down Alt (Option on a Mac) when you click with the Zoom tool to zoom out.
-
Select Zoom options: With the Zoom tool selected, right-click (Control+click) the image window to access a context-sensitive menu that lets you select one of these options:
-
Fit on Screen: Displays the image in its largest possible size.
-
Actual Pixels: Displays the image at actual pixel size.
-
Print Size: Displays the image at its print size.
Tip Toggle between tools and the Zoom option: If you have another tool selected and want to zoom in, press and hold the Spacebar+Ctrl (Space-bar+z on a Mac) keyboard combination. The tool changes to the Zoom tool. Click or marquee-select to magnify the image. When you release the keyboard keys, the tool you were originally working with returns. Likewise, if you want to zoom out while another tool is selected, hold down Space-bar+Alt (Spacebar+Option on a Mac), then click or marquee-select. (When you marquee-select an area, you press the mouse button and drag to select a region.)
Tip Set Zoom magnifications: To change the magnification to a specific percentage, use the Magnification box at the lower-left corner of the Photoshop window. Double-click the Magnification box to highlight the current percentage, type in a new percentage, and then press Enter (Return on a Mac). The image zooms to the magnification you specify.
-
Using keyboard shortcuts for zooming
Using keyboard shortcuts to zoom in and out is fast and easy. Table 3-2 lists shortcuts you should know.
| Zoom Action | Windows | Mac |
|---|---|---|
| Zoom in (image window not resize | Ctrl++ (Ctrl and the plus sign) | z++ (zand the plus sign) |
| Zoom out (image does window not resize | Ctrl+- (Ctrl and the minus sign) | z+- (zand the minus sign) |
| Zoom in (image window resizes) | Ctrl+Alt+ (Ctrl, Alt, and the plus sign) | z+Option+ (z, Option, and the plus sign) |
| Zoom out (image window resizes) | Ctrl+Alt+- (Ctrl, Alt, and the minus sign) | z+Option+- (z, Option, and the minus sign) |
| Zoom to actual pixels, 100% view | Ctrl+Alt+0 (Zero) | z+Option+0 (Zero) |
| Fit image on screen | Ctrl+0 (Zero) | z+0 (Zero) |
Using the Hand tool
![]() Imagine putting your hand down on a piece of paper that is on a table, and then sliding the paper around using the flat of your hand. The Hand tool works in just this way. The Hand tool is great for quickly repositioning an image in the image window.
Imagine putting your hand down on a piece of paper that is on a table, and then sliding the paper around using the flat of your hand. The Hand tool works in just this way. The Hand tool is great for quickly repositioning an image in the image window.
To use the Hand tool, select it from the Toolbox. You’ll notice that the mouse pointer turns into a little hand, as shown in Figure 3-14. Then, position the hand over the image, press and hold the mouse button, and drag. The image moves in the image window, corresponding with your dragging movements. When you’re finished moving the image around, release the mouse button.
Figure 3-14: Use the Hand tool to move an image around in its window.
| Tip | If you find that you need to do a lot of work at high magnification, seeing the changes as you make them is very important. With Photoshop CS you can open the same image in two windows at the same time, work in the magnified window (suppose it’s magnified to 400%), and watch the changes on a window set to actual pixel size (100%). To open a second window, choose Window→Arrange→New Window. |
Using Toolbox buttons to change image view
The three buttons at the bottom of the Toolbox — Standard Screen mode, Full Screen mode with Menu Bar, and Full Screen mode — let you change the way the image fills the screen. They are shown in Figure 3-15.
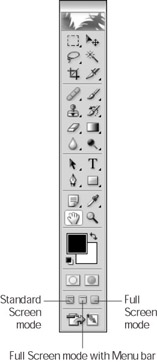
Figure 3-15: Use the buttons at the bottom of the Toolbox to change image view.
Try the three buttons out to see how they change image view:
-
To view the image window as you normally see it with scroll bars and title bar, and Photoshop’s Menu bar and Options bar visible, click the Standard Screen mode button. (This is the default.)
-
If you want to the image fill the screen without scroll bars or a title bar (but with the Menu bar showing), click the Full Screen mode with Menu Bar button.
-
To view a full-screen version of the image without scroll bars or title bar, and with Photoshop’s Menu bar removed, click the Full Screen Mode button.
Tip You also can press Tab to hide the Toolbox, Options bar, all palettes, and the status bar. Then press Tab again to redisplay them.
EAN: 2147483647
Pages: 221