Using Displacement Maps
So far, all the displacement maps demonstrated involve gradations of one form or another. Gradient dmaps distort the image over the contours of a fluid surface, like a reflection in a fun-house mirror. In this respect, the effects of the Displace filter closely resemble those of the Pinch and Spherize filters as well as the Free Transform command, all described in previous chapters. But the Displace filter also offers its share of unique functions, including the ability to add texture to an image.
Applying predefined dmaps
Since the Displace filter was introduced in Photoshop 2.0, the program has shipped with a collection of predefined dmap files. These reside in the Displacement Maps folder that's inside the Plug-Ins folder, inside the folder that contains the Photoshop application file. These special files were first introduced in the section on creating patterns and texture in Chapter 2 ” a more detailed description of them follows .
Figure 10-29 details four of the dozen images in the Displacement Maps folder. As you can see, the files contain sometimes independent information in the red and green channels. The blue channel is left white, hence the tendency of the colors toward blue, cyan, and magenta . In the final column of Figure 10-29, the blue channels are filled with 50 percent gray. This merely helps the colors to print better; because the Displace filter ignores the blue channel, it has no effect on the performance of the displacement map.
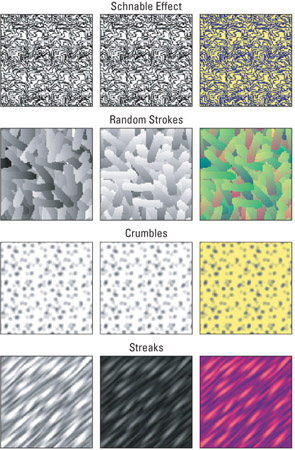
Figure 10-29: Four random files from the Displacement maps folder (typically a subfolder of the Plug-ins folder). Note that the red(left column) and green(middle column) channels often differ , thus conveying unique horizontal and vertical displacement information. The final column shows the full- color dmap, with the blue channel set to 50 percent gray.
Figure 10-30 shows a sample image subjected to each of the four dmaps from Figure 10-29. The second and third columns in Figure 10-30 show the image displaced exclusively horizontally or vertically by the amounts described in the labels. Figure 10-31 shows the image displaced using a host of arbitrary Horizontal and Vertical Scale values applied in tandem. (In case you missed them earlier, you can see more examples way back in Figure 2-32.)
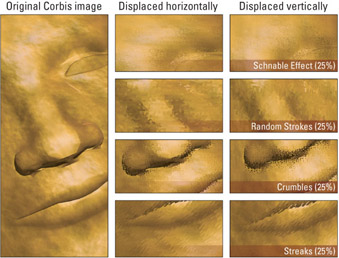
Figure 10-30: The stock photo from the Corbis image library (left) displaced horizontally (middle) or vertically (right) using the dmaps featured in the previous figure.
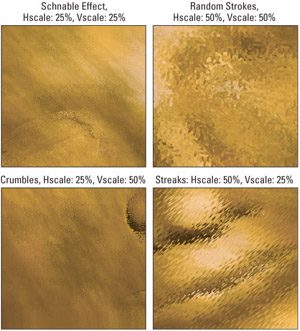
Figure 10-31: More applications of Photoshop's predefined dmaps, this time using independentHorizontal and Vertical Scale values.
You may notice that some of the dmap file names recommend a percentage amount for you to use, as in the case of Pentagons (10%). This happens to be the Scale value, Horizontal and Vertical, that precisely divide the image into solid blocks of color, as in the first example in Figure 10-32. In this regard, the Displace filter map may produce an effect similar to Filter Pixelate Crystallize; but armed with a custom dmap, you have the opportunity to design an infinite array of regularly repeating shapes . Of course, you shouldn't hesitate to experiment with values other than 10 percent. Figure 10-32 offers a few suggestions.
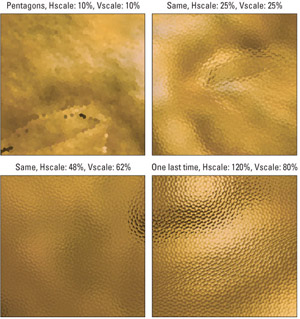
Figure 10-32: Examples of an image displaced with thePentagons dmap. By setting the Scale values to 10 percent apiece, you assign each pentagon its own solid color (top left). Other values result in glass-refraction effects.
As illustrated in Figure 10-32, many of Photoshop's predefined dmaps produce the effect of viewing the image through textured glass ” an effect known in the 3-D realm as glass refraction. Those few patterns that contain too much contrast to pass off as textured glass ” including Fragment Layers, Mezzo Effect, and Schnable Effect ” can be employed to create images that appear as if they were printed on coarse paper or even textured metal. Note that the Fragment Layers dmap has nothing to do with Photoshop's layers; in fact, it was so named before Photoshop even had layers . Rather, it is intended to separate an image into multiple veins of fragmented color.
| Tip | When using a repeating pattern ” including any of the images inside the Displacement Maps folder ” as a dmap, be sure to select the Tile radio button inside the Displace dialog box. This repeats the dmap rather than stretching it out of proportion. |
Creating your own textural dmaps
In Chapter 2, you also learned a few ways to create your own textures from scratch using filters such as Add Noise, Clouds, Crystallize, and Emboss. (See Figure 2-33 and its accompanying text for more information.) These very same patterns can be put to effective use as displacement maps.
STEPS: Creating a dmap from a Pattern
Consider Figure 10-33. The first example shows a new image with the same dimensions as the subject of Figure 10-30. Follow along with these steps:
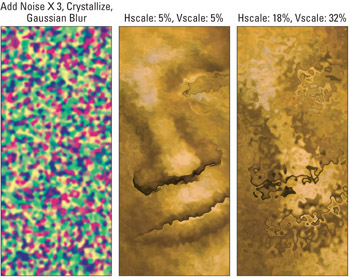
Figure 10-33: You create the gooey texture dmap (left) by applying the Add Noise, Crystallize, and Gaussian Blur filters to a new image, independently in the red and green color channels. You can then use the Displace filter to apply the texture as a displacement map at 5 percent (middle) and 18 and 32 percent (right).
-
First, choose Filter Noise Add Noise . Apply the effect at 100 percent, Uniform, and Monochrome.
-
Press Ctrl+F ( z +F on the Mac) twice. This repeats the filter.
-
Choose Filter Pixelate Crystallize. Apply a Cell Size value of 20.
-
Next apply a Gaussian Blur with a Radius value of 3 pixels. The difference between this and a similar effect illustrated back in Figure 2-33 is that all three filters were applied to the red and green channels independently. The blue channel was filled with gray.
-
After saving that image in the native PSD format, choose apply Distort Displace. In the example, this was applied to the image used in Figure 10-30, and some experiments were performed with a couple of different sets of Scale values, as labeled in Figure 10-33. The result is a custom ripple effect, unlike anything you can produce with the Ripple filter ” it appears more watery than the imagery created with the Ocean Ripple filter.
Needless to say, this ripple dmap is only one of an infinite number of textures that you can create with the help of Photoshop's corrective and destructive filters. Figure 10-34 starts off with a very basic dmap created by applying Filter Render Clouds to the red and green channels independently. (Again, the blue channel is gray.) The foreground and background colors were set to their defaults, black and white. That's all there was to it. And yet armed with that simple dmap, it was possible to severely distort the mask image, ultimately transforming it into a marble-like pattern, shown on the right side of Figure 10-34.
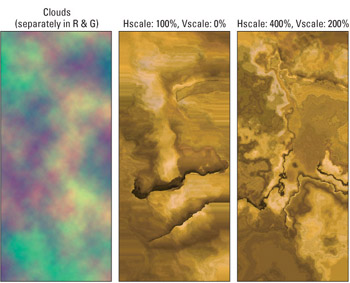
Figure 10-34: This dmap (left) was created by applying the Clouds filter in the red channel and then the green. Then, the dmap was applied to the image exclusively horizontally (middle) and finally using very high Scale values (right).
If the effect pictured in Figure 10-34 is too rough for you, you know what to do: Blur the dmap and try again. In Figure 10-35, the Gaussian Blur filter was applied with a Radius value of 40 pixels. Then the Scale values were exaggerated to generate smoother image patterns. Despite very high Scale values, the face remains discernable in the final example.
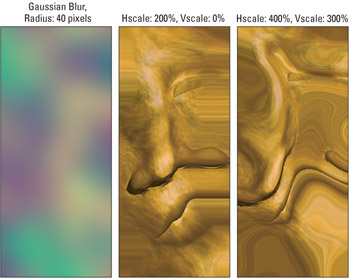
Figure 10-35: After blurring the dmap from the previous figure (left), it was used to displace the sculpted face. Even after applying a Horizontal Scale value of 400 percent (right), you can identify at least two faces in the distorted mix.
Customizing a dmap to an image
Want to get carried away? Then by all means, get carried away. Just as masking is the art of selecting an image using any tool inside Photoshop, displacing is the admittedly more arcane art of distorting an image using any tool inside Photoshop. The more fun you allow yourself to have with displacement maps, the more you'll come to understand how they work and the more likely you'll be to divine practical applications for them.
Case in point: In Figure 10-36, working in the standard composite RGB view, the Add Noise filter was applied three times in a row using the same 100-percent setting as before. Then Filter Pixelate Color Halftone was applied, with a Max. Radius value of 12 pixels, and the other values left set to their defaults. (Color Halftone automatically applies different settings to different channels, so there was no need to switch channels this time around.) Last, Filter Distort ZigZag was chosen , with an Amount value of 30 percent and a Ridges value set to 5. The Style was Pond Ripples. The first image in Figure 10-36 shows the finished dmap.
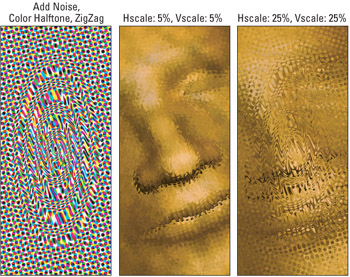
Figure 10-36: A displacement map can be as wild as you want it to be. Here a colorful dmap is crafted using the Color Halftone and ZigZag filters (left) in which red and green channels are unique. Then the dmap was applied to the image using small Scale values (middle and right).
The second and third images in Figure 10-36 show displacements achieved using the Color Halftone dmap. Because the dmap texture is so busy, dramatic effects are produced using small Scale values. As with Figure 10-33, the results are ripple patterns that aren't possible using any filter but Displace. That's wonderful and all, but you might reasonably wonder how many ripple patterns a person really needs, especially given the fact that the dmap has such a destructive effect on the central feature of the sun god: his face. Is there a way to design a dmap that affects one part of an image and protects another?
The answer is an unqualified yes. In fact, most artists who use displacement maps on a regular basis design a dmap with a specific image in mind. This means either creating the dmap from the image itself, or tracing the dmap over the image.
STEPS: Tracing an Image-Based dmap
If you want to go with the latter option, follow these steps:
-
With the Color Halftone dmap and image file open , copy the image and paste it into the dmap image. Photoshop registers the pasted image in place and relegates it to its own layer, thus ensuring the original pattern is unharmed.
-
Create a new layer and use the Elliptical Marquee tool to approximately select the circular area around the object .
-
Choose Select Feather. Use the effect with a Radius of 64 pixels.
-
Fill the selected area filled with 50 percent gray using Edit Fill. Gray is the neutral color in a dmap ” it shifts colors in the image neither horizontally nor vertically ” so the face is now protected.
-
Having finished tracing the sun god face, you can delete the pasted layer. The resulting custom dmap appears at the top of Figure 10-37.
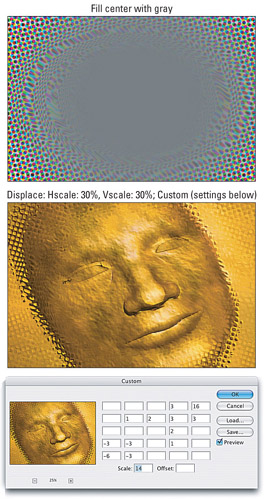
Figure 10-37: The central portion of the dmap was filled with gray to protect the face(top). This way, when theDisplace filter was applied, the area around the face could be rippled without harming the features (bottom). Finally, theCustom filter was used to emboss the image using the settings shown (inset). -
Save the dmap in the PSD format. Note that when saving layered dmaps, it's necessary to include a flattened version of the image inside the PSD file. So either choose Edit Preferences File Handling and make sure that the Maximize PSD File Compatibility pop-up menu isn't set to Never or flatten the image before saving it. Next, back in the face image.
-
Choose Filter Distort Displace. Apply the new dmap using Scale values of 30 percent each.
-
To enhance the effect, choose Filter Other Custom. This creates a color emboss effect, as in the bottom example in Figure 10-37.
Now, if you're keeping up with this series of steps, you might wonder why you would go to all the effort of adding a gray area to the dmap file. Wouldn't it be easier to just select the area around the sun god's face and apply the previous dmap to the selection? After all, a selection protects an image just as well as gray pixels in a custom displacement map. But by learning how to customize a dmap to fit the needs of a specific image, you prepare yourself to take dmaps to the next level, as described in the next section.
Designing custom transformations
Let's face facts ” Photoshop is very nearly flawless. Well, it's not actually flawless ” there are still a dozen or so features Adobe could add to make it closer to flawless ” but it's a great application and it's been a great tool for millions of users. That said, among the features that Photoshop is lacking is an envelope distortion function. Envelope distortions enable you to move areas of an image by dragging points inside a grid. Armed with an enveloping function, you could, say, precisely taper the jaw line along a face, adjust the position of a person in a photograph, or scale one part of an image independently of another.
With all that said, take a gander at Figure 10-38. Three kids out boogie-boarding. But for our money, the littlest surfer seems a tad too far away from the safety of his siblings. After all, we wouldn't want the little tyke gobbled up by a shark, or something. Time to pull the youngster over to the left a bit.
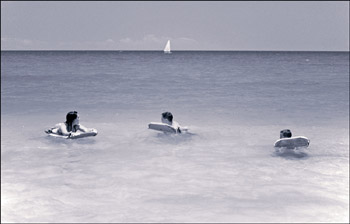
Figure 10-38: Everyone looks spiffy. But they've got to get closer together. This is a job for a dmap.
Using the photo in Figure 10-38 as an example, you can see how an envelope distortion would take care of this problem lickety-split. But as stated, Photoshop doesn't give us one. So it's fortunate that there's a workaround ” the virtuous and flexible dmap. Not any dmap, mind you, but a dmap that's been specially customized for this image.
STEPS: Envelope Distortions with dmaps
To make the dmap, follow these steps:
-
Create a new image that matches the width of the photo . Because you want to perform a horizontal displacement only ” the vertical alignment of the elements is fine ” the height of the dmap is not important. So to save memory, you create a short strip of an image, much like the one shown at the top of Figure 10-39.
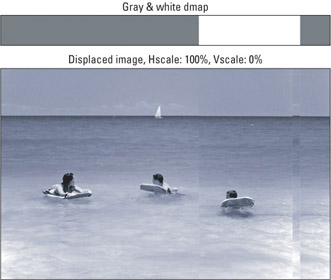
Figure 10-39: A neutral gray dmap with a swatch of white toward the right (top) serves to shift the boy to the left without disturbing any other elements in the photo. Unfortunately, the transition between displaced pixels and those around them is brusque, to say the least. -
Fill the dmap with 50 percent gray and white. Gray indicates no movement; white moves pixels to the left. No black is needed.
-
Make the white cover the distance that you want to move your subject.
-
Save the image as a PSD file and apply it to your photo using the Displace filter. Because no vertical displacement is needed, you can set the Vertical Scale value to 0 percent. For the photo shown in Figure 10-38, a Horizontal Scale value of 100 percent happens to work well; you'll want to experiment when you try this technique.
The upshot is that Photoshop shifts Junior, part and parcel , 128 pixels to the left. As shown in the second image in Figure 10-39, this corrects the composition problem, but it results in an abrupt transition between our boy and the world around him ” more like we've gone at him with a pair of scissors than used glorious Adobe Photoshop to solve our problems. The same result could have been crudely achieved by selecting the subject with the Rectangular Marquee tool and moving it.
The rules learned earlier still apply. If you want to smooth out transitions in a displacement, blur the dmap.
-
After undoing the displacement, return to the dmap file.
-
Choose Filter Blur Gaussian Blur and enter a Radius value of 30 pixels. As shown in the first example in Figure 10-40, this is enough to smooth out the transitions between gray and white without eliminating the gray along the right-hand edge of the dmap.
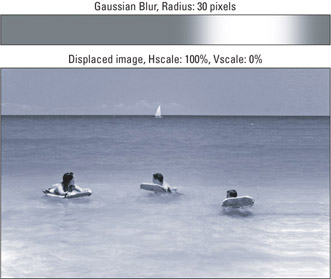
Figure 10-40: To soften the transitions, apply the Gaussian Blur command to the gray-and-white dmap file (top). When the Displace filter is reapplied using the same setting as before, a much more believable effect is achieved (bottom).
Now when you apply the Displace filter, you get a continuous transformation effect. Granted, you end up with stretch marks along the right edge of the image, as witnessed in Figure 10-40. But that's okay. All you have to do is crop them away, and you get the work of utter perfection shown in Figure 10-41. If you inspect the final image closely, you may notice a couple of ripples in the water that weren't there before. But those bends are entirely consistent with the angle and lighting of the shot.
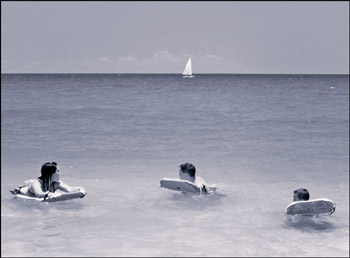
Figure 10-41: To complete the custom transformation, crop away the stretched pixels that appear along the right-hand side of the image. You'd never know anything was done to the image at all.
EAN: 2147483647
Pages: 95