Distortion Filters
For the most part, commands in the Distort submenu are related by the fact that they move colors in an image to achieve unusual stretching, swirling, and vibrating effects. They're rather like the transformation commands from the Edit menu in that they perform their magic by relocating and interpolating colors rather than by altering brightness and color values.
The distinction, of course, is that whereas the transformation commands let you scale and distort images by manipulating four control points, the Distort filters provide the equivalent of hundreds of control points, all of which you can use to affect different portions of an image. In some cases, you're projecting an image into a fun- house mirror; other times, it's a reflective pool. You can fan images, wiggle them, and change them in ways that have no correlation to real life, as illustrated in the disturbing but illuminating Figure 9-18, which employs the Spherize, Twirl, Polar Coordinates, Shear, Wave, and Ripple filters, plus Liquify.
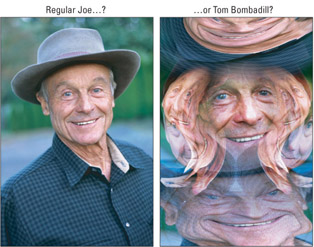
Figure 9-18: This is your image (left); this is your image on distortion filters (right) ” six of them, in fact. Liquify was also used for the effects at the bottom of the image. And, if you don't think Tom Bombadill was on something, read that chapter in The Fellowship of the Ring one more time.
Distortion filters are powerful tools. Although they are easy to apply, they are extremely difficult to use well. Here are some rules to keep in mind:
-
Practice makes practical: Distortion filters are like complex vocabulary words. You don't want to use them without practicing a little first. Experiment with a distortion filter several times before trying to use it in a real project. You may even want to write down the steps you take so that you can remember how you created an effect. Then again, why bother writing down steps when you can use the new History Log feature to save a record for you?
Cross-Reference Chapter 13's section on the File Info dialog box tells you how to find and view the content of the History Log.
-
Use caution during tight deadlines: Distortion filters are enormous time- wasters . Unless you know exactly how you want to proceed, you may want to avoid using them when time is short. The last thing you need when you're working under the gun is to get trapped trying to pull off a weird effect.
-
Apply selectively: The effects of distortion filters are too severe to inflict all at once. You can achieve marvelous, subtle effects, however, by distorting feathered and layered selections. Although you would hardly call the image in Figure 9-19 subtle, no single effect was applied to the entire image; each face is a separate layer and layer mask, with a different distortion filter applied. (The Liquify command was used to create the distortion in the bottommost face in the image.) The upcoming section on distorting with the Liquify command explains how to use this tool.
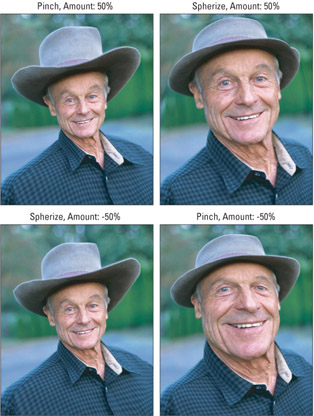
Figure 9-19: A kind and decent subject endures more humiliatingabuse ” thanks to thePinch and Spherize filters. Notice how negative values makePinch spherize, andSpherize pinch . -
Combine creatively: Don't expect a single distortion to achieve the desired effect. If one application isn't enough, apply the filter again. Experiment with combining different distortions.
Caution Distortion filters interpolate between pixels to create their fantastic effects. This means the quality of your filtered images depends on the setting of the Interpolation option in the General Preferences dialog box. If a filter produces jagged effects, the Nearest Neighbor option is probably selected. Try selecting the Bicubic or Bilinear option instead.
Reflecting an image in a spoon
Most people take their first venture into distortion filters by using Pinch and Spherize. Pinch maps an image on the inside of a sphere or similarly curved surface; Spherize maps it on the outside of a sphere. It's sort of like looking at your reflection on the inside and outside of a spoon.
You can apply Pinch to a scanned face to squish the features toward the center or apply Spherize to accentuate the girth of the nose. Figure 9-19 illustrates both effects. It's a laugh , and you pretty much feel as though you're onto something that no one else ever thought of before.
You can pinch or spherize an image using either the Pinch or Spherize command. Note that a positive Amount value in the Pinch dialog box produces a similar effect to a negative value in the Spherize dialog box. There is a slight difference between the spatial curvature of the 3-D calculations: Pinch pokes the image inward or outward using a rounded cone ” we're talking bell-shaped, much like a Gaussian model. Spherize wraps the image on the outside or inside of a true sphere. As a result, the two filters yield subtly different results. Pinch produces a soft transition around the perimeter of a selection; Spherize produces an abrupt transition. If this doesn't quite make sense to you, just play with one, try out the same effect with the other, and see which you like better.
Another difference between the two filters is that Spherize provides additional options that enable you to wrap an image on the inside or outside of a vertical or horizontal cylinder, as shown in Figure 9-20. To try out these effects, select the Horizontal Only or Vertical Only options from the Mode pop-up menu at the bottom of the Spherize dialog box. Perhaps counterintuitively, Horizontal Only wraps an image around a vertical cylinder and vice versa. There's just no accounting for the peculiarities of calculus, you know?
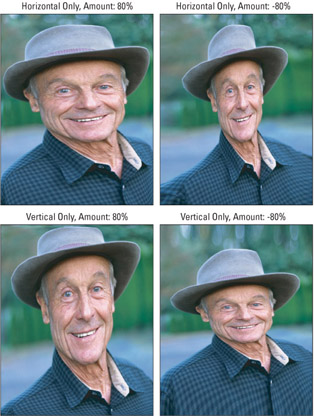
Figure 9-20: Spherize also lets you wrap your image around a vertical (top left) or horizontal(bottom left) cylinder. Or try your hand at wrapping the image around the inside of the cylinder (right examples).
| Tip | Both filters can affect elliptical regions only. If a selection outline is not elliptical, Photoshop applies the filter to the largest ellipse that fits inside the selection. As a result, the filter may leave behind a noticeable elliptical boundary between the affected and unaffected portions of the selection. To avoid this effect, select the region that you want to edit with the Elliptical Marquee tool and then feather the selection before filtering it. This softens the effect of the filter and provides a more gradual transition (even more so than Pinch already affords). |
One of the more remarkable properties of the Pinch filter is that it lets you turn any image into a conical gradation. Figure 9-21 illustrates how the process works. First, you may want to blur the image to eliminate any harsh edges between color transitions, and then apply the Pinch filter at full strength (100 percent). Reapply the filter several more times. Each time you press Ctrl+F ( z +F on the Mac), the center portion of the image recedes farther and farther into the distance, as shown in Figure 9-21. After 10 repetitions, the face in the example all but disappeared.
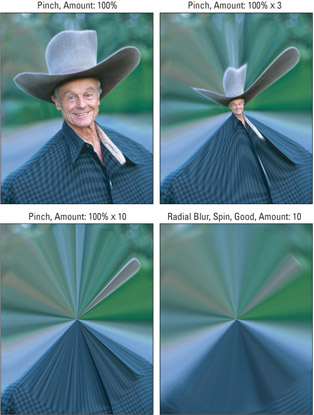
Figure 9-21: The image was pinched 10 times and the Radial Blur filter applied with its default settings to create a conical gradation.
Next , apply the Radial Blur filter set to Spin 10 pixels or so to mix the color boundaries a bit. The result is a type of gradation that you can't create using Photoshop's Gradient tool.
Twirling spirals
The Twirl filter rotates the center of a selection while leaving the sides fixed in place. The result is a spiral of colors that looks for all the world as if you poured the image into a blender set to a very slow speed.
When you choose Filter Distort Twirl, you can enter a positive value from 1 to 999 degrees to spiral the image in a clockwise direction. Enter a negative value to spiral the image in a counterclockwise direction. Figure 9-22 shows 30-degree and 100-degree spirals in both positive and negative directions. As you are probably already aware, 360 degrees make a full circle, so the maximum 999-degree value equates to a spiral that circles around almost three times, as shown in the bottom right example in Figure 9-23.
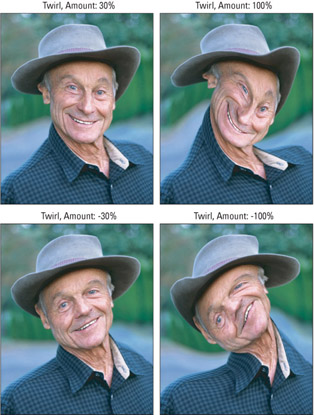
Figure 9-22: You can adjust the direction of the Twirl filter to suit whichever side of the equator you happen to be on.
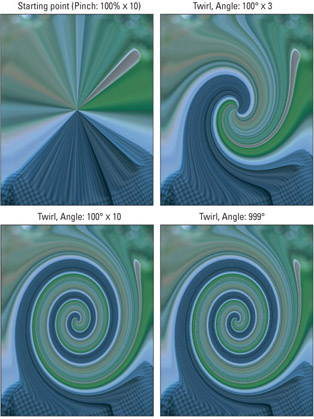
Figure 9-23: The poor Pinch-headed subject (upper left) gets subjected to the tortures of the Twirl filter (upper right). Repeatedly applying the Twirl filter at a moderate value(bottom left) allows you to have more control over the level of Twirl achieved than applying the filter once at a high value (bottom right).
| Tip | The Twirl filter produces smoother effects when you use lower Angle values. Therefore, you're better off applying a 100-degree spiral 10 times rather than applying a 999-degree spiral once. |
In addition to creating ice cream swirls like those shown in Figure 9-23, you can use the Twirl filter to create organic images virtually from scratch, as witnessed by Figures 9-24 and 9-25. To create the images shown in Figure 9-24, things got started with Mr. Pinch-head (top left) and the Spherize filter was used to flex the image vertically by entering 100 percent in the Amount option box and selecting Vertical Only from the Mode pop-up menu. After repeating this filter several times, a stalactite- stalagmite effect was achieved, as shown in the top right example of the figure. To increase the contrast in the image, Unsharp Mask was applied, followed by a little Gaussian Blur to make things creamier. The Twirl filter was repeatedly applied to curl the straight spikes like two symmetrical hairs. The result merges the simplicity of pure math with the beauty of bitmapped imagery.
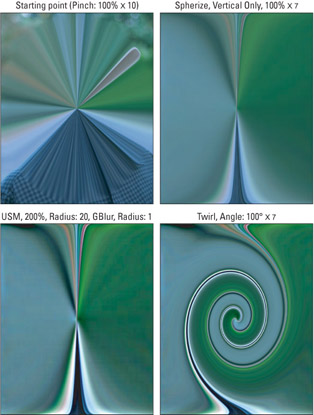
Figure 9-24: You can create surprisingly naturalistic effects using distortion filters exclusively.
Figure 9-25 illustrates a droplet technique designed years ago by extraordinary digital artist, Mark Collen, and is accompanied by the steps to create the look.
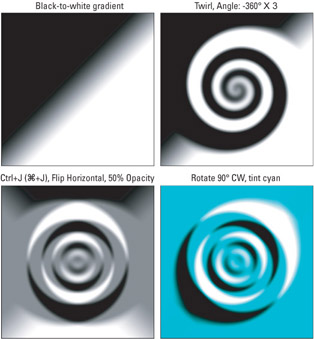
Figure 9-25: Although they appear as if they might be the result of the ZigZag filter, these images were created entirely by using the Gradient tool, the Twirl filter, and a couple of transformations.
STEPS: Creating a Thick-Liquid Droplet
-
Press D to restore the default foreground and background colors.
-
Shift+drag with the Rectangular Marquee tool to select a square portion of an image.
-
Create a linear gradation by dragging inside the selection outline with the Gradient tool. Before you drag, select the linear gradient style in the Options bar and select the foreground to background gradient from the Gradients drop-down palette, also in the Options bar. Drag a short distance near the center of the selection from upper left to lower right, creating the gradation shown in the top left image in Figure 9-25.
-
Choose the Twirl filter and apply it at “360 degrees so that the spiral moves counterclockwise. To create the top right image in the figure, the Twirl filter was applied three times. Each repetition of the filter added another ring of ripples.
-
Press Ctrl+J (Win) or z +J (Mac) to copy the selection to a layer.
-
Choose Edit Transform Flip Horizontal.
-
Lower the Opacity value to 50 percent. You can do this from the keyboard by selecting the Rectangular Marquee tool and pressing 5. The result appears in the lower left example in Figure 9-25.
-
Choose Edit Transform Rotate 90 ° CW. This rotates the layer a quarter turn, thus creating the last image in the figure. You can achieve other interesting effects by choosing Lighten, Darken, and others from the brush modes pop-up menu.
Now, if a few twirls and transformations can produce an effect this entertaining in black and white, just imagine what you can do in color. On second thought, don't imagine; check out Figure 9-26 instead. Starting with one of Photoshop's predefined gradients ” Blue, Red, Yellow ” the previous Steps 1 through 4 were followed, which resulted in the top-left example. Next, Ctrl+J (or z +J on the Mac) was pressed to clone the image to a separate layer, and Edit Transform Flip Horizontal chosen . Then the Difference mode was applied from the Layers palette, producing the top-right example.
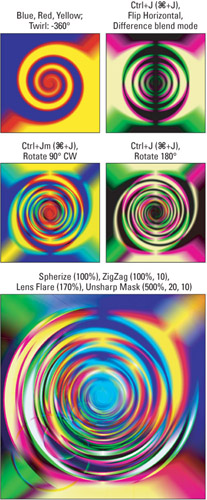
Figure 9-26: Starting with the preset Blue, Red, Yellow gradient, choose theTwirl filter (top left). Next, make extensive use of floating copies of layers with the Difference blend mode (next three examples), and finish with a littleSpherize, ZigZag, Lens Flare, andUnsharp Mask to mutate the concentric rings into vividly colored puddles(bottom).
From there, it was largely a matter of cloning the layer and applying more transformations. Ctrl+J ( z +J) was pressed again and then Edit Transform Rotate 90 ° Clockwise was chosen to achieve the second effect on the left. Ctrl+J ( z +J) was pressed, and Edit Transform Rotate 180 ° chosen to get the second effect on the right. Because the Difference mode remains in effect for each new layer, the bright colors from one layer invert the colors from the layers below, producing a wild array of colors that go well beyond the original blue, red, and yellow.
To produce the final effect, a series of filters was applied to the top layer only. First, Filter Distort Spherize was selected, and the Amount value set to 100 percent. Then Filter Distort ZigZag was applied, with 100 percent and 10 used, respectively, for the Amount and Ridges values; the Style option was set to Pond Ripples. Next, Filter Render Lens Flare was chosen, with the Brightness value set to 170 percent with a Lens Type of 50 “300m Zoom. The flare starts in the upper-right corner of the image. Finally, Filter Sharpen Unsharp Mask was applied with the settings listed in the figure.
If that went a little fast for you, don't worry. More important than the specific effects is this general category of distortion drawings, which you might think of as synthetics ” because you create them not from digitized photographs but out of thin air. A filter such as Pinch or Twirl enables you to create wild imagery without ever drawing a brushstroke or scanning a photograph. If you can do this much with a simple three-color gradation, just think of what you can do if you throw in a few more colors. Pixels are little more than fodder for these very powerful functions.
Creating concentric pond ripples
When most people think of zigzags, they imagine cartoon lightning bolts, wriggling snakes , scribbles ” anything that alternately changes directions along an axis, like the letter Z. The ZigZag filter does arrange colors into zigzag patterns, but it does so in a radial fashion, meaning that the zigzags emanate from the center of the image like spokes in a wheel. The result is a series of concentric ripples. (The ZigZag filter creates ripples and the Ripple filter creates zigzags. Go figure.)
When you choose Filter Distort ZigZag, Photoshop displays a dialog box offering the following:
-
Amount: Enter an amount between negative 99 and positive 100 in whole- number increments to specify the depth of the ripples. If you enter a negative value, the ripples descend below the surface. If you enter a positive value, the ripples protrude upward.
To illustrate how the Amount value works, check out the sample image pictured in Figure 9-27. Starting with the much-maligned Mr. Pinch as seen in the upper-left example, the image was copied to an independent layer, rotated 180 degrees, and the Overlay blend mode applied (upper right). The layer was floated, Overlay used again, and the Twirl filter applied repeatedly (lower left). Finally, the flag image was pasted in, inverted, and the Difference mode used on the layer. This flattened the entire image (lower right). Pretty cool, huh? Figure 9-28 shows the final image subject to the ZigZag filter with two different Amount values.

Figure 9-27: Mr. Pinch does his duty as a proud American, resulting in a kaleidoscopic sample image.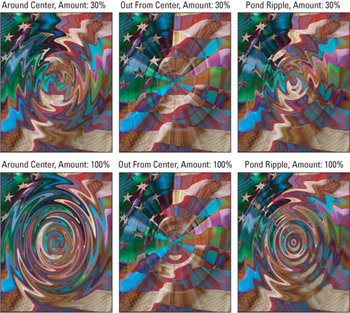
Figure 9-28: The results of applying the ZigZag filter using Amount values of 30 percent (top row) and 100 percent (bottom row) and each of the three Style settings. In all cases, the Ridges value was 5. -
Ridges: This option box controls the number of ripples in the selected area and accepts any value from 0 to 20. Figure 9-29 illustrates the difference between a Ridges value of 5 (top row) and 20 (bottom row).
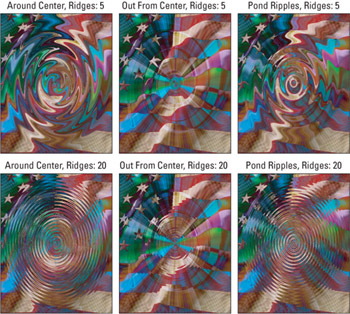
Figure 9-29: The effects of the ZigZag filter using two Ridges values and each of the three Style pop-up menu settings. In all cases, the Amount value was 50. -
Style: The options in this pop-up menu determine how Photoshop moves pixels with respect to the center of the image or selection.
-
Around Center: Select this option to rotate pixels in alternating directions around the center without moving them outward, as shown in the left columns of Figures 9-28 and 9-29. This is the only option that produces a true zigzag effect.
-
Out From Center: When you select this option, Photoshop moves pixels outward in rhythmic bursts according to the value in the Ridges option box. The middle columns of Figures 9-28 and 9-29 show some examples.
-
Pond Ripples: This option is really a cross between the previous two. It moves pixels outward and rotates them around the center of the selection to create circular patterns. As demonstrated in the right columns of Figures 9-29 and 9-30, this option truly results in a pond ripple effect.
Creating parallel ripples and waves
Photoshop provides four means to distort an image in parallel waves, as if the image were lying on the bottom of a shimmering or undulating pool. Of the four, the ripple filters ” which include Ripple, Ocean Ripple, and Glass ” are only moderately sophisticated, but they're also relatively easy to apply. The fourth filter, Wave, affords you greater control, but its options are among the most complex Photoshop has to offer.
The Ripple filter
To use the Ripple filter, choose Filter Distort Ripple. Photoshop displays the Ripple dialog box, giving you the following options:
-
Amount: Enter an amount between negative and positive 999 in whole-number increments to specify the width of the ripples from side to side. Negative and positive values change the direction of the ripples, but visually speaking, they produce identical effects. The ripples are measured as a ratio of the Size value and the dimensions of the selection ” all of which translates to"experiment and see what happens." You can count on getting ragged effects from any value over 300, as illustrated in Figure 9-30.
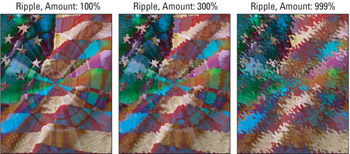
Figure 9-30: The effects of three different Ripple filter Amount values. Notice that the transitions turn jagged between 300 and 999 percent, so high values are generally discouraged. -
Size: Select one of the three options in the Size pop-up menu to change the length of the ripples. The Small option results in the shortest ripples and therefore the most ripples. Combining the Small option with a relatively high Amount value results in a textured-glass effect. The Large option results in the longest and fewest ripples. Figure 9-31 shows an example of each Size option.
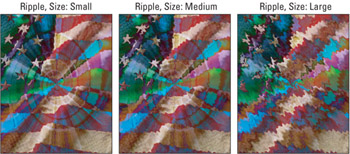
Figure 9-31: The effects the Ripple filter set to each of the three Size settings. Medium generally produces the most even effects.Tip You can create a blistered effect by overlaying a negative ripple onto a positive ripple. Try this: First, copy the selection. Then apply the Ripple filter with a positive Amount value ” say, 300. Next, paste the copied selection and apply the Ripple filter at the exact opposite Amount value, in this case, “300. Press 5 to change the Opacity value to 50 percent. The result is a series of diametrically opposed ripples that cross each other to create teardrop blisters.
Ocean Ripple and Glass
The Ocean Ripple and Glass filters are gifts from Gallery Effects. Both filters emulate the effect of looking at an image through textured glass. These two distorters so closely resemble each other that they would be better merged into one. But where the effects filters are concerned , interface design is as fickle and transitory as the face on the cover of Tiger Beat magazine.
The Ocean Ripple filter's two parameters, Ripple Size and Ripple Magnitude, are illustrated in Figure 9-32. Compare the examples horizontally to observe an increase in Ripple Size values from 3 to the maximum of 15; compare vertically to observe an increase in Ripple Magnitude from 5 to the maximum of 20. As you can see, you can vary the Ripple Size value with impunity. But raise the Ripple Magnitude value, and you're looking through sculpted glass.
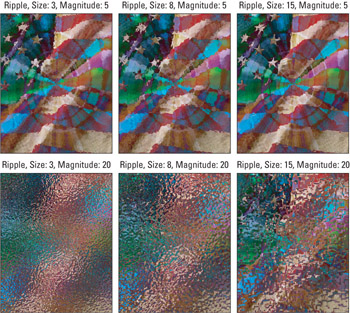
Figure 9-32: Raising the Ripple Size value spreads out the effect; raising the Ripple Magnitude adds more depth and contrast to the ripples.
The principal difference between Glass and Ocean Ripple is that while Ocean Ripple uses one preset distortion texture, Glass gives you four to choose from, plus it lets you load your own (similar to Texturizer). You can invert the texture ” high becomes low, low becomes high ” and also scale it to change its size relative to the layer you're distorting. Figure 9-33 uses the Tiny Lens texture throughout and demonstrates how different the effect can be depending on the Distortion and Smoothness settings. Compare the examples in the figure horizontally for proof that Distortion is perhaps the best-named parameter in all of Photoshop. Smoothness, on the other hand, is sort of like an "anti “Ripple Magnitude" setting. High Smoothness settings in Glass are analogous to low Ripple Magnitude settingsin Ocean Ripple.
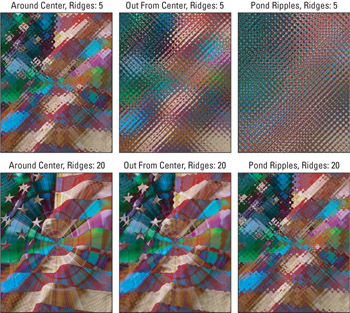
Figure 9-33: For maximum privacy while showering, choose a Glass door with high Distortion and low Smoothness settings (upper right).
The Wave filter
Now that you've met the Ripple family, it's time to ride the Wave by choosing Filter Distort Wave (that's the easy part) to display the Wave dialog box shown in Figure 9-34. Things get a little more complicated after that, but hang on. Photoshop presents you with the following options:
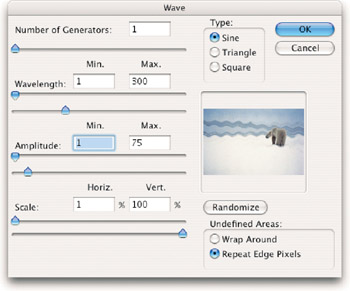
Figure 9-34: The Wave dialog box lets you wreak scientific havoc on an image. Put on your pocket protector, take out your slide rule, and give it a whirl.
-
Number of Generators: Right off the bat, the Wave dialog box boggles the brain. To simplify, imagine rocks thrown into water ” the more you throw, each generating its own set of ripples, the more ripples you get. One generator means that you throw in one rock to create one set of waves. You can throw in two rocks to create two sets of waves, three rocks to create three sets of waves, and all the way up to a quarry full of 999 rocks to create, well, you get the idea. If you enter a high value, however, be prepared to wait a few years for the preview to update. If you can't wait, press Escape, which turns off the preview until the next time you enter a value in the dialog box.
-
Wavelength and Amplitude: Beginning to feel like you're playing with a ham radio? The Wave filter produces random results by varying the number and length of waves (Wavelength) as well as the height of the waves (Amplitude) between minimum and maximum values, which can range from 1 to 999. (The Wavelength and Amplitude options, therefore, correspond in theory to the Size and Amount options in the Ripple dialog box.) Figure 9-35 demonstrates the difference between Wavelength and Amplitude.
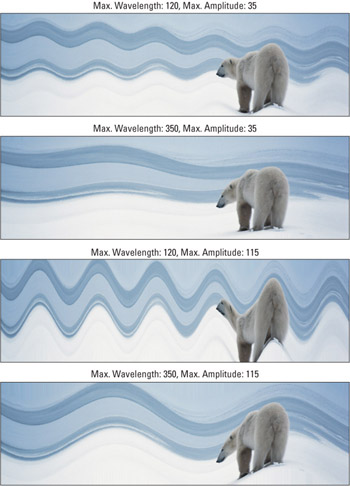
Figure 9-35: With all other parameters set according to the specifications at the bottom of the figure, increasing Wavelength creates a larger horizontal distance between the peaks of waves. Increasing Amplitude creates a higher wave peak. -
Scale: You can scale the effects of the Wave filter between 1 and 100 percent horizontally and vertically. For clarity's sake, all the effects featured in Figures 9-35 use only Vertical Scale, with Horizontal Scale set at the minimum of 1 percent. Increasing Horizontal Scale would make the waves go back and forth as well as up and down.
-
Type: You can select from three kinds of waves. As shown in Figures 9-36, the Sine option produces standard sine waves that rise and fall smoothly in curves, just like real waves. The Triangle option, shown in the first and third examples of Figure 9-36, creates zigzags that rise and fall in straight lines, like the edge of a piece of fabric cut with pinking shears. The Square option, illustrated in the second and last examples of Figure 9-36, has nothing to do with waves at all, but rather organizes an image into a series of rectangular groupings, reminiscent of Cubism. You might think of this option as an extension of the Mosaic filter. All examples in Figure 9-36 utilize a Number of Generators setting of 1.
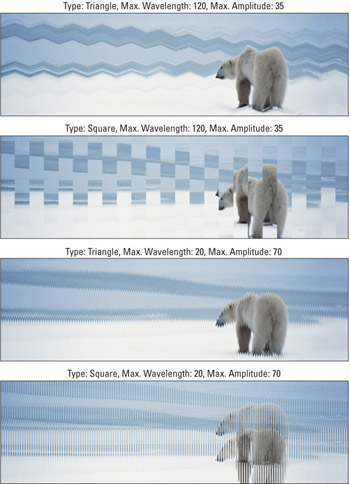
Figure 9-36: The effects of the unsmooth Triangle and Square types, using relatively high Wavelength and low Amplitude values (top two examples) versus relatively low Wavelength and high Amplitude values (bottom two examples). -
Randomize: The Wave filter is random by nature. If you don't like the effect you see in the preview box, click the Randomize button to stir things up a bit. You can keep clicking the button until you get an effect you like.
-
Undefined Areas: The Wave filter distorts a selection to the extent that gaps may appear around the edges. You can fill those gaps either by repeating pixels along the edge of the selection, as in the figures, or by wrapping pixels from the left side of the selection onto the right side and pixels from the top edge of the selection onto the bottom.
Distorting an image along a curve
The Distort command (Edit Transform Distort), which isn't discussed elsewhere in this book, creates four corner handles around an image. You drag each corner handle to distort the selected image in that direction. Unfortunately, you can't add other points around the edges to create additional distortions, which can be frustrating if you're trying to achieve a specific effect. If you can't achieve a certain kind of distortion using Edit Free Transform, the Shear filter may be your answer.
Shear distorts an image or selection along a path . When you choose Filter Distort Shear, you get the dialog box shown in Figure 9-37. Initially, a single line that has two points at either end appears in the grid at the top of the box. When you drag the points, you slant the image in the preview. This, plus the fact that the filter is named Shear ” Adobe's strange term for skewing (it appears in Illustrator as well) ” leads many users to dismiss the filter as nothing more than a slanting tool. But in truth, it's more versatile than that.
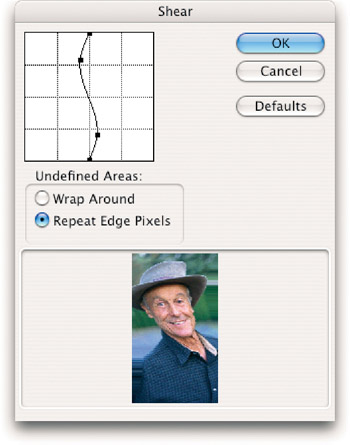
Figure 9-37: Click inside the grid line in the upper-left corner of theShear dialog box to add points to the line. Drag these points to distort the image along the curve.
You can add points to the grid line simply by clicking on it. A point springs up every time you click an empty space in the line. Drag the point to change the curvature of the line and distort the image along the new curve. To delete a point, drag it off the left or right side of the grid. To delete all added points and return the line to its original vertical orientation, click the Defaults button.
The Undefined Areas options work just as they do in the Wave dialog box (described in the preceding section). You can either fill the gaps on one side of the image with pixels shoved off the opposite side by selecting Wrap Around, or repeat pixels along the edge of the selection by selecting Repeat Edge Pixels.
| Tip | Although Shear was obviously conceived to create horizontal distortions, you may find you need to create a vertically based distortion instead. If you can't change the filter, why not change the image? As shown in Figure 9-38, simply rotating the image on its side allows you to give the desired slant to the subject's face. You do this by choosing Image Rotate Canvas 90 ° CCW. This allows vertical distortion of the image with the Shear filter. Choosing Image Rotate Canvas 90 ° CW restoresthe image to its original position. 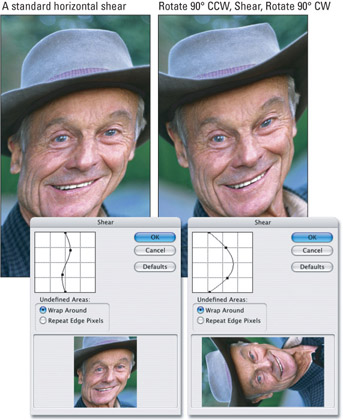 Figure 9-38: If you don't like the effect achieved with a normal application of Shear (left), you can vertically distort the image with the Shear filter (right). |
Changing to polar coordinates
The Polar Coordinates filter is another one of those gems that a lot of people shy away from because it doesn't make much sense at first glance. When you choose Filter Distort Polar Coordinates, Photoshop presents a dialog box with two radio buttons , as shown in Figure 9-39. You can either map an image from rectangular to polar coordinates or from polar to rectangular coordinates.
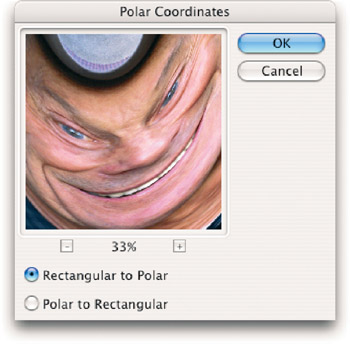
Figure 9-39: In effect, the Polar Coordinates dialog box enables you to map an image onto a globe and view the globe from above.
All right, time for some global theory.
On a spherical globe, lines of latitude converge at the poles. On a Mercator map, they run absolutely parallel. Because the Mercator map exaggerates the distance between longitude lines as you progress away from the equator, it likewise exaggerates the distance between lines of latitude. The result is a map that becomes enormous at each of the poles. It's why, when you look at a Mercator map, Antarctica looks all smooshed and flat along the bottom, and Greenland looks bigger than Canada, the United States, and Mexico combined.
When you convert an image to polar coordinates (by selecting the Rectangular to Polar radio button in the Polar Coordinates dialog box), it's as if you're looking down on it from one of the poles. This means that the entire length of the top edge of your image becomes a single dot in the exact center of the polar projection. The length of the bottom edge of the map wraps around the entire perimeter of the circle.
If you select the Polar to Rectangular option, the Polar Coordinates filter produces the opposite effect. Imagine for a moment that the image shown in the upper-left corner of Figure 9-39 is a fan spread out into a full circle. Now imagine closing the fan, breaking the hinge at the top, and spreading out the rectangular fabric like an accordion. The center of the fan unfolds to form the top edge of the fabric, and what was once the perimeter of the circle is now the bottom edge of the fabric. This can be especially useful for examining the composition of a spiraling or concentric effect, as demonstrated in the upper right image in Figure 9-40.
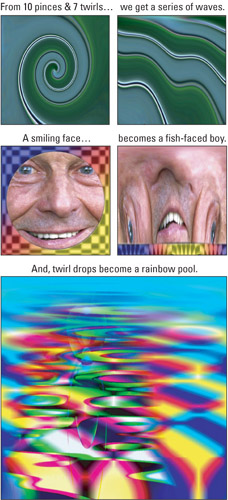
Figure 9-40: A pair of circular images (left) converted from polar to rectangular coordinates (right).The final example shows the result of applying the Polar toRectangular option to the twirl- drops image from Figure 9-26.
Alternatively, if you're feeling adventurous, try it out on a person's face. As the second row of images in Figure 9-40 illustrates, the Polar to Rectangular setting can melt a person's eyes down his cheeks and give you a once-in-a-lifetime opportunity to look up his nose. It's not attractive, but isn't the world filled with enough good-looking people?
As a special bonus, notice that the right side of each of the filtered images matches up perfectly with its left side. This means the image will transition seamlessly when repeated horizontally, perfect for building patterns.
| Tip | The Polar Coordinates filter is a great way to edit gradations. After drawing a linear gradation with the gradient tool, try applying Filter Distort Polar Coordinates with the Polar to Rectangular option selected. (Rectangular to Polar just turns it into a radial gradation, sometimes with undesirable results.) You get a redrawn gradation with highlights at the bottom of the selection. Press Ctrl+F ( z +F on the Mac) to reapply the filter to achieve another effect. You can keep repeating this technique until jagged edges start to appear. Then press Ctrl+Z ( z +Z) to return to the last smooth effect. |
Distorting with the Liquify command
The final essential distortion function isn't located under the Filter Distort sub- menu. In fact, in many respects, it's not a filter at all. The Liquify command is more of a separate distortion utility that just happens to run inside Photoshop. It enables you to perform any number of distortions ” you can warp, shift, twirl, expand, contract, and even copy pixels. It grants you multiple undos and redos before you apply the final effect. And unlike other distortion filters, which apply a uniform effect across a layer or selection, Liquify lets you modify pixels by pushing them around with a brush.
The result is a distortion filter that doubles as a powerful retouching tool. Consider the images in Figure 9-41. We took so many liberties with this poor girl in Chapter 6, it seems only fair to continue the abuse here. It's like having your own degree in plastic surgery from the most questionable and unacredited medical school south of the banana republic of your choice.
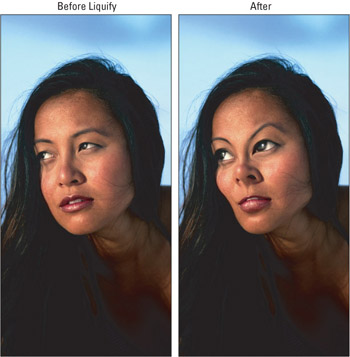
Figure 9-41: Using only the Liquify command, the perfectly normal-looking young woman on the left is transformed into a refugee from some anime cult classic on the right.
| Note | English teachers and ex “spelling bee champions may notice the habitually strange spelling of the word "liquefy" throughout this and the following pages. Rather than referring to the "Liquefy command," which would not match your screen, or the condescending "Liquify [sic] command," which you would get "sic" of quickly, it's easier to be flexible and adopt Adobe's spelling. Photoshop's engineers swear that "liquify" is an acceptable alternative spelling, and they seem to be technically right. But here's a head-scratcher: If you use the Type tool to enter the word "liquify"and then choose Edit Check Spelling, Photoshop will suggest liquefy, liquefied, liquefier, liquefies, and liquefying, but it always wants to replace that second I with an E. Oh, well. |
Liquify basics
To enter the world of Liquify, choose the Liquify command from the Filter menu or press the keyboard shortcut Ctrl+Shift+X ( z +Shift+X on the Mac). Photoshop displays the immense Liquify image window shown in Figure 9-42, breathtaking in its wealth of tools and options.
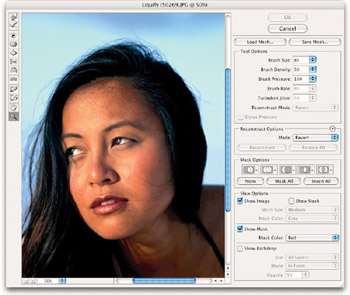
Figure 9-42: Choose Filter Liquify to shove pixels around in your image by dragging them with a brush.
The miniature toolbox on the left side of the window contains tools for distorting your image. You drag or click with the tools as explained in the next section. (You can even select tools from the keyboard, as indicated by keys in parentheses.) But before you begin, here are a few basic facts:
-
All tools respond to the Brush Size setting on the right side of the window. Press the right and left bracket keys, [ and ], to raise and lower the brush size from the keyboard by 2 pixels. This is a bit of a departure from Photoshop's standard painting tools, where pressing [ or ] routinely changes the brush size by 10 pixels or more. To change the brush size inside the Liquify window more rapidly , press and hold [ or ]. Or press Shift with a bracket key to change the brush size by 20 pixels. Throughout, your cursor reflects the approximate brush size.
-
The Brush Density setting determines how much feathering the edges of your cursor will have while you are creating your distortions. A smaller Brush Density setting means that effects will be more localized to the center of the brush.
-
The Brush Pressure option controls the impact of the tools; higher values produce more pronounced effects. If you work with a pressure-sensitive tablet, select the Stylus Pressure check box to make Photoshop adjust the tool pressure based on the amount of pressure you put on the pen stylus.
-
The Brush Rate option controls the strength of the tool that you use. Available when you use the reconstruct, twirl clockwise, pucker, bloat, and turbulence tools, the Brush Rate option controls the strength of a tool when you click a particular area but keep the cursor still. The higher the Brush Rate setting, the faster distortions will apply to the area.
Tip You can use the standard shortcuts Ctrl+plus to zoom in and Ctrl+minus to zoom out ( z +plus and minus on the Mac). Use the scroll bars to reposition the image, or press the spacebar to get the Hand tool and drag the image inside the window. The Liquify window also provides zoom (Z) and hand (H) tools for your navigation pleasure .
-
If you select a portion of your image prior to choosing Filter Liquify, any deselected areas are considered frozen , which just means that they're unaffected by the distortion tools. You can freeze and then thaw ” make available for editing ” portions of the image as explained in the upcoming section"Freezing and thawing pixels." You can even create partially frozen or thawed areas, which further limits the impact of the distortion tools. In addition to a selection, you can freeze or unthaw pixels based on a combination of the transparency information in the image and even through a layer mask.
-
By default, frozen regions are covered with a red translucent coating, just like masked areas in the quick mask mode. You can change the appearance of the overlay by selecting a new color from the Mask Color pop-up menu in the View Options section of the Liquify window. If you don't want to see the coating at all, turn off the Show Mask check box.
-
If your image contains layers, then you see only the current layer against a transparent checkerboard background when you enter the Liquify window. To see other layers, turn on the Show Backdrop check box in the bottom-right corner of the window. You can either view all layers, or select a specific layer from the nearby pop-up menu. The Opacity option controls how well you can see the other layers.
-
The Mode pop-up menu in the Show Backdrop settings specifies exactly how the layer you're currently distorting interacts with the other layers in the image . Regardless of what you see, Photoshop lets you edit only the active layer.
-
Select the Show Mesh check box to display gridlines on top of the image. You can use the gridlines as a guide if you want to apply very precise distortions. You can even apply your distortions while viewing only the grid by des- electing the Show Image check box. Set the grid size and color by selecting options from the Mesh Size and Mesh Color pop-up menus .
-
You can save a distortion for later use by clicking the Save Mesh button. To use the mesh on both the Mac and PC, the file name needs to end with the extension .msh . Click Load Mesh to load a distortion stored on disk. Note that Photoshop is smart enough to scale the mesh to fit the current image, so a mesh specifically designed for one image may turn out to be useful for another.
The Liquify tools
Okay, so much for the basics. You're probably itching to start mucking around in your pixels, so here's how the distortion tools along the left side of the Liquify window work:
Forward Warp (W): Drag to shove the pixels that lie under your cursor around in the image. At first, it may feel a lot like the Smudge tool. But instead of smearing pixels, you're incrementally moving points in the mesh and that distorts the image. The first example in Figure 9-43 shows a few large- scale changes made with a large brush and the default Pressure value. That's a lot of fun, of course, but it's only practical if you're trying to produce a caricature of Carrot Top, which, let's face it, would be redundant. And yet, when used properly, Forward Warp is the Liquify command's most practical tool. To create the second image, the Forward Warp tool was used, set to a smaller brush size. The biggest difference was in the length of the strokes ” instead of dragging, say, 10 to 20 pixels at a time, only one or two pixels were dragged. As you can see, making lots of little adjustments ” in this case, somewhere in the neighborhood of 30 strokes ” produces the best results.
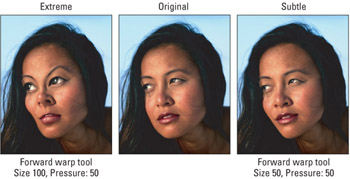
Figure 9-43: Making big strokes with the Forward Warp tool produces bizarre results (left); short, careful drags give you more control (right). But you have to be patient. It took six strokes to make the big changes on the left and about 30 to make the subtle changes on the right.

Avoid a mess by saving your mesh As with other Save buttons found throughout Photoshop's myriad dialog boxes, the Save Mesh button may strike you as the kind of nifty option that may prove useful every once in a while. To go that one better, it's recommended that you use it every time you use the Liquify command. Did you get that? Last thing you should do, right before you click the OK button, is click Save Mesh. Why? Because Photoshop does not automatically keep track of your previous Liquify settings. So if you spend 15 minutes or so working inside the Liquify window, click OK, and then decide that the distortion doesn't work exactly as well as you had hoped, you're left with two unpleasant options: Choose Liquify and try to tweak the image further, which can result in incremental damage to the detail, or undo the previous operation and start over again. But if you saved the mesh, then you always have that last distortion to come back to. And the beauty is, a mesh is purely mathematical until it's applied. So you can use one mesh as a jumping-off point for another without doing incremental damage. Pixels only get involved after you click OK. So don't forget, save your mesh!
Reconstruct (R): Rather than a distortion tool, the Reconstruct tool is more of a reversion tool, in that it undoes the twisting and turning that the other liquify tools inflict on your image. If you've gone on a destructive binge with the other tools, you can use the Reconstruct tool to selectively push and pull pixels back into place. Because you're always referencing the original pixels of the image until you click OK and close the Liquify window, you maintain the ability to restore the image to its original state without any loss of quality. You specify the type of reconstruction you want to perform by choosing an option from the Reconstruct Mode pop-up menu in the Tool Options area. These options are discussed in more detail in the upcoming section on reconstructing and reverting .
Twirl Clockwise (C): Click or drag to spin pixels under your cursor in a clockwise direction.
This tool's one-time companion, the Twirl Counterclockwise tool, no longer owns a slot in the Liquify toolbox. (Now it knows how the Airbrush tool felt in Photoshop 7.) But you can still access the Twirl Counterclockwise tool by pressing the Alt key (Option key on the Mac) when you use the Twirl Clockwise tool. You can press and release Alt in mid-drag to switch the twirl direction on the fly. Figure 9-44 shows how the hair was curled using the Twirl Clockwise tool. Start by clicking and holding in 15 locations to rough in the basic curls, as shown on the left in Figure 9-44. Then click and drag between those curls to fill in the effect, as shown on the right.
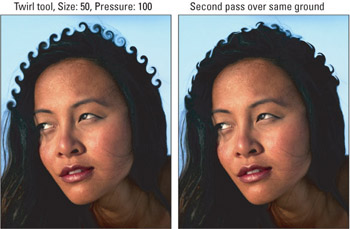
Figure 9-44: The Twirl Clockwise tool creates a fabulous new hairstyle. You can rough in basic curls (left), and fill in the effect between the curls (right).
Pucker (S): With a keyboard shortcut, you could just rename this the Sucker tool. Drag with this tool to suck pixels toward the center of the brush cursor. The effect is similar to applying the Pinch filter with a positive Amount value. If you mouse down instead of dragging, Photoshop steadily increases the extent of the distortion until you release the mouse button.
Bloat (B): When you drag or mouse down with this tool, pixels underneath the cursor move outward, like a stomach after too many trips to the buffet line. As is the case with the Pucker tool, the longer you hold down the mouse button, the stronger the effect you get.
Tip Press the Alt key (or Option on the Mac) to toggle between the pucker and bloat functions on the fly.
The Pucker and Bloat tools are really great and fun to use. They are particularly valuable for removing weight or adding bulk. For example, in the first image in Figure 9-45, the Pucker tool exclusively slims the details in the image. After much clicking and dragging around the jaw line, nose, and chin, the result is larger, buggy eyes, an elongated chin, and a swollen bottom lip.
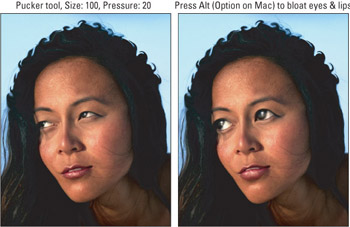
Figure 9-45: Armed with the Pucker tool and a lot of clicking and dragging, you can shave unsightly inches off the nose and lips. To add insult to injury , you can make the subject's eyes bug out.
Push Left tool (O): As you drag with this tool, pixels underneath the cursor move in a direction perpendicular to your drag. For example, if you drag up, pixels get pushed to the left (hence the name). Drag straight down, and pixels move to the right. It sort of follows , then, that dragging in a clockwise circle around an object in your image makes it get bigger, and dragging counterclockwise makes it smaller. To reverse the direction of the pixels, press the Alt key (Option on the Mac).
Tip At first, the Push Left tool may seem unwieldy, resulting in dramatic and sometimes unpredictable movements. But you can control it using two techniques. First, reduce the Brush Pressure value to 25 or lower. Figure 9-46 illustrates the difference between drags performed using Pressure settings of 50 and 20. Second, try using it in a straight line by clicking at one point and Shift+clicking at another, as you might with Photoshop's painting and editing tools. The result is a neat line, great for reducing flab along straight elements, such as arms and legs.
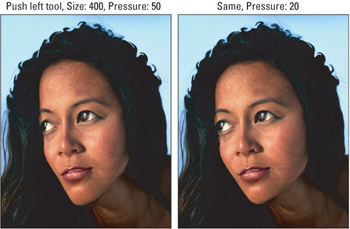
Figure 9-46: Drag down on the left side of the face and up on the right to slim the face with the Push Left tool. The first image used a Brush Pressure value of 50, which produces extreme results. For the second image, the edits repeat, using a Pressure value of 20.
Mirror (M): In Photoshop 7, this was called the Reflection tool, though it still had the keyboard shortcut of M. And now Adobe has renamed it the Mirror tool, which goes with the shortcut. Maybe there's hope for a Sucker tool after all. Dragging with this tool does create a reflection, albeit one you might see in a fun-house mirror. As you drag, Photoshop copies pixels from the area perpendicular to the direction you move the cursor. So if you drag up, you clone pixels to the right of the cursor into the area underneath the cursor; drag down to clone pixels from left to right, as shown in Figure 9-47. Press the Alt key (Option on the Mac) to reflect from another direction on the fly.
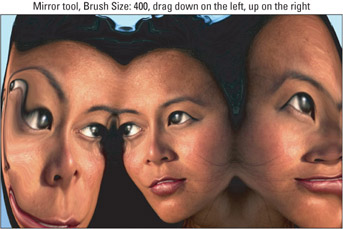
Figure 9-47: Using the mirror tool, drag down on the left side of the woman and up on her right side. Pixels are reflected in a clockwise direction.
Turbulence (T): The Turbulence tool is a variation on the Forward Warp tool that distorts pixels in random directions as you drag. When you select this tool, Photoshop grants you access to a fifth Tool Options value labeled Turbulent Jitter. If the Brush Size value controls how many pixels are affected at a time and Brush Pressure controls the strength of the stroke, then Turbulent Jitter specifies just how much random variation is permitted. The minimum value of 1 causes the Turbulence Tool to behave much like the Forward Warp tool; a maximum value of 100 mixes pixels in all directions.
Figure 9-48 illustrates a few examples. For purposes of demonstration, all four images were created using a very large Brush Size, 400, and the maximum Pressure value, 100. For each image in the top row, the brush was held in place for 15 seconds. The random variations built up from one moment to the next. Not surprisingly, a Turbulent Jitter value of 30 produced a more dramatic effect than one of 10. But things become a bit more complicated when you drag with the tool. For each image in the bottom row, two brushstrokes were made from the bottom of the image to the top, once on the right side of the face and again on the left. This time, the higher Turbulent Jitter value produces more random fluctuation, but both images result in roughly equivalent amounts of distortion, as dictated by the fixed Size and Pressure values.
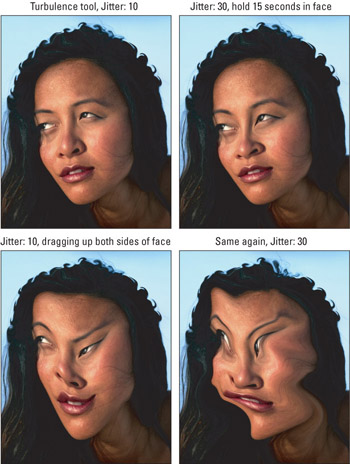
Figure 9-48: Four variations created using the Turbulence tool, twice holding the mouse in place (top row) and twice dragging with the tool on the left and right sides of the face (bottom row). Throughout, the Size and Pressure were set to 400 and 100, respectively.After all that, what good is the tool? When combined with low Turbulent Jitter values, you might find it helpful for introducing small tremors or, if you prefer, turbulence into an image. At higher values, 30 and up, things go haywire very quickly.
| Tip | After you drag with any of these tools, you can undo the effect by pressing Ctrl+Z ( z +Z on the Mac). You also have the option of multiple undos. Press Ctrl+Alt+Z( z +Option+Z on the Mac) to backstep through your operations. Press Ctrl+Shift+Z ( z +Shift+Z) to redo undone distortions. To learn how to go back in time nonsequentially and explore additional reversion options, read the section"Reconstructing and reverting." |
Freezing and thawing pixels
As mentioned a few paragraphs ago, if you make a selection in your image, Photoshop automatically freezes unselected pixels when you enter the Liquify dialog box. This means that any distortions you apply don't affect them. In previous versions of Photoshop, you couldn't thaw these pixels from inside the Liquify window. But Photoshop lets us thaw pixels, freeze new ones, and determine frozen pixels based on transparency and layer masks in ways never before possible.
To freeze a portion of your image from the Liquify window, you have two options:
Freeze mask (F): Press F to select the Freeze Mask tool and then drag over areas that you want to protect. You can adjust the brush size, density, and pressure as you can when working with the distortion tools. But in this case, the Brush Pressure setting determines how deeply frozen the pixels become. At anything less than 100 percent, the pixels become partially distorted when you drag over them with a distortion tool. If you set the pressure to 50 percent, the distortion is applied with half the pressure used in unfrozen areas. Likewise, the Brush Density setting controls how deeply pixels become frozen toward the outside of the brush. To freeze the entire image, click the Mask All button in the Mask Options settings.
Thaw Mask (D): D is for defrost , presumably. To thaw areas that were once frozen, again making them slaves to the distortion tools, paint over them with the Thaw Mask tool. The tool options affect this tool just as they do the Freeze Mask tool. To thaw the entire image, click the None button in the Mask Options settings.
| Tip | Just as you can invert a selection outline or invert a mask in the Quick Mask Mode, you can click the Invert All button to quickly freeze any unfrozen pixels and thaw any frozen ones. |
Among the more complex additions to the Liquify dialog box in Photoshop are the Mask Options settings, located below the Reconstruct Options. Above the None, Mask All, and Invert All buttons just mentioned, you're presented with five different buttons, each giving you a different option for interacting with the current mask. And each of those buttons has three options, when relevant; you can use information from the layer's current selection, transparency, or layer mask.
-
Replace selection replaces the current mask, completely wiping out any freezing or thawing you've done, and replacing it with a mask drawn from the layer's current selection, transparency, or layer mask.
-
Add to selection keeps all thawed areas in the current mask, and also thaws other areas according to the layer's current selection, transparency, or layer mask.
-
Subtract from selection keeps all frozen areas in the current mask, and also freezes other areas according to the layer's current selection, transparency, or layer mask.
-
Intersect with selection only allows an area to stay thawed if it is thawed both in the current mask and according to the layer's current selection, transparency, or layer mask.
-
Invert selection takes the current mask and inverts it, but only within the thawed areas according to the layer's current selection, transparency, or layer mask.
Reconstructing and reverting
In the Reconstruct Options section of the Liquify window (refer to Figure 9-42), you see a Mode pop-up menu plus two buttons, Reconstruct and Restore All. You can use these options not only to revert an image to the way it looked before you applied a distortion, but also to redo a distortion so that it affects the image differently.
The following list outlines reversion possibilities:
-
Undo: The Liquify window doesn't give you a History palette, but Ctrl+Alt+Z and Ctrl+Shift+Z still let you undo and redo sequences of operations. (That's z +Option+Z and z +Shift+Z on the Mac.)
-
Reset: To return everything back to the way it was the very first time you opened the Liquify window, Alt+click (Win) or Option+click (Mac) the Cancel button, which changes to Reset. Not only do you restore your original image, but you also restore the Liquify window's default settings.
Tip Believe it or not, Reset and other reversion techniques are undoable. Just press Ctrl+Z ( z +Z on the Mac) to get your edits back.
-
Restore All: To revert the image without resetting all values to their defaults, click the Restore All button. This affects frozen and thawed areas alike.
Liquify also offers a handful of reconstruction techniques that are more controlled and more complex than the reversion options. When you select the Reconstruct tool, these options become available to use with that tool in the Tool Options. Just paint where you want to reconstruct, using the other Tool Options to determine the severity of your reconstruction.
The reconstruction options are also available, quite naturally, in the Reconstruct Options section. Click Reconstruct to apply a reconstruction in the currently selected Mode. And if you want another option for applying these options, click the little arrow in the upper-right corner of the Reconstruct Options section. Here, you can choose one of the Mode options, which will take you to another dialog box. Drag the slider or type in a number to determine the amount of reconstructing you want to do in that chosen mode; the preview window will update as you drag. After you like what you see, click OK and the reconstruction will be applied.
| Tip | All the reconstruction modes calculate the change to the image based on the warp mesh (grid). To get a better feel for how each mode works, deselect the Show Image check box, turn on Show Mesh and then apply a simple distortion across a portion of the grid. Freeze part of the distorted region and then keep an eye on the grid lines at the intersections between frozen and unfrozen regions as you try out each of the modes. The modes, available in the Reconstruct tool's Reconstruct Mode options and in the Mode menu of the Reconstruct Options, are: |
-
Revert: The Revert mode restores unfrozen portions of the image to their original appearance, without regard to the borders between the frozen and unfrozen areas. Compare this to the Restore All button, which restores frozen and unfrozen areas alike.
-
Rigid: This mode extends the distortion only as needed to maintain right angles in the mesh where frozen and unfrozen areas meet. The result is unfrozen areas that look very much like they did originally but that smoothly blend into the frozen areas.
-
Stiff: Stiff interpolates the distortion so that the effect tapers away as you move farther from the boundary between the frozen and unfrozen areas.
-
Smooth, Loose: These two modes extend the distortion applied to the frozen areas into the unfrozen areas. The Smooth setting tries to create smooth transitions between frozen and unfrozen areas. Loose shares more of the distortion from the frozen area with the unfrozen area. You'll achieve the most dramatic results when frozen and unfrozen areas have been distorted differently.
-
Displace , Amplitwist, and Affine: The last three modes are only available with the Reconstruct tool in the Reconstruct Mode menu. Using these modes, you can apply one or more distortions that are in force at a specific reference point in the image. Click to set the reference point and then drag through unfrozen areas to distort them. Use the Displace mode to move pixels to match the displacement of the reference point; select Amplitwist to match the displacement, rotation, and scaling at the reference point; and choose Affine to match all distortions at the reference point.
Although Liquify certainly gives you plenty of ways to reconstruct distortions, predicting the outcome of your drags with the Reconstruct tool can be nearly impossible . So be prepared to experiment. And if you don't get the results you want, remember, you can undo a reconstruction just as easily as a distortion.
EAN: 2147483647
Pages: 95