Moving, Linking, and Aligning Layers
Moving, Linking, and Aligning Layers
You can move an entire layer or the selected portion of a layer by dragging in the image window with the Move tool. If you have a selection going, drag inside the marching ants outline to move only the selection; drag outside the selection to move the entire layer.
You can temporarily access the Move tool when some other tool is active by pressing Ctrl (Win) or z (Mac). To nudge a layer, press Ctrl or z with an arrow key. Press Ctrl+Shift ( z +Shift on the Mac) to nudge in 10-pixel increments .
If part of the layer disappears beyond the edge of the window, no problem. Photoshop saves even the hidden pixels in the layer, enabling you to drag the rest of the layer into view later.
| Caution | Note that this works only when moving all of a layer. If you move a selection beyond the edge of the image window using the Move tool, Photoshop clips the selection at the window's edge the moment you deselect it. Also be aware: If you move your cursor outside the image window, Photoshop thinks you are trying to drag and drop pixels from one image to another and responds accordingly . |
If you Ctrl+drag (Win) or z +drag (Mac) the background image with no portion of it selected, you get an error message telling you that the layer is locked. If some portion of the layer is selected, however, you can drag that selected portion, and Photoshop will fill in the hole with the background color .
Linking and unlinking
There've been a few changes to the way you link and unlink layers in Photoshop CS2. Of course, there's no big change in your overall capabilities in terms of layer linking and unlinking, but the procedure for linking layers (and then unlinking them later) has changed a bit. First off, there's no longer any link check box or chain icon next to each layer.
| Photoshop CS2 | In Photoshop CS and its layer-supporting predecessors, in addition to the box where the Eye icons live, there was another column of boxes, which when clicked, displayed a chain icon. This little box also housed a brush icon, which indicated when a particular layer was active. A chain link in the box meant the corresponding layer was linked to the active layer. You'd then unlink layers by clicking the chain icon and breaking the link. In Photoshop CS2, a new Link Layers button is now on the bottom of the palette, and you use it to link and unlink selected layers. Figure 5-14 shows this button, along with two linked layers.  Figure 5-14: Select the layers you want to link, and then click the Link Layers button, found at the lower left end of the Layers palette buttons . |
You can also link layers with the shortcut menu. As you may recall from the section on switching between layers earlier in this chapter, you can bring up a pop-up menu listing the layers in an image by Ctrl+right-clicking (Win) or z +Control+clicking (Mac) an image element with any tool. Add Shift while selecting a layer from the pop-up menu to link or unlink the layer rather than switch to it.
| Tip | But that's not all. If you're plum crazy for shortcuts, you can change the link state without visiting the pop-up menu by ” drum roll please ” Ctrl+Shift+Alt+right-clicking (Win) or z +Shift+Option+Control+clicking (Mac) an element in the image window. If you're already shortcutted-out by now, you have everyone's permission to just ignore this one. After all, you have a mouse for a reason. It's okay to use it occasionally. |
When you drag and drop linked layers from one image window into another, all linked layers move together and the layers retain their original order. If you want to move just one layer without its linked buddies , drag the layer name from the Layers palette and drop it into another open image window. If you hold down Shift when dropping, Photoshop centers the layers in the document. If the document is exactly the same size as the one from which you dragged the layers, Shift-dropping lands the image elements in the same position they held in the original document. And finally, if something is selected in the document, the Shift-dropped layers are centered inside that selection.
Another word about unlinking, a point that's related to what's new about linking and unlinking in CS2: When you have just two layers linked, unlinking is just as easy as previously stated: With the layers selected, click the Link Layers button, and the link is broken. The chain icon leaves the layers, and the link is no more. But what if you have more than two layers linked? Is it an all-or-nothing proposition? Nope. To unlink three, four, or more linked layers, right-click (or Ctrl+click on the Mac) any one of the linked layers and choose Select Linked Layers from the pop-up menu. To unlink just one or two (or any number, just not all) of the linked layers, select just those that you want to unlink and click the Link Layers button. The layers you didn't select remain linked, but the selected layers are no longer part of the chain gang.
Organizing layers in groups
Grouping layers is new in Photoshop CS2. In previous versions, you could place layers in sets : using the Folder button at the foot of the Layers palette, you could create a set and drag layers into it, and you could also create nested sets by creating sets within sets and dragging layers into the nested sets. It all worked like file management in Windows or Mac, with folders and subfolders , and organized file storage. Sets served the same purpose in Photoshop, enabling you to organize your layers and deal with them in large . . . well, groups. That may be why the name was changed, huh?
| Photoshop CS2 | In Photoshop CS2, sets are called groups, and you call the process of creating them and placing layers in and taking layers out of them grouping and ungrouping layers. For those of you who are new to grouping layers, or if you're familiar with putting layers in the aforementioned sets, read on to find out how the wholegrouping/ungrouping thing works. |
Anyway, when you click the Create a New Group button (it's still a folder button) at the foot of the Layers palette (shown in Figure 5-15). A generically named Group layer appears in the palette, called Group 1 (if it's your first in the current image, as it is in Figure 5-1). Once the group is created, you can double-click its name and rename it to anything you want, or right-click it (Ctrl+click if you're on the Mac) and choose Group Properties, which enables you to choose a display color for the group in the palette and choose which Channels will be included in the group. An existing group 's mode and opacity are also easily changed, using the options at the top of the Layers palette.
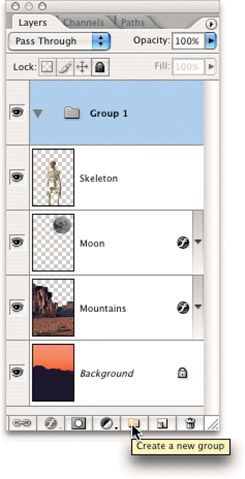
Figure 5-15: Choose the Create a New Group command to create a new group (here named Group 1 because it's the first group created in this image).
If you like the hand-holding that a dialog box offers, you can also Alt (or Option if you're on the Mac)+click the Create a New Group button and open the New Group dialog box, which allows you to name your new group, choose a color for its display in the Layers palette, and choose a Mode (the default is Pass Through) and Opacity for it. Pass Through mode will be discussed shortly.
| Tip | The Pass Through Mode option tells Photoshop to observe the blend modes assigned to the individual layers in the group. By contrast, if you apply a different blend mode such as Multiply to the group, Photoshop overrides the blend modes of the layers in the group and applies Multiply to them all. |
The group appears as a folder icon in the Layers palette scrolling list. There's also a little triangle next to the folder icon, which you use to display and hide the list of grouped layers ” not hide them in the image, but hide them in the palette.
To add a layer to the group, drag the layer name within the Layers palette and drop it on the folder icon. That little fist mouse pointer you saw in the coverage of restacking layers returns, and follows you as you drag the layer up or down to the group in which it belongs. Figure 5-16 shows a new group in place.
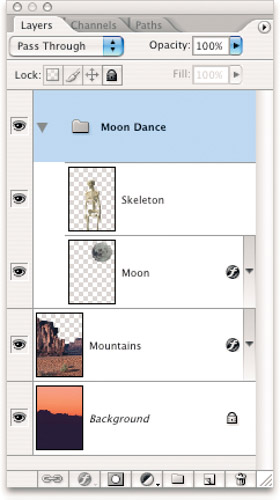
Figure 5-16: A new group and its layers.
Photoshop also lets you place groups inside of other groups up to five levels deep, a process called nesting . Nesting layer groups is a great way to better organize your layers and groups, providing stronger visual connections between related elements of the image within the Layers palette. To place one group inside another, simply drag and drop it onto the other group in the same manner you would a layer. As it does when you place a layer into a group, Photoshop applies the blend mode of the master group to every layer and nested group within it when the mode is not set to Pass Through.
Here are some other ways to create and modify groups:
-
Double-click a group name to rename it.
-
Drag a group name up or down the palette to move it.
-
When a group is expanded, you can drag a layer within the group, move a layer out of the group, or drop a layer into the group at a specific position.
-
To duplicate a group, drag it onto the folder icon at the bottom of the Layers palette.
-
Hate dragging all those layers into a group? Select the layers before creating the group and choose Layer Group Layers. The new group is created, and the selected layers are automatically its members . You can do this to create a nested group, too: just select layers already in a group and issue the Layer Group Layers command. A nested group, complete with members, is created.
-
In case you're wondering if you can link layers in different groups, yes, you can. If you're wondering if you can link groups together, yes, it's possible not only to link groups, but also to link individual layers to entire groups. Pretty snazzy, huh?
-
You know that you can click the triangle next to a Folder icon to open or close the group and show or hide the layers and nested groups it contains. Alt+click (Option+click on the Mac) the triangle next to a folder icon to show or hide every element contained in the group, including nested groups and layer styles.
Anytime a group name is active in the Layers palette, you can move or transform all layers in the group as a unit, much as if they were linked. To move or transform a single layer in the group, just select that layer and go about your business as you normally would.
| Tip | Hang on, what if you've got a group and you don't want it anymore? You want the layers, but don't want them grouped. What to do? Right-click (or Ctrl+click on the Mac) the Group layer, and choose Ungroup Layers from the pop-up menu. The group disappears, but the layers that were in it remain in place, maintaining their original modes, opacity settings, and stacking order. If you want to delete an entire group, members (layers) and all, right-click (Ctrl+click on the Mac) and choose Delete Group. |
EAN: 2147483647
Pages: 95