Retouching Photographs
Having seen how the Clone Stamp tool and Healing Brush work, the following sections examine a few sample uses for the tools. For example, say that you're confronted by the worst image in the world, such as the one shown in Figure 2-13. Your first instinct might be to scrap the image and shoot it again, if possible. You could also rescan the image after taking a moment to clean the glass on your scanner ” that is, if the problem came from dust and dirt on the glass.
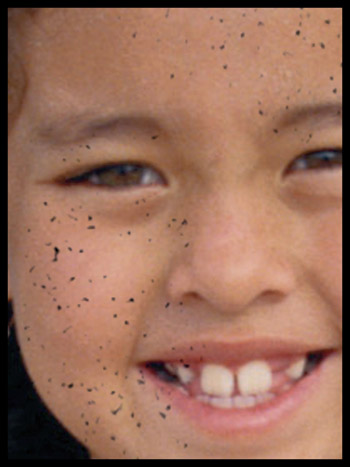
Figure 2-13: A not-so- shabby photograph, ruined by a bad scanning process.How do you improve such a wretched image insidePhotoshop?
But let's say none of these solutions are available or possible. Imagine the subject no longer exists or cannot be reshot, the scanner wasn't the problem, and if you have the negative, you've lost it, so you can't reprint. What can you do?
First, investigate your available retouching tools. As luck would have it, Photoshop actually offers an automatic function for images such as this. It's called Dust & Scratches, and it's located under the Filter menu in the Noise submenu. This filter averages the colors of neighboring pixels with the intent of smearing away imperfections. Unfortunately, as it does so it smears away photographic detail as well. However, in the case of this image, there's not much detail to work with in the first place, so Dust & Scratches was used, with the settings indicated in the left example of Figure 2-14. In the matter of a few seconds, the filter gets rid of every single scratch and piece of dust in the photo ” along with much of the aforementioned detail.
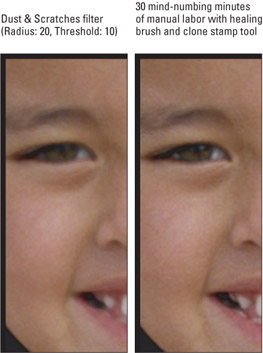
Figure 2-14: For this photo, you can either apply Dust &Scratches, which is quick, but gives blobby detail (left), or fix the image manually, which takes forever but produces better results (right).
Of course your not-so-automatic options include the Healing Brush, the Spot Healing Brush, and a little help from the Clone Stamp tool. The Healing Brush and Spot Healing Brush fare well in flat areas, but can introduce incongruous colors. When this occurs, try the Clone Stamp tool instead. After using the tools described, you see the results in Figure 2-14. The right-hand image is an improvement, but it's not vastly superior . In purely practical terms, the result may not justify the effort ” although your image and your results may be different.
As a final step, the Filter Sharpen Unsharp Mask filter was applied (see Figure 2-15). As discussed in Chapter 8, the filter firms up some of the details lost to the previous retouching efforts.
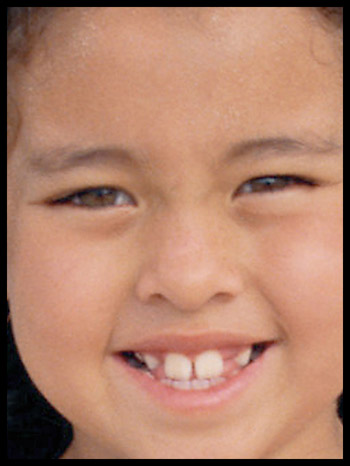
Figure 2-15: The final touch is to sharpen the image using the Unsharp Mask filter.
The lesson to draw from all this is that, although Dust & Scratches may suffice for purging fibers and defects from a low-quality photo like this one, it's hardly a professional-level tool. In almost all cases, the better alternative is to roll up your sleeves, get busy and fix your image flaws manually with the Healing Brush, Spot Healing Brush, and Clone Stamp tools. You'll be glad that you did.
Restoring an old photograph
Dust, hairs, spots, and other blemishes are introduced during the scanning process. But what about more severe problems that trace back to the original image? The left image in Figure 2-16 is a prime example. This photograph was shot sometime before 1940. It's a wonderful photo, but 60+ years is a long time for something as fragile and transient as a scrap of paper. It's faded, stained, creased, and flaking. The normally simple act of extracting it from its photo album took every bit as long as scanning it.
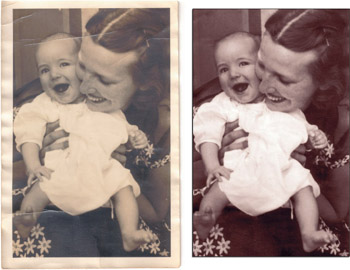
Figure 2-16: The photo on the left has seen better days. Then again, it is more than 60 years old. The photo on the right shows the results of about an hour of work with the Clone Stamp tool and Healing Brush.
But despite the photo's rough condition, it was restored without incident in Photoshop, as evidenced by the right image in Figure 2-16. After about an hour and a few hundred brushstrokes, the image was well in hand. If an hour sounds like a long time to fix a few rips and scrapes, bear in mind that photographic restoration is a labor- intensive activity that relies heavily on your talents and your mastery of Photoshop. The job of the Clone Stamp and Healing/Spot Healing Brush tools is to make your edits believable, but they do little to automate the process. Retouching calls for a human touch, and that's where you come in.
The main trick in all this is to Alt+click (Option+click on the Mac) in an area that looks like it'd do a good job of covering up a blemish and then drag over the blemish. Repeat about 250 times, and you're done. So rather than document every single brushstroke ” which would be quite tedious ” here is some advice that specifically addresses the art of photo restoration:
-
Toss the bad channels: Most images in this kind of condition are black and white. Scan them in color and then peruse the color channels to see which grayscale version of the image looks best. In the image used in this section, the original had lots of stains. Therefore, when the individual color channels were viewed , as illustrated in Figure 2-17, the blotches showed in the blue channel. (Blue is the opposite of yellow, so where yellow is prominent, the blue channel was dark.) The red channel turned out to be in the best shape, so that channel was used and the other two disposed of by choosing Image Mode Grayscale. The simple act of trashing the green and blue channels went a long way toward getting rid of the splotches.
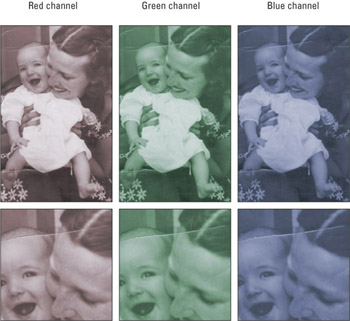
Figure 2-17: A quick peek through the color channels shows the red channel (left) to be the best choice. The blotches are most evident in the blue channel, enlarged in the bottom row. -
View actual pixels: When possible, work at 100 percent view size or larger. It's difficult to judge scratches and other defects accurately at smaller zoom ratios, but if you must, stick with the "smooth views," 50 percent and 25 percent.
-
Keep an eye on the source: Keep the original photo next to you as you work. What looks like a scratch on screen may actually be a photographic element, and what looks like an element may be a scratch. Only by referring to the original image can you be sure.
-
Wait to crop: Don't crop until you're finished retouching the image. You'd be surprised how useful that extra garbage around the perimeter is when it comes to covering up really big spots, stains, and tears.
-
Vary the brush hardness: Use hard brush shapes against sharp edges. But when working in general areas such as the shadow, the ground, and the wall, mix it up between soft and hard brushes using the shortcuts Shift+[ and Shift+]. Staying random is the best way to avoid harsh transitions, repeating patterns, and other digital giveaways.
-
Short is beautiful: Paint in short strokes. This helps keep things random, but it also means you don't have to redraw a big long brushstroke if you make a mistake.
-
Turn Aligned off: Another way to stay random is to change the source of your clone frequently. That means Alt+clicking (Option+clicking) after every second or third brushstroke. And keep the Aligned check box turned off. An aligned clone is not a random one.
-
Try out brush modes: Feel free to experiment with the brush modes and, when using the Clone Stamp tool, the Opacity setting. For example, a scratch that can be corrected by cloning the content with the Healing Brush may look great in detail, but the Healing Brush can overdo it sometimes, and the repairs can seem obvious. To solve this, set the brush mode for the Healing Brush to Screen.
-
Fade the clone: You also can try applying Edit Fade to change the opacity and brush mode of the pixels you just cloned. This little trick is extremely useful when using the Healing Brush, because it means you can introduce an Opacity value into the proceedings where none existed previously. Wondering how that might work? After applying a Healing Brush stroke, choose Edit Fade or press Ctrl+Shift+F ( z +Shift+F on the Mac). You get an Opacity value and no Mode option, exactly the opposite of what you see in the Options bar when using the tool.
-
Grain is good: Don't attempt to smooth out the general appearance of grain in the image. Grain is integral to an old photo, and hiding it usually makes the image look faked. If your image gets too smooth, or if your cloning results in irregular patterns, select the problem area and apply Filter Noise Add Noise. Enter very small Amount values (2 to 6 percent). Monochromatic noise tends to work best. If necessary, press Ctrl+F ( z +F on the Mac) to reapply the filter one or more times.
With Photoshop's history brush at your side, there's really no way to permanently harm an image. You can even let four or five little mistakes go and then correct them en masse with the history brush. Just click to the left of the state in the History palette that directly precedes your first screw-up and then drag with the history brush. To paint back to the original scanned image, click in front of the very top item in the History palette. Using the history brush is easy, satisfying , and incredibly freeing. For more information, check out Chapter 3.
Eliminating distracting background elements
The stamp and healing tools also come in handy for eliminating background action that competes with the central elements in an image. For example, Figure 2-18 shows a photo of a little girl and her dad, both facing away from Mom, the photographer. It's a sweet photo, but it has a few distracting elements ” the stain from tape at the bottom (this can be cropped out if you don't mind losing the white frame, so common in photos going back to the 1960s) and the person sun-bathing in front of the subjects. If the photo were just of these two people standing on the boardwalk, looking out at the beach, it'd be great. What to do? Whack that sunbather, and send her back to her overpriced rented beach house, towel and all. You could even get rid of the edge of the towel in the lower left, while you're at it.
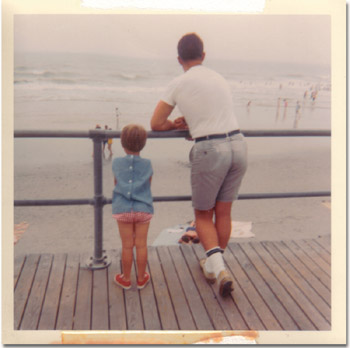
Figure 2-18: Don't leave distracting elements, even seemingly insignificant one in your photos. For example, the sunbather creates obvious visual "noise."
| Note | Remember as you read these steps that cloning away an image element is something of an inexact science. It requires considerable patience and a little bit of trial and error. So regard the following steps as an example of how to approach the process of editing your image rather than as a specific procedure that works for all images. You will undoubtedly need to adapt the process to suit the specific needs of your image. |
STEPS: Eliminating Distracting Elements from an Image
-
Clone a spot that matches near the edge of what you want to eliminate . In this beach example, you clone a spot in the sand near the edge of the sunbather's towel. Set the brush to a size that encompasses a reasonable amount of sand, but keep the brush size small enough that you fit it between the bars on the railing the two subjects are leaning on. Figure 2-19 shows the Clone Stamp poised above its first section of towel, one click under its belt.
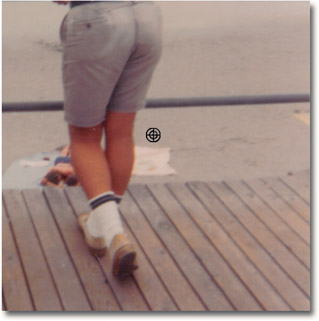
Figure 2-19: Clone the content that obscures the unwanted portion of the image ” in this case, sand will bury the sunbather.Tip Make sure the Clone Stamp is set to a soft-edged brush, so that there are no obvious edges to the cloned content.
-
Clone away the distracting elements. In the example, clone away the towel and sunbather, getting as close to the edges of the railing and the subject's legs as you can without risking cloning them out of the photo too. Figure 2-20 shows this in progress.
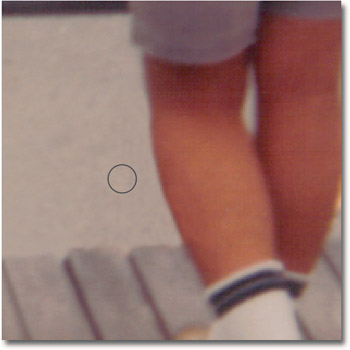
Figure 2-20: Click and drag to keep applying sand from the source point. -
Shrink your Clone Stamp brush and zoom in. You need to get in tight on the subject's legs now, so you can clone away the sunbather and her towel, right up to the legs. This is again why you want a soft-edged brush, so you don't get a hard edge that makes the subjects look like cutouts that were pasted onto a photo of the beach. As you get in tight on corners and in crevices, you can go as low as a 1- or 2-pixel brush, because zoomed in as tight as you are, it won't seem that small and it won't be hard to see the brush cursor.
-
Keep cloning. Just keep cloning along, clicking and dragging up to the edge of the subject's legs, the railing, and the edge of the boardwalk. Get as close as you can, and keep zooming in if you need to, so you don't clone anything you wanted to keep.
Tip If you really feel like you can't come right up to the edge without cloning the legs too, then select them with the Magnetic Lasso (or whichever lasso you feel most comfy with) and copy them to a new layer. You can then hide that new layer and clone right up to and onto the original legs and then redisplay the legs after the fact. Of course, a little feather on the selection keeps the edges soft enough to seem like they belong after they're back in the picture.
-
Use the Blur tool, set to a low Strength , and gently smooth out any edges where the cloning along the legs and railings was too obvious. You can also use the Eraser, set to a soft-edged brush, to clean up the edges of the legs (and railings) if you put them on their own layer, per the tip that precedes this step.
-
Look for any obvious patterns or repetitions in your background. In this example, you're looking for repeated sections in the sand . The one risk with the Clone Stamp, even with the Aligned option off, is that the cloned content will look cloned. This is especially likely when you're cloning natural substances like fabric, grass, or in this case, sand with footprints and other irregular high and low spots in it. You want to keep the random, natural look, so if you see any places where the cloning looks obvious, clone on top of it, grabbing from a source point that's nowhere near the unwanted pattern. Of course, keep the color and texture of the sand in mind, and don't go grabbing wet sand from near the tide line and expect it to look right way back on the dry sand near the subjects.
Figure 2-21 shows the final result ” after blurring, re-cloning to get rid of patterns, and a teeny-tiny bit of Burn tool use to darken the front edges of the boards so they didn't look cut off.
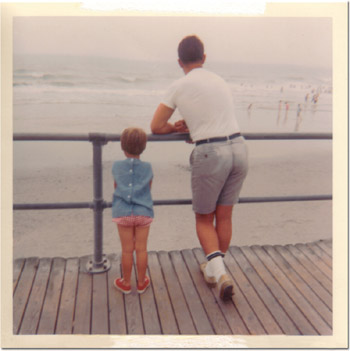
Figure 2-21: With a little softening, some tight, tiny cloning, and in this case, a little "cheating" with the Burn tool to darken an edge or two, this photo is distraction free of sunbathers, beachcombers, and that stain from the tape.
Hopefully, as you experimented with this procedure, you found that cloning with the stamp tool requires you to alternate between patching and whittling away. There are no rights and wrongs, no hard-and-fast rules. Anything you can find to clone is fair game. As long as you avoid totally messing up the foreground image, you can't go wrong (well, then there is one hard-and-fast rule). If you're careful and diligent, no one but you will notice your alterations.
| |
Any time you edit the contents of a photograph, you tread on potentially shaky ground. Although some have convincingly argued that electronically retouching an image is, theoretically, no different than cropping a photograph ” a technique available and in use since the first daguerreotype ” photographers have certain rights under copyright law that cannot be ignored. A photographer may have a reason for including an element you want to eliminate. So, before you edit any photograph, be sure to get permission either from the original photographer or from the copyright holder. For the photos used in this chapter, the permission came from one of the authors, who either appears in or is related to the subjects.
| |
Applying Repeating Patterns
The Clone Stamp tool shares a slot with the Pattern Stamp tool, which you can get by pressing Shift+S. Unlike the Clone Stamp tool, the Pattern Stamp tool doesn't require you to Alt+click to set a source. Instead, it paints with a repeating pattern that you select from the Pattern pop-up palette in the Options bar, as shown in Figure 2-22. You can use the Pattern Stamp to create frames , paint wallpaper-type patterns, or retouch Patches of grass, dirt, sky, and so on.
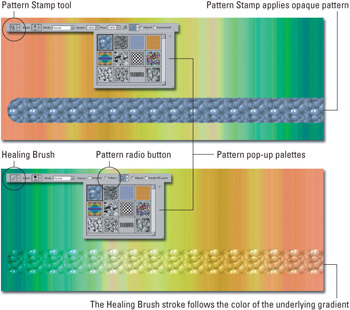
Figure 2-22: Both the Pattern Stamp tool and the Healing Brush offer variations for painting with repeating patterns.
Even better for retouching is the Healing Brush with the Source option set to Pattern, as shown in the bottom half of Figure 2-22. Select the pattern that you want to use from the Pattern pop-up palette, and then paint to merge the texture of the pattern with the colors and shades around the edge of the brushstroke. Again, you don't need to Alt+click.
You can also apply a pattern with the Patch tool. To do so, draw a selection with the tool or start with a selection defined earlier. Then select a pattern from the Pattern pop-up palette in the Options bar and click the Use Pattern button. In many ways, the effect is similar to filling a selection with a pattern using the Paint Bucket tool or Edit Fill. The difference is that the Patch tool mixes the texture of the pattern with the colors and shades of the pixels around the outside edge of the selection.
Retouching with a pattern
Figure 2-23 begins a look at how and why you might apply a repeating pattern with the Healing Brush. The figure starts out with a timeworn face, with several wrinkles removed in favor of a pattern, as shown in Figure 2-24.

Figure 2-23: The starting point for the image (left) flanked by a 64-x-64-pixel neutral noise pattern (right). You create this pattern by filling the image with medium gray and then applying the Add Noise filter with an Amount value of 6 percent and Monochromatic turned on.
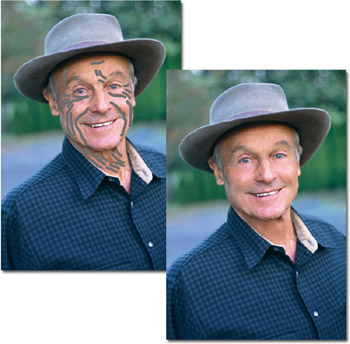
Figure 2-24: The Pattern Stamp tool paints a series of Neutral Noise 6% strokes over the most prominent blemishes an image (left). Using the Healing Brush to paint those exact same brushstrokes (right), you eliminate many of the wrinkles.
First, it was necessary to establish the neutral noise pattern, as shown in the background and in the portion of the dialog box shown on the right side of Figure 2-23. Combined with the Healing Brush, this neutral noise pattern allowed smoothing of imperfections while matching the grain of the image.
Next, to retouch the image, follow these simply steps:
-
Create a new image, measuring 64 x 64 pixels. The exact size isn't important, but 64 x 64 pixels is big enough to hide repetition and small enough to require little processing on the part of Photoshop.
-
Choose Edit Fill. This opens the Fill dialog box.
-
Set the Use option to 50% Gray. Click OK.
-
Choose Filter Noise Add Noise. The Add Noise dialog box appears.
-
Enter an Amount value of 6 percent, and select the Monochromatic check box. This is about the right amount of noise to match the grain in a high- quality photograph.
-
To turn the gray noise into a pattern, choose Edit Define Pattern. Photoshop asks you to name the pattern, so do that ” typing a short but relevant name , such as "Neutral Noise 6%."
You're now ready to paint with the pattern using the Healing Brush. For the sake of demonstration, the left-hand image in Figure 2-24 shows what would have happened if the Neutral Noise 6% pattern had been applied using the Pattern Stamp tool. This way, you can see every one of the many brushstrokes used to retouch the image. The second image shows what happened when the exact same brushstrokes were painted using the Healing Brush instead. Photoshop applied the noise to the image and fused together the wrinkles to match the surrounding skin. It may sound too good to be true, but it works like a dream.
| Tip | If things look too grainy (noisy) where you've painted with the Healing Brush, zoom in and use the Blur tool, set to a very low strength ” 30 percent or less ” and gently rub out some of the noise, only where it's a real detriment. For example, in the man's face in Figure 2-24, where the visible noise appears on his chin and jaw line, it makes sense, as it looks like part of his encroaching "five o'clock shadow." Across his cheeks and under his eyes, however, it was a bit too noisy , so a touch of blurring came in handy. This is often better than reducing the noise in your pattern, as doing so can result in healing that looks more like thick makeup . |
Pattern painting options
The pattern painting tools offer the usual group of settings in the Options bar that you saw when using the Clone Stamp tool and Healing Brush. For example, there's the Aligned check box. When turned off, Photoshop begins and ends patterns in different brushstrokes at different locations. This means that the patterns clash when they overlap. In Figure 2-25, a series of strokes were painted using the Woven Flat pattern (part of the Patterns group) and the Pattern Stamp tool. In the first image, the Aligned option was turned off.
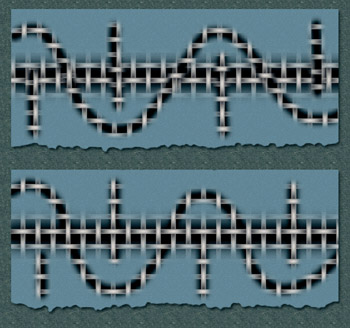
Figure 2-25: With the Aligned check box off, Photoshop starts each pattern with the beginning of the brushstroke (top), and overlapping brushstrokes clash. With the Aligned check box on, patterns align in all brushstrokes to match up perfectly (bottom), to create an intact weave .
If you select the Aligned check box, Photoshop aligns all patterns you apply with the stamp tool, regardless of how many times you start and stop dragging. In the bottom example in Figure 2-25, all elements in the pattern remain exactly aligned throughout all the brushstrokes.
An option that's utterly unique to the Pattern Stamp tool is the Impressionist check box. A very old feature, Impressionist adds an element of color jitter to the brush- stroke. If you select the Impressionist check box, the Pattern Stamp tool paints a series of spots, randomly colored according to the colors inside the active pattern. If this sounds peculiar at best and useless at worst, you may be right. The Color Dynamics options inside the Brushes palette (discussed in Chapter 1) render Impressionist largely redundant.
Creating patterns and textures
Now that you know how to apply patterns, the question becomes, "Where do you find patterns?" And for that matter, how do you go about making your own? The answers, it turns out, are numerous . Artists and designers generally think of Photoshop as an image editor, but it lives a secret life as a frustrated pattern laboratory. Since Version 1, Photoshop has shipped with highly specialized varieties of pattern libraries, and new patterning features are added with just about every upgrade.
The simplest way to access a pattern is from the Options bar. The Pattern option makes itself available when you use the Healing Brush, Patch tool, Pattern Stamp tool, or Paint Bucket tool. Click the down-pointing arrowhead to display a pop-up palette of pattern thumbnails, numbering 12 by default, some of which appear in Figure 2-26. You can also access these patterns from the Texture panel of the Brushes palette. To fill a selection with a pattern, choose Edit Fill or press Shift+Backspace (Shift+Delete on the Mac) and select the Pattern options from the Use pop-up menu. You can even coat a layer with a pattern by choosing either the Pattern Overlay or Pattern command from, respectively, the layer style or fill layer icons at the bottom of the Layers palette (see Chapter 7).
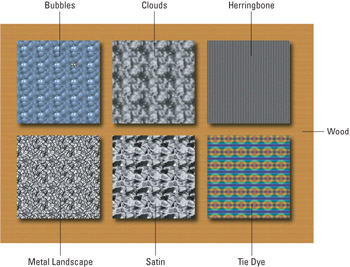
Figure 2-26: Seven samples from the dozen predefined patterns that Photoshop loads by default the first time you launch the program (and thereafter until you make changes). The seventh sample, Wood, appears in the background.
| Tip | To restore the default dozen patterns at any time in the future, click the right-pointing arrowhead (the Palette menu) in the Pattern palette and choose Reset Patterns. To clean out all patterns but the default dozen, click OK. To add the default dozen to your existing patterns (which may result in duplicates), click Append. |
Here are some other ways to access Photoshop's predefined patterns, as well as create your own:
-
Add a preset library: In all, Photoshop installs a total of nine pattern libraries that you can load at will. With the Pattern pop-up palette visible, click the right-pointing arrowhead to display the palette menu. At the bottom of the menu are nine options, each of which loads a different library. The library called Patterns comprises the default dozen plus 12 more, so if you choose this option (which is a good idea), click OK rather than Append to avoid repetition. Most of the other libraries include unique sets of patterns, the exception being the mostly redundant Patterns 2, which calls up patterns that you can find elsewhere. Figure 2-27 shows a few examples.
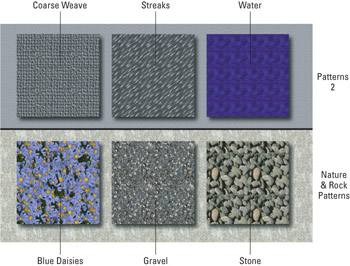
Figure 2-27: A handful of preset patterns from Photoshop's other pattern libraries. To open any one of these patterns, choose its library name from the bottom of the Pattern palette menu. -
Define a pattern tile: You can save any rectangular area as a tile that you can repeat over and over inside a pattern. Just select the area with the Rectangular Marquee tool ” no other tool will do. Then choose Edit Define Pattern. Photoshop asks you to name the pattern and then makes it available to all the Pattern pop-up palettes until you delete the pattern or replace the active library with another one. Obviously, not every rectangular selection repeats well, which is why it's so important to know how to design seamless tiles that blend to form continuous patterns. This process is explained shortly.
-
Load a displacement map: Discussed at length in Chapter 10, a displacement map is a special kind of pattern that refracts colors inside an image as if you're looking through textured glass. Consider Figure 2-28. In the top row, you start with the original, untouched image, followed by five different displacement maps, applied as tiles. In the top row, the tile offset is set to 20, both horizontally and vertically. In the bottom row, the maps are applied at 10/10. To access these effects, select the content you want to displace , and then choose Filter Distort Displace. Enter the percentage values shown in the figure (or experiment with your own settings); make sure that the Displacement Map option is set to Tile. Then click OK and open one of the pattern files, found in the Displacement Maps folder, typically stored the Plug- Ins folder, which is inside the same folder as the Photoshop application. Naturally, every one of these images doubles as a repeating pattern. Just open it inside Photoshop and choose Edit Define Pattern.
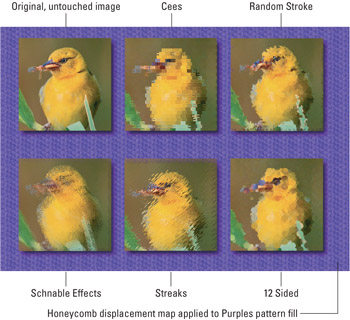
Figure 2-28: The five displacement maps that you can use to refract colors in your image (the top left image is the original) appear here. Displacement maps give the effect of looking through textured glass. -
The Texturizer: To emboss an image with a pattern file stored on disk, choose Filter Texture Texturizer. You'll see the Texturizer filter open up inside Photoshop's Filter Gallery, but more on that in Chapter 9. For now, just select Load Texture from the arrow to the right of the Texture pop-up menu on the right side of the Filter Gallery. You can open one of the pattern files stored in the previously mentioned Displacement Maps folder, or you can open one from the Adobe ImageReady Only folder inside the Patterns folder, which in turn is inside the Presets folder. For a demonstration of the Texturizer filter, Chapter 9.
-
Designing patterns with filters: That's it for Photoshop's predefined patterns, but it's just the beginning of Photoshop's patterning capabilities. You can also create your own patterns, just as you'd expect from an accommodating program like Photoshop. And as luck would have it, you can do so without painting a single line. In fact, you can create a nearly infinite variety of background textures by applying several filters to a blank document. Figure 2-29 presents four examples. Note that none of these textures repeats seamlessly like the pattern tiles you've looked at so far ” they're each intended to fill an entire background with very little effort.
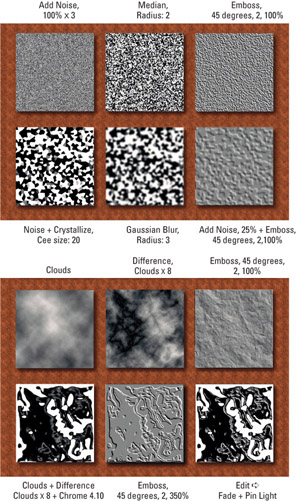
Figure 2-29: A series of four different background textures created using commands from the Filter menu, as noted. The background contains the Rusted Metal pattern fill, with the Crumble displacement map applied via the Filter Distort Displace command.-
Using the Noise, Median, and Emboss filters: To create the texture shown in the top row of the figure, start with a blank image. Then choose Filter Noise Add Noise, enter a value of 100 percent, and select the Monochromatic check box. After clicking OK, press Ctrl+F ( z +F on the Mac) twice, each time repeating the filter, so that Add Noise is applied three times in a row. Next, choose Filter Noise Median and enter a value of 2 pixels, which averages the noise into clumps. Finally, choose Filter Stylize Emboss and enter 45 degrees in the Angle option box, 2 pixels for the Height value, and 100 percent for the Amount. The result is a bumpy surface that looks a bit like stucco.
-
Using the Noise, Crystallize, Gaussian Blur, and Emboss filters: To get the second row of effects in Figure 2-29, start at the point labeled "Add Noise (100%) x 3" in the first row and apply Filter Pixelate Crystallize with a Cell Size of 20 pixels. Then, blur the cells using Filter Blur Gaussian Blur and a Radius of 3 pixels. And finally, apply the Add Noise filter, this time at 25 percent, and the Emboss filter, using the same settings as before.
-
Using the Clouds, Difference Clouds, and Emboss filters: To create the third row of textures, start with a blank image, and press the D key to make the foreground and background colors black and white. Choose Filter Render Clouds, and then apply Filter Render Difference Clouds, repeating the filter by pressing Ctrl+F ( z +F) seven times in a row. In the last image, again apply the Emboss filter with an Amount value of 350 percent.
-
Using the Cloud Difference, Emboss, Fade, and Pin Light filters: For the fourth row, take the second effect in the third row ” the one labeled "Difference Clouds x 8" ” and apply Filter Sketch Chrome with a Detail value of 4 and a Smoothness setting of 10. Next, apply Emboss using the same Amount value of 350 percent as before. Finally, choose Edit Fade Emboss and select Pin Light from the Mode pop-up menu. This blends the Chrome and Emboss effects into a frothy, plastery soup.
Cross-Reference To learn more about filters so that you can make up your own textures, read Chapters 8 and 9. Chapter 8 covers Add Noise, Median, Gaussian Blur, and the Fade command; Chapter 9 talks about Emboss, Crystallize, Clouds, Difference Clouds, and Chrome.
-
The Pattern Maker: This command generates repeating tiles at the click of a button. More often than not, it still results in some harsh edges, but if you tough it out, you can get some interesting results. You'll learn how to use this command in the next section.
-
Marquee and Clone: Not happy with any of these solutions? Interested in creating the best seamlessly repeating pattern ever made? Well, it's a fair amount of work, but you can use the Rectangular Marquee and Pattern Stamp tools to transform an image into a custom pattern. Because this technique is more complicated as well as more rewarding than the others, it is explained in detail in the "Building your own seamless pattern" section.
-
Using the Pattern Maker
Located under the Filter menu, the Pattern Maker is a repeating tile generator. It enables you to fill an entire image or layer with a repeating pattern ” or even one massive texture ” or save a pattern to Photoshop's presets for later use.
Unlike other patterning tools on the market, the Pattern Maker does not blur the edges of an image or create reflections to ensure seamless transitions. Rather, it chops an image into random clumps, pieces that clump together in random formation. It then makes a sort of chopped salad of the image to produce the randomness you see in the natural world. In most cases, the results are only marginally successful, and they often exhibit unacceptably defined edges. But every so often, you get something you can actually use. If that sounds like faint praise, bear in mind that the upside is that the Pattern Maker requires very little effort to use. It works like a free slot machine, so even though the odds are against you, you can take as many chances as you like. Just keep pulling the crank and sooner or later, you'll come up with a winner.
Generating a pattern
Start with an image that contains some basic texture like gravel or grass or something else that you'd want to repeat over a large image area. If you don't have such an image, you're in luck ” Photoshop has already given you some. Inside the folder that contains the Photoshop application, open the Presets folder, and then open the Textures folder. Inside you should find close to 30 images with names like Leafy Bush and Snake Skin. These are photographic textures provided specifically for use with the Pattern Maker filter.
When you get started on your own image, give yourself room to work:
-
Expand the canvas size by choosing Image Canvas Size, turn on the Relative check box, and enter 200 for both the Width and Height options. This way, you'll have space for your tile to repeat a few times and you can see how it holds up as a pattern.
-
Choose Filter Pattern Maker. This displays the commodious dialog box pictured in Figure 2-30. From here, creating a texture is the three-step process described in the figure.
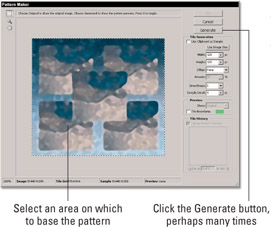
Figure 2-30: Crafting a pattern with the Pattern Maker filter is a three-step process, provided that you regard repeatedly clicking the Generate button as a single step. -
First, outline the portion of the image upon which you want to base the pattern. (If you prefer, you can select the area before entering the Pattern Maker dialog box, or copy an image and select the Use Clipboard as Sample check box to base the pattern on that.)
-
Second, click the Generate button to fill the image area with a random repeating pattern. If that looks beautiful, you're in luck. But more likely, it won't look very good.
-
Click Generate again. And again. And again.
That's really the gist of it. Some might argue that there's more to using the Pattern Maker than clicking the Generate button like a couch potato searching for a good TV show, but of course they'd be wrong. Still, at the risk of overcomplicating the topic, here are a few things you might want to know:
-
Tweaking the settings: If the filter consistently falls short of spawning a satisfactory effect, you can modify the Tile Generation options ” Width, Height, Offset, and so on, all of which are discussed in the following section ” then click Generate Again to see what kind of difference your new settings make. You may want to click Generate Again two or three times before giving up on a setting and moving on.
-
History is now full: The Pattern Maker saves your last 20 tiles to a temporary history buffer so that you can go back and compare them. After you generate your 20th tile, Photoshop warns you that the history buffer is full. After that point, an old tile drops off into the pit of pattern despair every time you generate a new one.
-
Managing your tiles: Fortunately, you can manage the tiles in the history buffer, so you don't lose your best tiles. You do this using the Tile History options in the lower-right corner of the dialog box, magnified in Figure 2-31. So when you get the "History is now full" error message, go down to the Tile History options and browse through the tiles you've created so far by clicking the arrowhead icons. You can also click inside the tile number ” 15 of 20, for example ” and enter a different tile number. When you come across a bad pattern, click the trash can icon to delete it.
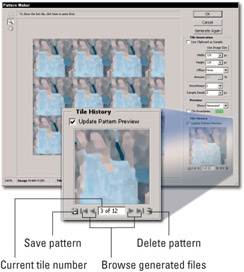
Figure 2-31: The Tile History area lets you peruse the last 20 created patterns. When you see a pattern you like, click the disk icon to save the pattern withPhotoshop's presets. -
Saving a tile: After you arrive at a tile that you deem satisfactory, don't just click the OK button. Instead, click the little disk icon in the Tile History area, labeled "Save pattern" in Figure 2-31. This saves the pattern to Photoshop's presets for later use. In fact, you may want to save several patterns, as they take up very little room.
When you're finished and you've saved the pattern or patterns you want to use, click Cancel. Yes, you read that right. Click Cancel. Clicking OK fills the entire image or active layer with the pattern, even if you have a selection active, which is almost never what you want. (The one exception occurs when using the Pattern Maker's exclusive Offset option, as explained in the next section.) With the pattern saved to the presets, you can apply it with more precision using the Pattern Stamp tool, History Brush, Fill command, or other function. So clicking Cancel opens up a wider world of options.
Tile Generation options
The options in the Tile Generation section of the dialog box allow you to change the size of the repeating tile and adjust other parameters that affect how the Pattern Maker calculates patterns. To make a modified setting take effect, you must click the Generate Again button. In order, here's how the options work:
-
Use Clipboard as Sample: When selected, this check box generates the pattern from an image you copied to the Clipboard rather than the selected area in the image window.
-
Use Image Size: Nothing says that you have to generate a repeating tile pattern: you can fill the image with one enormous texture. To do so, click the Use Image Size button to load the size of the foreground image into the Width and Height option boxes, and then click Generate Again. It takes several seconds to generate a very large tile, so be patient.
-
Width and Height: By default, the Pattern Maker creates 128-x-128-pixel tiles, a common standard for background patterns inside your computer's operating system and on the Web. However, you can enter any values you like. And they can be different ” rectangular tiles are completely acceptable.
-
Offset and Amount: Use the Offset option to offset rows or columns of tiles in the final pattern. The Horizontal setting offsets the rows; Vertical offsets the columns . Then use the Amount value to determine the amount of offset, measured as a percentage of the tile dimensions. Figure 2-32 shows the results of applying horizontal and vertical offsets to various tile generations. The green lines are courtesy of the Tile Boundaries check box in the Preview area of the dialog box.
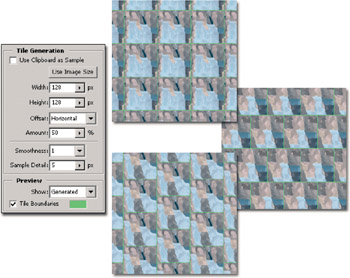
Figure 2-32: Offset the tiles to vary the overall pattern created by the repeated single tile. Here you see no offset (top), a horizontal 50% offset (right) and a 50% vertical offset (bottom).Caution Note that the Offset values only work when you apply the pattern directly from the Pattern Maker by clicking the OK button. The Offset data is not saved with a pattern and cannot be accessed from other pattern functions inside Photoshop.
-
Smoothness: If you keep seeing sharp edges inside your pattern, no matter how many times you regenerate it, try raising the Smoothness value. The value can only vary from 1 to 3, but higher values generally result in smoother transitions.
-
Sample Detail: As mentioned earlier, the Pattern Maker works by chopping up an image and reassembling its parts . The size of those chopped up bits is determined by the Sample Detail value. Very small details result in faster pattern generation, with the potential for more cut lines and harsh transitions. A higher Sample Detail value creates a chunkier pattern, with better detail and more natural transitions, but it takes longer to generate as well. It's a good idea to try this value at its minimum and maximum settings, 3 and 21, to see if it makes much of a difference. If so, endure the delays and play with the value to get the desired results. If not, crank it down to 5 and focus on the other settings instead.
Bear in mind that, as you work on a pattern, you can zoom in and out of the preview area in the central portion of the dialog box to get a better idea of how the pattern will look. The Pattern Maker provides specific tools for this purpose, but it's generally easiest to rely on the keyboard shortcuts Ctrl+plus and minus ( z +plus and minus on the Mac).
Building your own seamless pattern
The Pattern Maker is all very well and good for what it is ” that is, a filter that slices your image into a bunch of strips and throws them all over in a big pile. That works for random patterns, but it doesn't work well for regular, smooth transitions between recognizable elements. For example, let's say you want to make a pattern based on the owl shown at the top of Figure 2-33. If you applied the Pattern Maker to it, you'd get something like the image shown on the bottom.
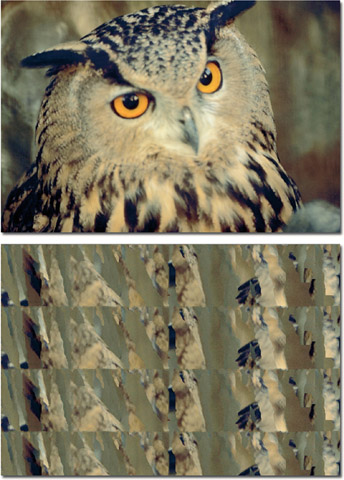
Figure 2-33: This close-up of an owl seems a perfect starting point for a repeating pattern (top). But surely something better than what the Pattern Maker comes up with (bottom) can be created.
The following steps describe how to change a scanned image into a seamless, repeating pattern the old-fashioned way ” by hand. To illustrate how this process works, Figures 2-33 through 2-37 show various stages in the creation of the owl pattern. You need only two tools to carry out these steps: The rectangular marquee tool and the Clone Stamp tool. Oh, and a bit of manual dexterity doesn't hurt.
STEPS: Building a Repeating Pattern from an Image
-
Open the image that you want to convert into a pattern. The owl's head, seen at the top of Figure 2-33, is the candidate here.
-
Select the Rectangular Marquee tool. In the Options bar, select Fixed Size from the Style pop-up menu and enter specific values in the Width and Height option boxes. This way, you can easily reselect a portion of the pattern in the steps that follow, as well as use the fixed-size marquee to define the pattern when you finish. To create the patterns shown in the figures, the marquee was set to 283 pixels wide x 233 pixels high.
-
Select the portion of the image that you want to feature in the pattern. Because you've specified an exact marquee size, all you have to do is click on your image to make a selection ” Photoshop creates a selection rectangle wherever you click your mouse. As needed, with the Marquee tool still active, point within the selection and drag to move the selection to a new spot inthe image.
-
Press Ctrl+C ( z +C on the Mac). This copies the selection to the Clipboard.
-
Press Ctrl+N ( z +N on the Mac) to make a new image and triple the Width and Height values. Photoshop will suggest a new image size of 450 x 450 pixels, which matches the size of the selection copied to the Clipboard. By tripling the values stated in Step 2 (283 wide by 233 high) values, you can arrive at a new image size of 849 x 699 pixels.
-
Press Ctrl+V ( z +V on the Mac). Photoshop pastes the copied selection in the center of the window, which is exactly where you want it. This image will serve as the central tile of your repeating pattern.
-
Ctrl + click ( z +click on the Mac) the item labeled Layer 1 in the Layers palette. Photoshop pastes the image on a new layer. But to duplicate the image and convert it into a pattern, you need to select it, and the easiest way to do that is to Ctrl+click (or z +click) the layer thumbnail to select the pasted pixels.
-
Press Ctrl+E ( z +E on the Mac). This merges the layer with the background, thereby flattening it; or you can choose Layer Flatten Image. Either way, the selection outline remains intact.
-
Choose Edit Define Pattern. This establishes the selected image as a pattern tile. Give the pattern a name when Photoshop prompts you.
-
Press Ctrl+D ( z +D on the Mac) to deselect the image. You neither need nor want the selection outline any more. You'll want to fill and clone freely without a selection outline getting in the way.
-
Press Shift+Backspace (Shift+Delete on the Mac) or choose Edit Fill. Then select Pattern from the Use pop-up menu, select your new pattern from the Custom Pattern palette, and press Enter or Return. This fills the window with a 3-x-3-tile grid, as shown in Figure 2-34.
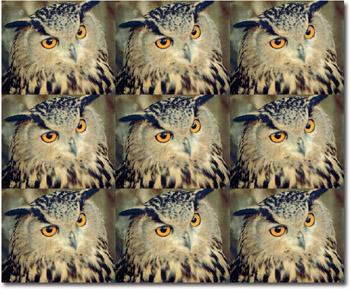
Figure 2-34: To build the repeating pattern shown in its final state in Figure 2-37, a grid of nine image tiles was created. -
Drag the title bar of the new image window to position it so you can see the portion of the image you copied in the original image window. You want to be able to see both images at once because you'll be cloning from one into the other. After you have your windows arranged, click the title bar of the new image to make it the active window.
-
Select the Clone Stamp tool. Press the S key, or press Shift+S if the Pattern Stamp tool is active.
-
Turn off the Aligned check box in the Options bar. Ironic as it may sound, it's easier to get the alignment between the clone-from and clone-to points established with Aligned turned off.
-
Specify the image you want to clone by pressing Alt (Option on the Mac) and clicking in the original image window. No need to switch out of the new window. Alt+click (or Option+click) an easily identifiable pixel that belongs to the portion of the image you copied. The exact pixel you click is very important.
-
Now click with the Clone Stamp tool on the matching pixel in the central tile of the new window. If you clicked the correct pixel, the tile should not change one iota. If it shifts at all, press Ctrl+Z ( z +Z on the Mac) and try again. Because Aligned is turned off, you can keep undoing and clicking over and over again without resetting the clone-from point in the original image.
-
Turn on the Aligned check box. After you click in the image without seeing any shift, select the Aligned option to lock in the alignment between the clone- from and clone-to points.
-
Use the Clone Stamp tool to fill in portions of the central tile. For example, in Figure 2-35, the owl's feathers were extended outward, on the sides and on the top of the owl's head. Because the owl's own feathers naturally follow a repeated pattern, the cloning process doesn't look as false as it might with another subject.

Figure 2-35: Use the Clone Stamp tool to copy pixels, extending the owl's feathers to the edges of the tile. As you may still see a gap between the tiles, running vertically, the edges of each tile might need some cleanup.All of this can be eliminated to create seamless tiling. -
Select a portion of the modified image. After you establish one continuous transition between two tiles in any direction ” up, down, left, or right ” click with the Rectangular Marquee tool to select an area that includes the transition.
-
Repeat Steps 9 through 11. That is, choose Edit Define Pattern, press Ctrl+D (or z +D), choose Edit Fill, select the pattern you just defined, and press Enter or Return. This fills the image with your new transition. Don't worry if the tiles shift around a bit ” that's to be expected.
-
If you started by creating a vertical transition, use the Clone Stamp tool to create a horizontal transition. Likewise, if you started horizontally, now go vertically. You'll need to turn off the Aligned check box again to establish the proper alignment between clone-from and clone-to points. In the image used in these figures, the clone-to point was shifted several times ” alternatively building on the central image (the owl's head and face), the one to the left of it, and the one directly above. Each time you get the clone-to point properly positioned, turn the Aligned check box back on to lock in the alignment. Then clone away.
Note As long as you get the clone-from and clone-to points properly aligned, you can't make a mistake. If you change your mind, realign the clone points and try again. In Figure 2-36, the results of tidying up the tile's edges, removing any obviously false feather pattern, is shown.
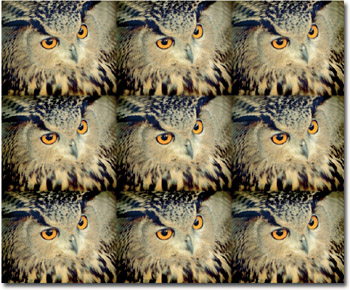
Figure 2-36: After completing a smooth transition between the upper-central tile and the tiles above and to the left of it, theEdit Define Pattern was used on a selected portion of the image. -
After you build up one set of both horizontal and vertical transitions, click with the Rectangular Marquee tool to select the transitions. As shown in Figure 2-36, this includes parts of each of four neighboring heads, mostly focusing on the horizontal transition. Don't worry if the image doesn't appear centered inside the selection. What counts is that the image flows seamlessly inside the selection outline.
Tip You can also use other tools to create a smooth transition between tiles ” slight blurring of the tile's edge, burning the edges, whatever works to make the seams appear either invisible (if you want to create the look of a continuous image), or smooth, as in the case of Figure 2-37, where each tile is an individual owl's head, yet the seams are smooth, with no sharp lines between them).
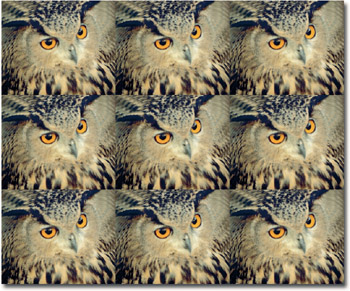
Figure 2-37: This montage is the result of applying he finished pattern with the Fill command. -
Repeat Steps 9 through 11. If the tiles blend together seamlessly, as in Figure 2-37, you're finished. If not, clone some more with the Clone Stamp tool and try again.
EAN: 2147483647
Pages: 95
- Chapter I e-Search: A Conceptual Framework of Online Consumer Behavior
- Chapter V Consumer Complaint Behavior in the Online Environment
- Chapter XIII Shopping Agent Web Sites: A Comparative Shopping Environment
- Chapter XVI Turning Web Surfers into Loyal Customers: Cognitive Lock-In Through Interface Design and Web Site Usability
- Chapter XVII Internet Markets and E-Loyalty