Opacity and Strength, Flow and Exposure
Another way to change the performance of a paint or edit tool is to adjust the Opacity and Flow values, which also go by the names Strength and Exposure, respectively, depending on the tool that you're using. When available, these controls appear in the Options bar. You can click the arrow to display a slider bar, drag the slider to raise or lower the value, and then press Enter or Return. You can also double-click the option box, type a value, and press Enter or Return. But the newest way also happens to be the best way: That scrubbing trick we mentioned earlier works in the Options bar, too.
Here's a look at how these options work:
-
Opacity: The Opacity value determines the translucency of colors applied with the Brush or Pencil tool. At 100 percent, the applied colors appear opaque , completely covering the image behind them. (Exceptions occur when using the Brush tool with Wet Edges active, which produces a translucent stroke, and when applying Mode options, discussed in the upcoming "Brush Modes" section.) At lower settings, the applied colors mix with the existing colors in the image.
Tip You can change the opacity of brushstrokes or edits that you just applied by choosing Edit Fade or pressing Ctrl+Shift+F ( z -Shift-F on the Mac). Then scrub the Opacity amount in the Fade dialog box. While you're in the dialog box, you can apply one of Photoshop's brush modes to further change how the modified pixels blend with the original ones.
-
Strength: When using the Blur or Sharpen tool, the Opacity option changes to Strength. The value determines the degree to which the tool changes the focus of the image, 1 percent being the minimum and 100 percent being the maximum. Strength also appears when using the Smudge tool, in which case it governs the distance the tool drags colors in the image. Another difference between Strength and Opacity: Whereas the default Opacity value for each tool when you begin using Photoshop is 100 percent, the default Strength value is 50 percent. Whether Strength is stronger than Opacity or these tools merely happen to know their own Strength is uncertain , but 50 percent is the baseline.
-
Flow: The Flow option appears when using the Brush tool, Sponge, History brush, both stamp tools, and the Eraser. Although the Airbrush icon always accompanies the Flow option, you can use Flow and Airbrush independently. The Flow value controls the opacity of each spot of color a tool delivers. In Figure 1-24, for example, a Flow value of 20 percent comes in slightly darker than an Opacity value of 50 percent.
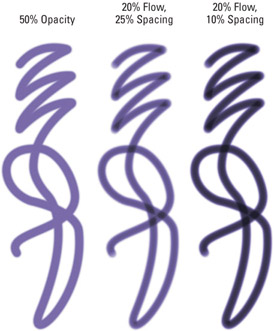
Figure 1-24: The difference between Opacity, which controls an entire brushstroke, and Flow, which affects individual spots of paint. When Opacity is consistent (left), Flow compounds wherever the stroke overlaps itself (middle). Tighter Spacing values also heighten the effect of Flow (right).Tip A Flow setting can produce a more opaque line than an equivalent Opacity setting and results in a progressive effect that compounds as a brushstroke overlaps itself. You can also increase or decrease the opacity of a line further by lowering or raising, respectively, the Spacing value in the Brush Tip Shape panel.
When using the Brush, History, Stamp, and Eraser tools, you can combine Opacity and Flow values to achieve unique effects. You can also add in the Airbrush, which compounds Flow further by adding spots of color when you slow down a brushstroke or hold the cursor still.
-
Exposure: Available when using the Dodge or Burn tool, Exposure controls how much the tools lighten or darken the image, respectively. As with Flow, Exposure compounds when you corner or overlap a brushstroke, and includes an airbrush variation. A setting of 100 percent applies the maximum amount of lightening or darkening, which is still far short of either absolute white or black. As with Strength, the default is 50 percent.
Tip You can change the Opacity, Strength, or Exposure setting for the active tool in 10- percent increments by pressing a number key on the keyboard or keypad. Press 1 to change the setting to 10 percent, press 2 for 20 percent, and so on, all the way up to 0 for 100 percent. Want to change the Opacity, Strength, or Exposure setting in 1-percent increments ? No problem ” just press two keys in a row. Press 4 twice for 44 percent, 0 and 7 for 7 percent, and so on. This tip and the preceding one work whether or not the Options bar is visible. Get in the habit of using the number keys and you'll thank yourself later.
Changing the Flow value on the fly is trickier, but still possible. When the Sponge tool is active, Flow works just like Opacity: Type a number to change the value in 10-percent increments; type two numbers to enter a specific value. But what about the Brush tool and others that offer both Opacity and Flow? Typing a number changes the Opacity value unless the Airbrush icon is active, in which case typing a number changes Flow. If the Airbrush is turned off, press Shift plus a number key to change the Flow value. When the Airbrush is turned on, pressing Shift plus a number key changes the Opacity value.
EAN: 2147483647
Pages: 95