Installing SUSE Linux with YaST
| The installation begins when you insert the first SUSE Linux CD into your drive and boot up. A menu appears with several startup choices (see Figure 3.1). Select Installation. YaST will identify and initialize the hardware it needs to begin, and then display the Novell Software License Agreement. Click I Agree to continue to the first installation screen. Select your preferred language from the extensive list. Figure 3.1. Select an Installation option from this initial screen. Initial Installation SettingsYaST loads the kernel modules for your hard drive and then displays a list of Installation Settings (see Figure 3.2). Review carefully all the settings for accuracy and click either the heading of each section or the Change button on the bottom to correct any errors. Figure 3.2. YaST autodetects your hardware and makes some default choices about your installation. Edit any default selection by clicking the heading or using the Change button. Tip If you have a two-button mouse, notice that YaST will automatically emulate a three-button mouse. This lets you access many middle-button features by clicking both buttons at the same time. PartitioningYou learned most of what you need to know about how disks are partitioned under Linux in Chapter 2, "Preparing to Install SUSE Linux." YaST creates a Root and swap partition by default. If you want to add partitions or use a different file system than ReiserFS, select the Partitioning heading and make your changes. Tip If YaST detects the presence of another operating system, it will ask whether you want to replace that OS with SUSE Linux or dual boot both. YaST will use the GNU Parted partitioning tool to shrink the existing partition and allow SUSE Linux to install. If you have two physical hard drives and want to install Linux on the second drive, it will format that drive accordingly. See "Thinking About Dual Booting, Partitioning, and Other Worries," in Chapter 2, and Chapter 11, "Going Cross-Platform," for more information. Setting Your Time ZoneUse the Time Zone section to identify your location so that the system time will be correct for your time zone. By default, time is marked using a 24-hour clock, rather than the AM/PM divide. You can change this in YaST later. See "Setting Date and Time" in Chapter 4, "Further Configuration with YaST2 and SaX2." Installing Software PackagesBy default, YaST installs the Standard System with KDE, a selection of basic applications and the K Desktop Environment. If you prefer the other leading Linux desktop environment, you can install the Standard System with GNOME. Click the Software section of the Installation Settings, and click the appropriate button. Click Accept when you are ready to install the base system. Depending on the software packages you selected, you may have to view and accept other license agreements for certain applications (for example, the Macromedia Flash player). Caution YaST will also warn you that it is formatting a partition and that any data on that partition will be destroyed. This gives you one more chance to turn back in case you have data on your computer that you want to preserve. Click Install to begin the process. YaST formats the designated partition for the data drive and the swap partition and then begins installing the operating system and the designated software packages. Depending on the amount of software to be installed and the speed of your processor and CD drive, the time it takes to do this will vary. The right side of your screen contains a progress bar that gives you a total estimate of the time remaining. If you are installing from the CD set (rather than from the DVD), you'll see a few horizontal bars crossing the progress bar; they represent the approximate time until you'll have to swap CDs again. Feel free to walk away from the keyboard while the installation proceeds. The DVD contains all the files on the single disk and frees you from the worry of needing to be ready to swap media as needed. Note To pass the time while YaST is installing, you can watch the slide show, which (as is traditional in lengthy software installations) presents a rundown of some of the new features in this version, or click the Details tab (see Figure 3.3) to see the list of packages being installed (and an overview of the number of packages installed from each CD). Figure 3.3. View the details of the software package installation in this screen.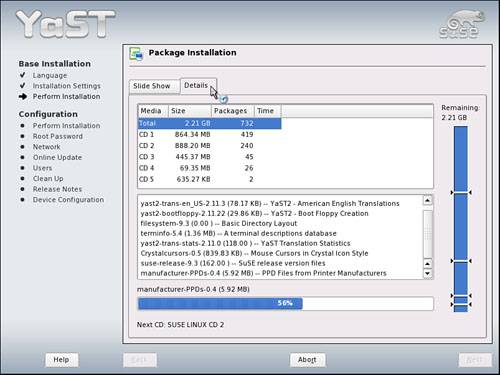 After the base system is installed, YaST reboots your computer to make sure things are in good shape to begin (you will have a 10-second warning when you can stop the reboot, if necessary). Leave the first CD in the drive for the reboot. When the reboot is complete, the Package Installation screen appears, and you'll be asked to insert the second CD. Packages will continue to install, and the blue progress bar will continue to shrink. You'll be asked again to swap out CDs occasionally until the installation is complete. Creating the root UserWhen all the packages have been installed, you will become the system administrator for the first time. Your task is to create the first user on the system: root. This is done simply enough: In UNIX and Linux, a user equals a password. The first password you create, for the root user, is by far the most important. The root user has complete control over the system, for good or evil. Therefore, the root password must be secure and easy to remember. If you forget the root password, it becomes extremely difficult (although not impossible) to access any system files. At minimum, the root password must be at least five characters and should have a mixture of letters, cases, and numbers. Tip See "Selecting Passwords" in Chapter 19, "Managing Users, Managing Security," for tips on creating secure passwords. Click Expert Options to choose the encryption method for your passwords (see Figure 3.4). By default, SUSE Linux uses the DES standard, but it is much safer to use the Blowfish encryption standard because it allows for up to 72 characters in the password string. This is much harder to crack randomly. When you have typed and confirmed the root password, click Next. Figure 3.4. Strengthen the encryption of your Root password by clicking Expert Options.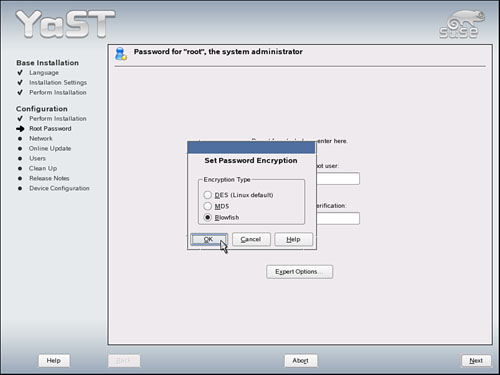 Configuring Network and Internet ConnectionsNext, YaST checks for networking hardware: Ethernet cards, dial-up modems, or high-speed connections. You have the option to configure these yourself later (click Skip Configuration), but it is a good idea to set this up during the installation. YaST will use this connection to go online to update your installation in the next step. Figure 3.5 shows the default network settings screen. As before, if YaST failed to detect all your networking hardware, or misidentified something, click the appropriate heading or use the Change button to make adjustments. Figure 3.5. Confirm or edit your network hardware and configuration on this screen.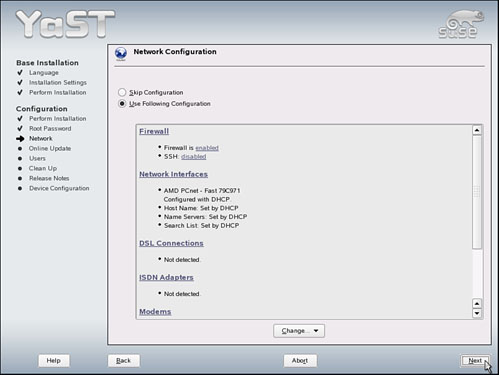 Note If more than one network interface card (NIC) is found, you may be asked to configure the second card. This might be the case if this computer is going to function as a router or Internet gateway. One card, labeled eth0, will be the first active interface when you boot. Note that the SUSE Firewall is turned on by default. This is a good thing, unless you are already protected by a hardware router, which is included with many Digital Subscriber Line (DSL) accounts, and in business network settings. Click Next to confirm the network settings. YaST tests your connection as you set it up. It connects to a nearby SUSE Linux update server to retrieve the latest Release Notes and any updates to your installed software. If you have any problem connecting, review the network settings and make sure everything is correct. Tip Learn more about your Internet connection in Chapter 12, "Connecting to the Internet." Creating a UserNow it's time to set up your first user you! As with the root user, the central task in creating a user on a Linux system is to make a password. YaST first asks whether this user will log in locally or from another computer, using either the Lightweight Directory Access Protocol (LDAP), the Network Information Service (NIS), or from a Windows PC through Samba. In all likelihood, the first user on the system will log in locally on this PC; select this option and click Next. Type the relevant information into the Add a New Local User screen (see Figure 3.6), including the user password. This should always be different from the root password, but use the same general rules. For further information and advice on New User settings, see "Setting Up User Accounts in YaST" in Chapter 19. Click Next to create this and all other system users. Figure 3.6. Add your first user (usually you) in this screen.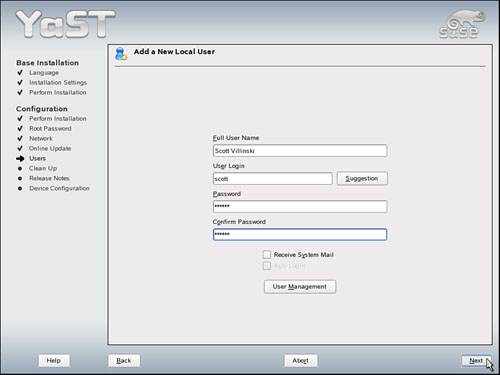 YaST now runs the SUSEConfig file to add the user and confirm the other changes made to this point. This can take a minute or longer, depending on your system. It then displays the Release Notes, with current information on new features and known problems. Click Next when you have reviewed this information. Configuring Hardware for the X Window SystemThe last step in the installation is identifying and configuring the hardware you'll need for the graphical X Window System and your chosen desktop environment. YaST autodetects your graphics card, connected printers, sound card, and a few miscellaneous peripherals. Again, if the autodetection failed or misidentified a card, select the appropriate heading or click the Change button and make any necessary changes. Click Next when you're ready. YaST confirms the changes and writes the default configuration files. You will now see the Congratulations! screen (see Figure 3.7), signifying the end of the installation process. You are ready to log in for the first time. If you want to check other settings or add more software packages next, check the Start YaST Control Center box before clicking Finish. You may remove your CD at this time. Figure 3.7. You've finished! The system will then begin the boot process, finishing by displaying the green screen with the login prompt. |
EAN: 2147483647
Pages: 332
- ERP System Acquisition: A Process Model and Results From an Austrian Survey
- The Second Wave ERP Market: An Australian Viewpoint
- The Effects of an Enterprise Resource Planning System (ERP) Implementation on Job Characteristics – A Study using the Hackman and Oldham Job Characteristics Model
- Context Management of ERP Processes in Virtual Communities
- A Hybrid Clustering Technique to Improve Patient Data Quality