Building Java Applications with Eclipse
| IBM has been a big backer of the Java language since its birth in the mid-1990s, and possibly even a bigger backer of Linux and open-source software since the turn of the twenty-first century. It isn't a big surprise that as a result, the IBM-sponsored Eclipse Java development platform is open source and works well in Linux. Eclipse began as, and basically still is, an environment for building applications in the Java language. Because it is endlessly extensible with plug-ins, much more can be done with it. Developers regularly use it to program in Python, PHP, and other languages. The Eclipse package that you install with SUSE Linux contains these core features: the Eclipse Java Development Tool (JDT), the Plug-In Development Environment (PDE), and the Eclipse Software Development Kit (SDK). SUSE Linux also includes the Ant build application, the JDI debugger, the JUnit testing framework, and a refactoring tool. Other plug-ins are installable through the Eclipse Update Manager, a YaST-like tool that checks for new software versions and installs them. Tip Using the Eclipse Update Manager with SUSE Linux can be troublesome at first, but it is not exceptionally difficult to fix. When YaST installs Eclipse, all the files and directories are owned by Root and the group Root. The average user has access only by default, but the Eclipse Update Manager needs write access to create and update files in the /usr/share/eclipse directory. You solve this problem by logging in as the SuperUser and creating a new system user called eclipse, and a group of the same name, with the new user as its only member. Finally, because Root owns this directory and its branches, you need to adjust the permissions for /usr/share/eclipse. Go to this directory and type: chgrp -R eclipse *. This makes the eclipse group responsible for the directory and all its subdirectories. Now you can use chmod to allow this group to read and write files in the same directories: chmod -R 661 *. You should now be able to run Update Manager without any trouble. Using the Eclipse WorkbenchThe first time you run Eclipse, you'll get a Welcome screen. Feel free to walk through the tutorials and examples offered there, and when you're done, click Workbench to get started. Tip Eclipse uses the Mozilla browser to deliver its online help, including the Welcome to Eclipse tutorials. If you don't have Mozilla installed, or if you prefer a different browser, go to Preferences in the Window menu in the Eclipse Workbench. Under Help, choose Custom Browser and identify your preferred application. In Figure 28.1, you can see a sample "Hello World" program written in Java in the Eclipse Workbench. We'll go into the program in more detail later, but the Workbench gives you quite a lot at your fingertips. Figure 28.1. The Eclipse Workbench puts many tools at your fingertips.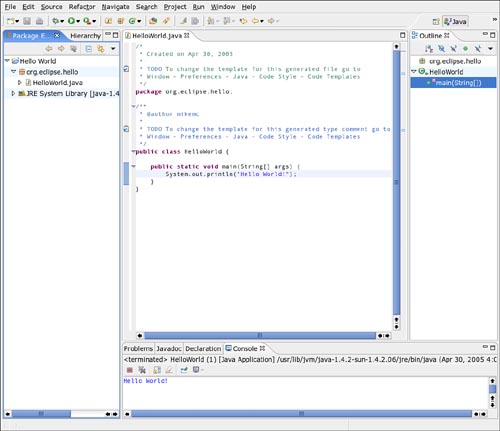 In the upper-left corner is the Package Explorer, which lets you move around and open files in your project editor. The editor is in the center. You can have any number of files open in the editor at any given moment, but only one active at a time. You'll see any others in a tab in this area. In the upper-right corner is the Outliner, which shows each element in the active program. Clicking any item in the Outliner highlights that element in the editor. Across the bottom, Eclipse watches for problems in your code and flags them for you. If your program displays some text on your shell (also known as the console), it will display a Console tab as well. Creating a Small Java Application in EclipsePerspectives are a set of related views and windows that help complete the task at hand. Each Perspective is tailored to a specific task. By default, Eclipse displays the Resource Perspective, with which you can start creating any sort of project.The Java Perspective was shown earlier in Figure 28.1. You can change Perspectives by going to the Window menu and selecting Open Perspective. The default list of choices changes depending on the Perspective you're starting from, but you can always display the entire list of Perspectives with the Other option. For our "Hello World" example, begin by selecting the Java Perspective. Eclipse will respond by moving the default windows around a little bit to set up the Java Perspective layout. You can further customize this view by maximizing windows, adding others, and closing some (if you find a particular setup useful, you can save a custom Perspective as well from Window, Save Perspective As). You will need a new project to store your code in. Go to File, New, Project (or use the New Project toolbar button), and a wizard appears. Create a new Java Project, and name it Hello World (spaces are permitted in project names). You can further specify build settings, but that's for projects more complex than this one and the defaults will suit us fine. Now your program (actually a Java class) can be created. Go to File, New, Class to launch the Class Wizard. Name it HelloWorld, this time with no space. You should also define a package, because the use of the default package is discouraged (a package puts the class in a folder with related classes). The convention for the Eclipse Platform is to use org.eclipse as the default; for this one, use org.eclipse.hello. Check the box to create a void main method stub, and then click Finish. You'll see the result, HelloWorld.java, in the Java editor window. The Main() function needs something to do. In the Outliner, click main(string[]). You'll see main highlighted in the editor. Go to the end of the line (with the left brace) and press Enter. Type System.out.println("Hello World!");. Your code should resemble the following: package org.eclipse.hello; public class HelloWorld { public static void main(String[] args) { System.out.println("Hello World!"); } } When you've finished entering your code, go ahead and save your work either with File, Save or the Ctrl+S key combination. Now it's time to run the program. Make sure HelloWorld.java is selected in the Package Explorer window on the left. Go to Run, Run As, Java Application. If all has gone well, you should see the Console window open on the bottom, as shown in Figure 28.1, displaying Hello World. If you have any problems, you can use the Debug view to help you sort it out. Eclipse offers you an easy way to export your project when it's time to finally release it. To export our new Hello World application as a JAR file, make sure the Hello World project's root is selected in the Package Explorer pane and select File, Export. The Export Wizard will appear. The first step of the wizard will prompt your for the type of export; select JAR file and click Next. Continue through the steps, ensuring that you set the export destination for your archive, and specify the main entry class. Eclipse will package your application and you can share it now with whomever you please. |
EAN: 2147483647
Pages: 332