Working with the RegForm Utility
As promised earlier, you are going to start your detailed lesson of how to create fully trusted forms by learning how to work with the RegForm utility, which does most of the hard work for you. Before you can start learning about it, you need to obtain a copy of the InfoPath SDK (if you don’t already have one), which is available for download at www.microsoft.com/downloads/ (search for “infopath sdk”) or from the MSDN web site at http://msdn.microsoft.com/InfoPath/.
The InfoPath SDK itself is a collection of forms and developer samples that demonstrates different ways to use InfoPath and integrate it into existing systems and databases. Once you have downloaded and installed the SDK, the RegForm utility, by default, will be available in the C:\Program Files\Microsoft Office 2003 Developer Resources\Microsoft Office InfoPath 2003 SDK\Tools\ folder.
The utility itself is a command-line tool that doesn’t have a graphical user interface—you need to run it from a command prompt with a number of switches to convert a form into a fully trusted form that can be installed on a client computer.
| Tip | Since you are going to use this utility often, you may want to move it to a more convenient location (for instance, C:\InfoPathTools\). |
When you create a trusted form using the RegForm utility, you have the option to create an installation script or (if you have Visual Studio .NET installed on your computer) a basic Microsoft Installer (MSI) file that you can use to install the trusted form on the client’s computer. The following sections look at both of these installation methods.
Creating a Trusted Form and Installing Using Scripting
The easiest method to create and install a trusted form is to use the scripting method, which is the default method used by the RegForm utility. This process converts your form to a fully trusted form and creates an installation script (written in JScript) that you can use to install your form.
To get started, you need to have a fully tested InfoPath form that is ready to be distributed. To use the RegForm utility on this form, open a command prompt from the Start menu: select Start | Run, type CMD in the Run dialog box, and then click OK to open a Windows Command Prompt. Navigate to the directory where you have installed the RegForm utility—by default, this is C:\Program Files\Microsoft Office 2003 Developer Resources\Microsoft Office InfoPath 2003 SDK\Tools\.
The basic input required for the utility is the path and filename of the form you want to make fully trusted and the /t switch set to YES, which is used to specify whether the form is fully trusted or not. So, if you were running the utility on a form named employee.xsn that is stored locally, your command would look like this:
RegForm employee.xsn /t YES
The RegForm utility will make a backup of your form and save it with a .bak extension in the same location as the original. Next, it will change the form files to make them fully trusted and create an installation script using JScript, as shown in Figure 13-1.
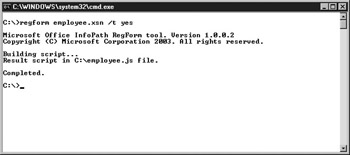
Figure 13-1: The completed RegForm utility
After the utility has finished running, you should have three files in your directory:
Employee.xsn
Employee.bak
Employee.js
You can now use the JScript file provided to install your trusted form.
Installing Your Trusted Form
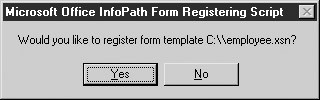
To install your form, all you need to do is run the script file that was generated by the RegForm utility. You can run this file from a command prompt or by simply double-clicking it from within Windows. A dialog box similar to the following appears and asks if you want to register the form template.
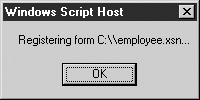
Click Yes to continue. A new dialog box displays the status of the registration process—click OK to continue.
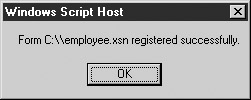
When the form has been properly registered, you will receive a confirmation message. Click OK.
| Tip | You can also run your installation script in “silent” mode by running the script with a /silent switch at the end (for example, employee.js /silent). |
Open InfoPath and your new fully trusted form will be available as a custom installed form. To fill out your form, select File | Fill Out a Form, which opens a task pane on the right side of the workspace. Locate and click the link for More Forms and then click the Custom Installed Forms tab, as shown in Figure 13-2.
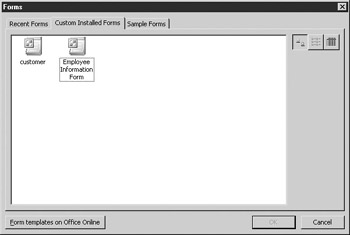
Figure 13-2: Custom Installed Forms
You can now fill out your form as you normally would—since the form is fully trusted, it will be able to access all the required resources on your computer. When you are finished filling out your form, you can save or submit it just like usual.
Installing a Form from a Different Location
Another common scenario you may encounter when installing forms using the scripting method is that the actual form file itself may be in a different location than your installation script. You can use the /d switch with your installation script to specify where to find the InfoPath form you want to install. For example, if you have a network drive (for example, F:) on which you store all of your InfoPath forms, you could install your form with a command similar to the following:
employee.js /d f:\forms\employee.xsn
As long as the computer on which you are installing your form has appropriate access to that drive, you will be able to install your form from the specified location.
Creating an Installation Using an MSI File
While the scripting method is the easiest way to convert and install your forms, the RegForm utility also enables you to create simple Windows Installer (MSI) files that you can use to install your trusted forms.
| Tip | Don’t forget! To use this functionality, you must also have Visual Studio .NET installed on your computer, because the utility uses the .NET development environment. |
In addition to providing additional options not offered using the scripting method, using MSI files allows you to deploy forms using “push” technology, such as Microsoft’s System Management Server. Using this installation method also means that the forms you install are shown in the Add/Remove Programs listing and thus can be easily removed or repaired if required.
If you ever need to remove a trusted form that you have installed on your computer, you can use the same script that was originally created with the RegForm utility. The script has an /uninstall switch that will remove the form, as shown here:
employee.js /uninstall
You may run into a problem if you haven't kept the original installation script but still need to remove the form. You could delete the form template file itself, but that would still not remove it from the list of Custom Installed Forms within InfoPath. To manually remove a form from this dialog box, you need to delete a key within the Registry.
| Caution | If you are not familiar with working with the Windows registry, please make a backup of your Registry before you get started by selecting File | Export and picking the option to export All. Keep this backup in a safe place in case you make a mistake later and want to return to a “good” copy of the Registry. |
Open the Registry by selecting Run from the Start menu and type REGEDIT. Navigate through the Registry to find the keys under HKEY_LOCAL_MACHINE\ SOFTWARE\Microsoft\Office\11.0\InfoPath\SolutionsCatalog\, which should look something like the keys shown here.
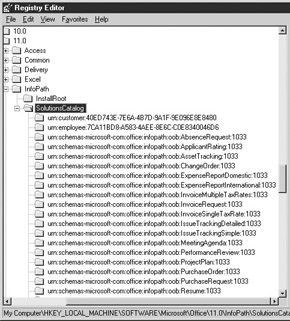
There is one key in this folder for each InfoPath form that is installed on your computer, listed by URN. To manually remove a form from InfoPath, click to select its key and then press the Delete key to remove it. When you open InfoPath, this form will no longer appear on the Custom Installed Forms tab.
To convert a form to be fully trusted and create an MSI file to install it, use the RegForm utility with an /MSI switch as follows (no further information is required to create the MSI file):
regform employee.xsn /t YES /MSI
| Note | If you are using Visual Studio .NET 2003, during the conversion process, you may receive a blank error message with the title “The project you are trying to open was saved with a previous version of Visual Studio…” Click No and then OK to continue. |
When the process is finished, the utility displays a screen like the one shown in Figure 13-3.
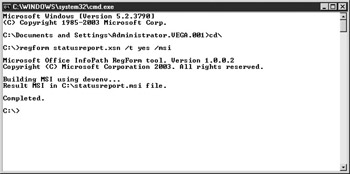
Figure 13-3: The completed RegForm utility
Your MSI file has been placed in the same location as the converted form, along with a backup of the original form file. You can now use this file to install your form onto other computers.
Installing Your Form
To install your form, simply locate and double-click the MSI file that was generated in the last step. This launches the Windows Installer service and starts the setup program that the RegForm utility created. Click Next on the Welcome screen.
| Note | Most computers already have the Windows Installer service installed and configured. (If yours does not, you can download a copy of the service from the Microsoft web site.) |
The first step in your setup program, shown in Figure 13-4, is to select where you want to install your form. By default, this location is set to C:\Program Files\InfoPath Form Templates\, but you can change to it wherever you like.

Figure 13-4: Installation folder options
Also, make sure that you select the option at the bottom of the dialog box to make this installation for Everyone, and then click the Next button to continue.
When the Confirm Installation screen appears, click Next to begin the installation process. A progress screen appears immediately to keep you updated on the installation process. When the installation has finished, an Installation Complete summary screen appears. Click Close to exit the setup program.
If all of those installation steps seem a bit much to you, you can always use the switches available for MSI files to change the way the setup behaves. For example, if you want to display a progress dialog box during the installation (but none of the other options), you could use the /qr switch:
employee.msi /qr
Likewise, if you want a completely “silent” install with no progress dialog boxes or indicators, you could run the MSI file using the /qb switch:
employee.msi /qb
| Tip | For a complete list of standard Windows Installer switches to use with MSI files, check out http://msdn.microsoft.com/library/enus/msi/setup/command_ line_options.asp. |
Removing Your Form
To remove a form installed using an MSI file, you can locate the form in the Add/ Remove Programs section of the Control Panel or simply rerun the MSI file, both of which will open the dialog box shown in Figure 13-5 and allow you to remove the form.
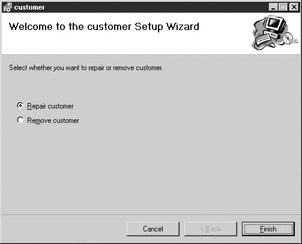
Figure 13-5: Remove options
Customizing the Output
In both of the scripting and MSI methods we used the RegForm utility with the default settings (with the exception of the /t switch to create a trusted form). There are a number of other switches that you can use to control the output of the RegForm utility. This section looks at how to use those switches and the features that they provide.
Changing the URN
As you saw earlier in the chapter (“Did you know? What’s the Difference?” sidebar), when modifying a form to make it fully trusted, you are changing it from being URL-based to being URN-based. By default, when you don’t specify a URN, the RegForm utility automatically creates a URN based on the form template and your company name. You can specify these values by using the /FT and /C switches, respectively. For example, if your form name is EmployeeInformation and your company name is Avantis, you could pass these values to the utility:
regform employee.xsn /t yes /ft employeeinformation /c avantis
If you don’t specify the form and company name, the utility generates and assigns a generic GUID to your form. While this may seem like the easiest answer, a GUID is a generated string of characters and numbers. Earlier, when you looked at manually deleting a form from InfoPath’s Custom Installed Forms, you saw that you had to delete a Registry key. If you choose to let the RegForm utility generate a GUID for the URN, it is almost impossible to determine which form is which without cracking open the underlying form files.
So, if you don’t want to use the form and company name and don’t want the utility to generate a GUID, you can specify your own URN by using the /U switch of the RegForm utility, as shown here:
regform employee.xsn /t YES /u urn:EmployeeInfo:Avantis
A URN usually consists of the form name and your company name, but you can create any type of URN you want. The structure of your URN must include two parts after the “urn” designation, separated by a colon, and the total length of the URN can’t exceed 255 characters.
| Tip | The “urn” must be in lowercase letters; otherwise, the utility will give you an error message. |
Changing the Version Number
In addition to specifying a custom URN, you can specify the version number for the form you are converting. InfoPath forms have an internal version number that is automatically incremented each time the form is saved. To view the version number of a form, open the form design in InfoPath, select Tools | Form Options, and click the Advanced tab, shown in Figure 13-6.
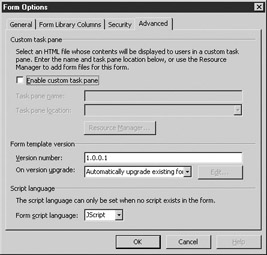
Figure 13-6: Advanced options
| Note | You can also use this dialog box to specify your own version number, but if you do so, InfoPath will not automatically update the version number from that point on. |
When distributing forms, you can override the version number by using the /v switch of the RegForm utility to specify a new number. Version numbers follow the pattern of 9999.9999.9999.9999, so to pass a version number using this switch, your command line would look something like this:
regform employee.xsn /t YES /v 2.5.0.1
| Tip | This only changes the version number of your new, fully trusted form. The backup of the form (employee.bak) will still have the old version number. |
Changing the Output File and Location
The final set of switches available for the RegForm utility are used to control the output filename and location. If you have specified that you want to create an installation script (which is the default behavior), this switch can be used to change the filename and location of your JS script. Likewise, if you are creating a Windows Installer setup, the switch can be used to change the name of your MSI file, as shown here:
regForm employee.xsn /t YES /MSI /O c:\installs\installform.msi
EAN: 2147483647
Pages: 142