Working with Scripting
One of the key strengths of InfoPath is its capability to extend form functionality through scripting. InfoPath supports both JScript and VBScript and includes a built-in editor, Microsoft Script Editor (MSE) to create and edit scripts within your forms (MSE is a standard Microsoft script editor and is not built specifically for InfoPath).
Scripting can be used for a wide gamut of tasks, from validating data and performing simple calculations to connecting to secondary data sources, manipulating form data, and more. In the course of this chapter, you are going to learn some of the ways that you can use scripting in your own forms, but before you get started, you need to look at some of the options you have for working with scripting in InfoPath.
To start, you can create your forms in either VBScript or JScript. VBScript (short for Visual Basic, Scripting Edition) is based on Microsoft Visual Basic and was introduced to provide Visual Basic developers with an easy-to-write scripting language for the Web. JScript is Microsoft’s implementation of JavaScript, a scripting language that is loosely related to the Java language. While JScript is Microsoft’s own “flavor” of JavaScript, it is standards-based, so if you are familiar with JavaScript, you will have no problems here.
| Note | During the course of this chapter, the scripting examples are in JScript exclusively. Appendix B provides a handy reference for some of the most commonly used declarations, methods, functions, and so on, that JScript provides. For more information on working with VBScript, check out http://msdn.microsoft.com/scripting/. |
If you are a scripting novice, you need to select which scripting language you want to use, a decision that is based on personal preference more than anything else. To set the default scripting language to be used each time you create a new form, select Tools | Options and then click the Design tab (which is available only while designing a form). There is a drop-down list box at the bottom of the dialog box that you can use to select the default scripting language that will be used for new forms.
| Tip | By default, your scripting language is JScript. |
So, with your default language set, you are ready to find out how you actually create scripts within your form, starting with a look at the Microsoft Script Editor.
Using the Microsoft Script Editor
The Microsoft Script Editor (MSE) is tightly integrated into InfoPath and provides a feature-rich environment you can use to create your own scripts. To launch MSE from within InfoPath, select Tools | Script | Microsoft Script Editor, which opens the window shown in Figure 10-1.
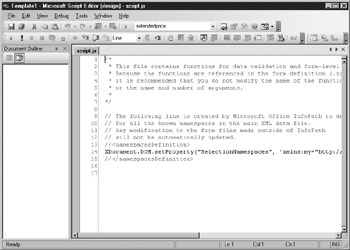
Figure 10-1: Microsoft Script Editor
| Note | If you have worked with other web or application development tools from Microsoft, MSE may seem familiar to you—Microsoft distributes this editor with a number of other products. |
MSE opens in a separate window and you can switch between your form’s design and MSE by using ALT-TAB. MSE’s workspace is broken down into a number of different areas, with the main code window taking up the most real estate on the screen. The Document Outline, usually shown on the left, lets you jump to a specific section of code.
| Tip | To view MSE in full-screen mode, press SHIFT-ALT-ENTER. |
When creating and debugging your scripts, you need to save the script in MSE and then switch over to InfoPath to preview your form and test the script. This can be a bit cumbersome at first but you will soon get the hang of it! From within the preview of your form, all of your script will run; if there are any errors, an error dialog box will appear and you will have some debugging options that will allow you to return to MSE to correct the problem. Alternately, you could close the preview and use ALT-TAB to get back to MSE. It’s up to you.
| Note | If you did a full install of Microsoft Office, you have the debugging tools installed. If you did a partial install or if the debugging tools are not installed, InfoPath will prompt you to install the tools the first time you start the Microsoft Script Editor. |
Understanding the InfoPath Object Model
When you are working with scripting, there are a number of elements that have nothing to do with InfoPath. For example, if you are using JScript as your scripting language, there are a number of declarations, functions, methods, and so on, that are provided as part of the JScript language that are unrelated to InfoPath. As you start working with scripting, you will find out that the underlying scripting language simply provides the framework and basic structure for your scripts. For example, you are going to use standard JScript functionality to declare variables, perform calculations, and control scripting flow with if…then statements.
When you need to actually dig into your form to extract information about the form or your form data, you need to turn to the InfoPath object model. An easy way to think of an object model is to think of your InfoPath form as a house.An object model simply describes all the different components that make up the house and provides different methods for extracting information about the house and its contents. For example, you may want to describe to someone where you are going to have dinner—in your house object model, the reference may be DiningRoom.Table, where you are referring to both the room and the location within the room where you are going to eat.
Within InfoPath, the object model is used to describe the form itself and the data within the form. This object model has been broken down into a number of functional areas, as shown in Table 10-1.
| Object | Description |
|---|---|
| Application | The base of the object model, providing details about your InfoPath form, including the application name and version (for example, InfoPath 11.0.5531) and the other high-level information |
| ExternalApplication | Used to control InfoPath from external applications—can be used to open, close, and create forms, register form templates locally, and so on |
| XDocument | Used to reference the contents of a form, including form data fields and more through XDocument |
| Windows | Used to reference a form's Window objects (for example, command bars, and so on) |
| View | Used to reference views within a form |
You will find all of these areas broken down in the InfoPath Developer’s Help file, which can be accessed from within MSE by selecting Help | Microsoft Script Editor Help and navigating to the folder named InfoPath Developer’s Reference. There is also a diagram of the object model that demonstrates where everything fits.
As you work more and more with scripting, you will become more familiar with the object model and how it is used. When you first get started with scripting in InfoPath, you might spend a bit of time looking up where to find different properties and methods. For example, if you want to put a command button on your form to close the form, you would need to find where in the object model this functionality is provided (if at all).
By searching the developer’s reference, you would find that you can close a form by using the Quit method, which is available from the application object, as shown here:
function CTRL13_5::OnClick(eventObj)
{
Application.Quit(false);
}
The reference includes sample scripts and examples where you would use different properties or methods, and you can cut and paste these examples directly into your own forms. Throughout this chapter, you will be working with the most common areas of the object model and the properties, methods, and events associated with those different areas. But there is no way the entire object model can be covered in this chapter, so make sure that you keep that developer’s reference handy, and don’t be afraid to go look something up if you are unsure.
Working with Events
Before you can start writing your first script, you need to understand where you can use scripting in your form. There are two main areas where scripts are used— with command buttons and with events. Command buttons are controls that you can add to your form; when the user clicks the button, a script will fire. Creating and using command buttons is a simple and effective way of using scripting, but it doesn’t cater to all the different ways you may want to use scripting in your form.
The majority of tasks that you likely want to accomplish will be attached to events within your InfoPath form. An event is some action that occurs. For instance, when you first open a form, an OnLoad event fires. Similarly, when a field is updated, there is another event that fires called OnAfterChange. (And to make it even more confusing, when you do use a command button on your form, there is a special OnClick event that is associated with the button.) Most of the scripts you will write will be attached to these events, so when the event fires, the script will be run. Table 10-2 lists some of the different events that you can associate with scripts.
| Event | Description |
|---|---|
| OnLoad | Fires when a form is first loaded. |
| OnSwitchView | Fires when a user switches between two form views. |
| OnVersionUpgrade | Fires when a form template is upgraded. |
| OnSubmitRequest | Fires when a form is submitted. |
| OnBeforeChange | Fires when a particular field is changed, but is before the new value is actually committed. |
| OnValidate | Fires when a particular field is changed and gives the user the opportunity to change the field. |
| OnAfterChange | Fires when a particular field has been changed. |
| OnClick | Fires when a command button is clicked. |
So, if you want to display a dialog box whenever a form is opened, you can put a bit of script behind the OnLoad event so that when the event fires, a snippet of script is run to display the dialog box with your message.
To add some script to the OnLoad event, select Tools | Script | On Load Event to open MSE and place your cursor within the OnLoad event for your form, which should look something like this:
function XDocument::OnLoad(eventObj)
{
      // Write your code here
}
When working with events, always leave the function declaration alone— InfoPath generates this part for you and there is no need to change it. To add some script to run when the form loads, you would need to replace the placeholder text with your own script. In this example, you want to display a dialog box when the form loads. To do this, you can use an alert (more information about alerts is provided later in the chapter, in the section “Working with Alerts”). So, your code would look something like this:
function XDocument::OnLoad(eventObj)
{
      XDocument.UI.Alert("Your form has been loaded");
}
Make sure that after you enter this script, you save the script within MSE. To run this script, switch over to InfoPath and preview your form using File | Preview Form | Default; your dialog box should appear when the form loads.
You could use this same method to associate a script with the other events as well. For example, if you want to add some validation to a field and use the OnBeforeChange event, right-click a data-entry control on your form, select Properties, and then click the Data Validation button to open the Data Validation dialog box, shown here.
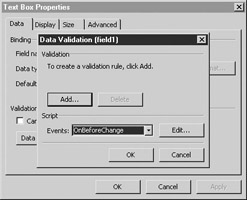
Use the Events drop-down list at the bottom of the dialog box to select the OnBeforeChange event and then click the Edit button to open MSE, which should open to a code snippet that looks something like this:
function msoxd__field1::OnBeforeChange(eventObj)
{
       // Write your code here
      // Warning: ensure that the constraint you are enforcing is compatible with the default value you set for this XML node.
}
You could then add some code to validate the values entered into the field and display a warning message to the user, either through an alert or one of the validation error methods described earlier.
It is worth mentioning that these events (onBeforeChange, onValidate, and onAfterChange) may fire twice when a field is changed (once for deletion and the other time for insertion). To determine for which operation the event is being raised, check the eventObj.Operation property, as in the following example:
Function msoxd_my_field1::OnBeforeChange(eventObj)
{
            if (eventObj.Operation == "Insert")
            {
                <variables>
    XDocument.UI.Alert("inserted");
    <do stuff>
}
}
Working with Form Fields
Building upon your newfound knowledge of the InfoPath object model, this section explains how to control the content of controls that may appear on your form. To start, you are going to look at a simple example. On the form shown in the following illustration, you are going to place some script behind the command button so that when you click the button, the text box shown on the form will display “Hello World.”

To use the “Hello World” code that follows, you need to create a new blank form and drag both a text box and a button control onto your form. Since you are creating the data source on-the-fly, there will be a field created in your data source named field1, which you will be using to display the text. To add some script behind your command button, right-click the button, select Button Properties, and then click the Microsoft Script Editor button. This opens MSE and positions your cursor in the OnClick function for your button.
So, to select the field that is displayed on your form, use the selectSingleNode method, as shown in the following script:
var myField
myField = XDocument.DOM.selectSingleNode("//my:field1");
myField.text = "Hello World";
Once you have selected this node, you can then set the Text property to display the text “Hello World” on your form. This is a very simple example, but you can use this same method to access all the data in your form.
If you have fields that are in a repeating group, you can use a similar method to retrieve the values stored in these fields by using the selectNodes method to select multiple nodes within your data source. In this example, you are going to look at an order form that is used to record an order made by a customer, as shown in Figure 10-2.
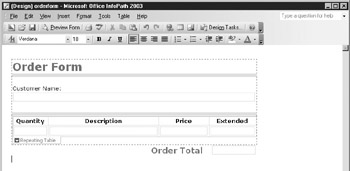
Figure 10-2: A typical form with a repeating table
You are probably experiencing a sense of d j vu here. This is similar to the example that was used in Chapter 7 when creating XPath expressions in expression boxes. While expression boxes are easy to create, they are limited in what they can be used for. Scripting, on the other hand, provides a robust development environment for creating complex calculations that extend far beyond the capabilities found when using expression boxes.
The form itself has a simple header with fields for the customer name and a repeating table that is used to gather information about the items that the customer has ordered, including the quantity, description, price, and extended price (which is the quantity order multiplied by price). To demonstrate how to select multiple nodes, you are going to create script that sums the extended price column and displays the result in a total field at the bottom of the repeating table.
When working with the selectNodes method, it treats the node you select as an array, which you can reference using square brackets ([]). For example, the following script selects the extended price field and then loops through all the order lines to sum this value from each line:
var runningtotal = 0;
var orderlines = XDocument.DOM.selectNodes("//order/items/item/extendedPrice");
      for (var i=0; i<orderlines.length; i++)
      {
      runningtotal += parseFloat(orderlines.item(i).nodeTypedValue);
      }
      var ordertotal = XDocument.DOM.selectSingleNode("//total");
      ordertotal.nodeTypedValue = runningtotal;
You’ll notice that whenever you use the selectNodes method to select multiple nodes, you can access some of the same properties that are available when working with arrays. For example, in the preceding code, the selected node is called orderlines, which is then used to select all the extendedPrice fields. You can use the length property of orderlines to determine how many lines have been entered on the order form and then use the subscript to get a particular value for extendedPrice from one of those lines.
Another trick that you may pick up on is the use of the property nodeTypedValue, which can be used to return a value of a particular type. In this instance, you are working with decimal fields, so the parseFloat method is used to parse the value to a floating decimal point type.
| Note | Both of these techniques are not specific to InfoPath. You can find more information on using them from the JScript reference in Appendix B or by searching in the online help from the Microsoft Scripting Editor. |
Working with Date Fields
When working with a form, chances are that you will want to date the form with the current date and time. Rather than have the user type this information in each time, it is much easier to let the scripting do the work. To work through the scripting examples for this section, you need to create a new blank form and drag a date picker control onto your form.
Because the goal is to keep things simple, the default name of the field, field1, will be used. If you like, you can put some text beside the field to label it (for example, Invoice Date), as this is the field where you are going to place the current date. Next, you need to open the OnLoad event so that your script will run whenever the form is first loaded. To view the OnLoad event, select Tools | Script | On Load Event to open MSE.
JScript provides a handy function that you can use to get the current date from the operating system, so in this example you are going to use this trick to get started. Since you have added a date picker control to your form, field1 is expecting a date field, so you need to do a little conversion on the current date to make it fit the format required by your control.
With date fields in JScript, a number of different methods are available that you can use to break the date apart into components. For example, the getMonth method can be used to get the current month from a date field, while getDays is used to return a number representing the current day of the month. You can find a complete listing of these date functions in Appendix B, but for now, you are going to use the getMonth and getDays methods along with getYears to strip apart the current date and put it back into a format that the control will like.
Putting all of these concepts together, the script for your form’s OnLoad event would look something like this:
      var CurrentDate = new Date();
      var m = CurrentDate.getMonth() + 1;
      var d = CurrentDate.getDate();
      var y = CurrentDate.getFullYear();
      if (m < 10)
            m = "0" + m;
      if (d < 10)
            d = "0" + d;
var FormDate = XDocument.DOM.selectSingleNode("//my:field1");
FormDate.text = (y + "-" + m + "-" + d);
The preceding script uses the CurrentDate variable to retrieve the current date and then uses the variables m, d, and y to represent the month, day, and year.
| Tip | Notice that the preceding script adds 1 to the month—the getMonth function is zero-based, so January is returned as 0, February as 1, and so on. |
The next four lines in the preceding script check whether the month and day need a leading zero and, if so, add that to the front. The final two lines dimension a variable FormDate to hold the contents of field1 and then perform some simple concatenation.
Why so much trouble for a simple date field? Date fields within InfoPath have to be entered into a form in a specific format. You need to enter the year, month, and date with dashes or slashes in between, and you have some leeway regarding the order in which you enter these values, but the safest bet is to put it in the format YYYY-MM-DD.
If you are working with a text field, as opposed to a date field, you have a few more options available to you. When working with date fields, you can either use toDateString or toTimeString to get the string that represents the date you are working with. Returning to the earlier example, if field1 were a text field, your script would be much simpler and would look something like this:
var CurrentDate = new Date();
var FormDate = XDocument.DOM.selectSingleNode("//my:field1");
FormDate.text = CurrentDate.toDateString();
Regardless of which method you choose, you will probably want to put the script into a function that you can call throughout your form. This will come in handy if you ever need to use the date transformation techniques again.
| Tip | For a look at how these functions might be created, modify the Issue Tracking sample form that is installed with InfoPath. There are two functions—getDateString and getTimeString—that demonstrate how to use functions to convert date values. |
Working with Strings
Strings within your InfoPath scripts can be manipulated by using a number of simple operators—to start, you can concatenate two strings by using a simple + operator. In the following example, a form has three fields—a first name field, a last name field, and an e-mail address field. The script reads the first and last name from the form and then concatenates the two fields to make an e-mail address, following a pattern established by the company.
var first = XDocument.DOM.selectSingleNode("//my:first");
var last = XDocument.DOM.selectSingleNode("//my:last");
var email = XDocument.DOM.selectSingleNode("//my:email");
email.text = first.text + "." + last.text + "@widgets.com";
To take this example even further—the e-mail field in this example has been displayed using a text box, but you can right-click that text box and use the Change To menu to change it to a hyperlink. With a little more concatenation, you could add a mailto: link at the start of the e-mail address so that the form displays a live link that will launch the user’s default e-mail client. The script for this technique looks like this:
var first = XDocument.DOM.selectSingleNode("//my:first");
var last = XDocument.DOM.selectSingleNode("//my:last");
var email = XDocument.DOM.selectSingleNode("//my:email");
email.text = "mailto:" + first.text + "." + last.text + "@widgets.com";
In addition to concatenating strings, you can also pull them apart. JScript treats strings like arrays of characters, so you can reference any character in a string by using the charAt property and referencing the character with a subscript, as shown here:
"David".charAt(3);  //returns v
"InfoPath.charAt(5);  //returns p
You also have standard string functions like toUpperCase, toLowerCase, and length, as well as other supported JScript string functions.
| Note | For a reference of even more string functions, check out Appendix B. |
Working with Alerts
Alerts are the most common method used to show critical information to a form user. If you read through Chapter 9, you have already had a brief look at working with alerts. An alert is a pop-up dialog box that can be shown with text that you enter to communicate with a form user, as shown here.

You can easily create alerts by using the UI (user interface) object that the InfoPath SDK provides. There is only one argument required for the Alert method and that is the text that you want to appear. So, to show an alert to a user concerning a customer credit limit, your script would look something like this:
XDocument.UI.Alert("This order exceeds the customer's credit limit"); If you want to create a multiline alert, you can add a carriage return to the text by adding /n escape code wherever you want to go to the next line. For example, the following script,
XDocument.UI.Alert("Please check the value/nentered and try again. /nValues entered must be above 10,000"); would produce an alert similar to the one shown here.

| Note | For a list of escape codes, see the JScript reference in Appendix B. |
You can use alerts throughout your scripting to display information to the user. The downside of the ease of use is that you can’t control the size, shape, or position of the alert dialog box. If you want more finite control or want to use an alternate dialog box to display information for the user’s benefit, you need to consider creating your own HTML pages to display using the ShowModal method of the UI object.
| Tip | For more information on using the ShowModal method, check out the InfoPath Developer’s Reference and search for UI.ShowModal. |
Controlling Script Flow
If you were to create a script that could run from the first line to the last straight through, you would be doing well—for the rest of us, a little flow control is required to make the most of scripting within InfoPath. Fortunately, there are a number of different control structures that you can use within InfoPath to control the flow of your script; the most popular seems to be the if…then statement.
To create an if…then statement in your script, you need to enclose the condition to be evaluated in parentheses and place the script that should be run if the condition is true in curly brackets, as shown in the following simple example:
if (InvoiceAmount > 10000)
 {
XDocument.UI.Alert("Please use a different form");
}
else
     XDocument.UI.Alert("This is the correct form");
You can use if…then statements on their own or add an else statement to the end. Since this is a function provided by the underlying JScript engine, you may not find documentation on it in the InfoPath Developer’s Reference. However, the JScript reference within MSE has numerous examples.
| Tip | In addition to if…then statements, InfoPath also supports do…while and for loops and others for controlling the flow of your script. |
Catching Scripting Errors
Unless you are perfect, you are going to encounter some errors in your script. If you choose to not use any type of error trapping, these errors can cause your form to stop working or cause nasty error messages to appear.
A much easier way to deal with potential errors is to use a try…catch statement to determine how errors are handled. A try…catch statement, simply put, runs a section of script and, if it results in an error, processes a second section of script to “catch” and handle the error.
In the following example, a try…catch statement has been used in conjunction with a simple calculation. This script merely retrieves a value from a total field and multiplies it by 1.1 (which works for a tax rate of 10 percent):
try
            {
            var myTotal = XDocument.DOM.selectSingleNode("//my:total");
            myTotal = myTotal * 1.1

            }
     catch (e)
            {
            XDocument.UI.Alert("Error:" + e.description);
            }
If you were to place this script in a form and run it, you would see immediately how a try…catch statement works. When referencing the myTotal field, the preceding script does not use the Text property, so the resulting script would throw an error. With catch statements, the error returned can be any variable you like (in this instance, it is named e) and you can obtain the properties of this error to determine the error number or description.
| Tip | A complete list of JScript error codes and descriptions is included in Appendix B. |
Once you have figured out what the problem is, you can correct it. The correct script for performing this calculation is listed here:
try
            {
            var myTotal = XDocument.DOM.selectSingleNode("//my:total");
            myTotal.text = myTotal.text * 1.1
            }
      catch (e)
            {
            XDocument.UI.Alert("Error:" + e.description);
            }
EAN: 2147483647
Pages: 142