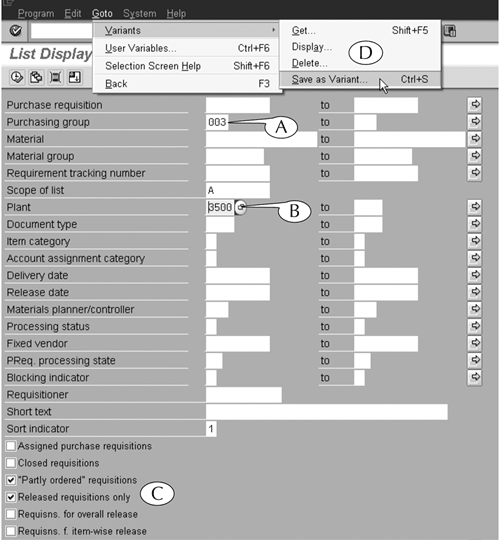
| We now demonstrate the procedure for creating and saving screen variants. This procedure can be used on all initial screens, but for an example, we create a variant for the initial screen of the ME5A list-display transaction (Figure 13.7). This transaction creates a list of related requisitions for the purchase of materials. Figure 13.7. The initial screen for the ME5A transaction, set up with our usual choices of selection criteria and showing the menu path for creating a screen variant. 
This initial screen contains many data entry fields and selection boxes for defining the selection criteria for the output report. We set up our initial screen, for instance, as follows. We enter the code for the purchasing agent who handles requisitions for our department in the Purchasing group field (A) so that the report only lists the requisitions for our department. We enter the code for our work location in the Plant field (B) so that the report is limited to materials that are delivered there, rather than to another office of our department in another state. We select the Partly ordered requisitions and Released requisitions only options (C) so that the report is limited to materials that have not been delivered.
We always make these same three entries and selections whenever we run this transaction, because they always yield a list of all our requisitions. Sometimes, however, we cut down the length of this list by adding more selection criteria in other fields. For example, when we want to limit the list to the requisitions for a specific material, we enter its code in the Material field; when we want to limit the list to materials from a specific source, we enter a vendor code in the Fixed vendor field; and so on. By the same token, we never enter selection criteria in many other fields, including the Document type, Release date, Order, and Materials planner/controller fields, because we do not track these data in our work (though users in other departments do). In addition, we never select the Assigned purchase requisitions option (we don't assign requisitions in our company) or Closed requisitions option (we are not interested in completed requisitions). Given the way that we use this transaction, we created a customized variant of its initial screen by following the steps in this next procedure. Procedure: Creating a Variant of an Initial Screen Step 1. | Navigate to the default initial screen of the transaction.
| Step 2. | Enter those data and select those options that you want to have prepopulated on the initial screen variant when you navigate to it. We entered codes and text in the Purchasing group and Plant fields and selected the two of the requisition type options (Figure 13.7A-C).
| Step 3. | Follow the menu path Goto > Variants > Save as Variant (Figure 13.7D), or
Hit the keystroke Ctrl + S, or
Click the Save button in the standard toolbar.
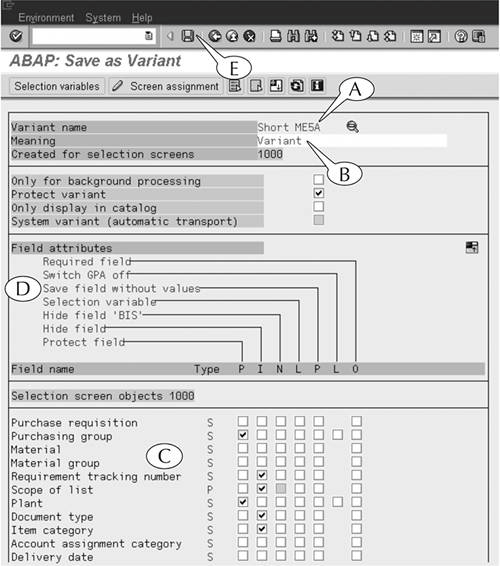
| Step 4. | The ABAP: Save as Variant screen appears (Figure 13.8). Enter a name for your variant in the Variant name field (A). You have two options here.
- To create a temporary variant, give it any name. When you return to the initial screen, this variant appears. However, if you navigate to another screen or log off and then return to the initial screen later, the default version will appear. If you want to use your screen variant at that point, you will have to call it up by a separate procedure (described later).
- To create a permanent variant, precede its name with a slash mark (for example, /Short ME5A). This variant will always appear hereafter whenever you call up this initial screen.
For this example, we gave the variant the temporary name of Short ME5A.
Figure 13.8. The ABAP: Save as Variant screen allows you to protect and hide selection criteria on an initial screen and create a screen variant. The top part only of this long screen is shown here. 
| Step 5. | Enter a short description of the variant in the Meaning field (B).
| Step 6. | Scroll down to the Selection screen objects field area. It contains a list of all the data entry fields and selection options on the initial screen (C). Each line is accompanied by several selection boxes. The key to these boxes appears in the Field attributes field area directly above them (D). The two critical selection boxes are Protect field and Hide field.
- Click the Protect field selection box for any data entry fields or selection options that you want to appear in an unalterable, prepopulated mode (with the entries and selections you made in Step 2) in the screen variant.
- Click the Hide field selection box for any data entry fields or selection options that you want to remove from the initial screen.
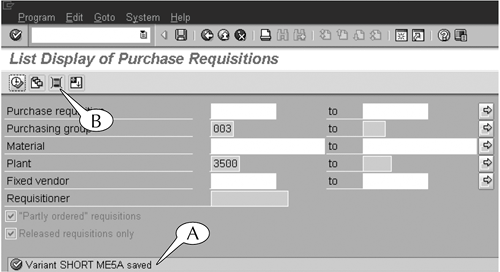
| Step 7. | Click the Save button (E) to save your input. The initial screen returns with a message in its status bar that the variant is saved Figure 13.9A).
|
Figure 13.9. A variant for the initial screen of the ME5A transaction, trimmed in length and with our usual selection criteria protected. 
Notice the convenient features of our screen variant. - First, it is considerably shorter than the default screen because we hid the data entry fields and selection options that we never use. Every data entry field and selection option of importance appears "above the fold"that is, we do not have to scroll down the length of the screen to find them.
- Second, the data entries and selections that we always make are prepopulated for us and grayed out so they cannot be changed (unless we decide to change the variant itself). We do not have to enter any codesor even remember them, for that matter.
- Third, the screen still contains the other data entry fields that we use on occasion, so it is still very flexible in terms of its potential use.
| A word of caution. All in all, screen variants are tremendous time savers, particularly for transactions that you regularly set up and execute in the same manner. However, you should be careful about creating screen variants, and particularly creating permanent ones, because you can confuse yourself. When we chose the data entry fields and selection options to protect and hide in our screen variant, we did so with the confidence that comes from ample experience with that particular transaction. We knew with absolute certainty that there were some fields and options that could be protected and prepopulated because they would not change as long as we still worked in the same office and did the same job. We also knew with equal certainty that there were fields and options that could be hidden because we would never use them, and other fields that had to remain available in case we wanted to use them. The potential for confusion arises six months or a year after you create a screen variant, when you suddenly find yourself working in another department or with different job responsibilities. At that point, you might want to use this same transaction to generate a list of requisitions with different selection criteria, but you cannot find the data entry fields or selection options for these criteria on the initial screenand you have forgotten that you are looking at a trimmed-down version of that initial screen, not the fuller default version. So be careful with screen variants. Don't create a variant for the initial screen of a transaction until you are very familiar with that transaction and the many ways that you might use it at your job. And when you decide to create a variant, exercise some caution in the choices you make on the ABAP: Save as Variant screen, and leave some flexibility on the screen so that you can still use it for other purposes. |
|


