ASP.NET Designer and Wizards
| Before using ASP.NET with C#Builder, it will be helpful to become familiar with the designer and available tools. To facilitate this, the example in this section will create a very simple Web page, demonstrating the basic tasks necessary for building ASP.NET Web pages with C#Builder. As with most of the C#Builder application tasks, the easiest way to start an application is by using a wizard. If you're starting a brand-new project, select File, New, ASP.NET Web Application. If you've already begun a project group, right-click on that project group in the Project Manager, select Add New Project, and double-click the ASP.NET Web Application icon in the C# ASP Projects folder. Either way will display the New ASP.NET Application dialog (see Figure 11.1). Figure 11.1. The New ASP.NET Application dialog.
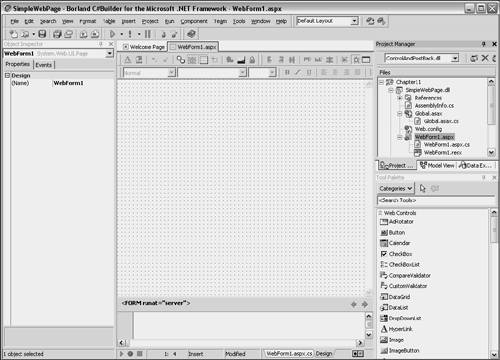
If you are following along with this description, click the View Server Options button to make the dialog expand to show more information. After it is expanded, the button text turns to "Hide Server Options" (see Figure 11.1). This refers to additional configuration options that are Web-server specific. Out of the box, C#Builder supports both Internet Information Server (IIS) and the Cassini Web server. Cassini is an open source Web server written by Microsoft. It is free to use and modify and can be found at http://www.asp.net. For IIS, the server options represent the same options that are available when creating a virtual directory at the IIS console. I normally accept the default options of Read and Run scripts (such as ASP). The other options, Execute (such as ISAPI applications or CGI), Write, and Browse, each increase security risk at the Web server, so I tend not to enable them unless there is very good reason. In-depth discussion of Web servers is beyond the scope of this book, but if you become familiar with your Web server, it will really help to avoid complications and reduce security risk. In the Name field of the New ASP.NET Application dialog is a default name of WebApplication1. For this example, I changed it to SimpleWebPage. While you type this, watch how the Location and IIS Alias fields change also. This keeps the names in sync. However, if either the Location or IIS Alias fields are changed, the other two fields don't change. In most cases it makes sense to keep these names in sync because it is simpler to know that your application, physical directory, and virtual directory have the same names. Notice the Location field and how it defaults to the physical directory where all other Web applications are built. If you prefer the Web application to be located in the same directory structure as the rest of the projects in the Project Group (that is, Class Library projects), click the button with the ellipsis to change the directory. Remember the directory name if you want it to be consistent with the application and virtual directory names. Another thing to remember when changing the Location is to give the ASPNET user (the NETWORK_SERVICE user in Windows Server 2003) permissions for the directory. The ASPNET user is the account that ASP.NET runs under. Forgetting this step will result in a security error when trying to access the page through the browser. After you have filled out the New ASP.NET Application dialog, click the OK button and the wizard will create the new files for the ASP.NET application (see Figure 11.2). The application area created includes new files in the Project Manager, control categories in the Tool Palette, an Object Inspector initialized with properties of the current object, and a designer surface for building the ASP.NET Web page. Figure 11.2. The ASP.NET application development area.
ASP.NET Files in the Project ManagerWhen the ASP.NET application is first created, the wizard adds files to the new project. Table 11.1 describes these files and their purposes.
Two of the file types, Global.asax and WebForm1.aspx, require more explanation. They have an extra branch in their Project Manager trees leading to a similarly named file with a .cs extension. ASP.NET can architecturally separate presentation from logic for supporting n-tier application development. By default that is what it is doing, and the files with the .cs extension are referred to as code-behind files. The presentation layer resides in the top level (WebForm1.aspx) and logic resides in the code-behind files (WebForm1.aspx.cs). The section titled "Creating an ASP.NET Web Application" later in this chapter goes into greater detail on how and why this works. |
- Chapter V Consumer Complaint Behavior in the Online Environment
- Chapter VI Web Site Quality and Usability in E-Commerce
- Chapter VII Objective and Perceived Complexity and Their Impacts on Internet Communication
- Chapter XI User Satisfaction with Web Portals: An Empirical Study
- Chapter XV Customer Trust in Online Commerce