Project34.Use vim Windows
Project 34. Use vim Windows"How do I edit multiple files in one vim session?" This project introduces windows and buffers, and shows you how to edit many files is a single vim session. Project 32 introduces vim, and Projects 33 and 35 cover advanced vim features and configuration. Edit Multiple FilesYou may list any number of files on the vim command line. vim reads all the files, loading each in its own buffer and presenting the first-named file in the main window. You might edit all HTML files in the current directory, for example, by typing $ vim *.htmlWhen you finish editing the first file, save the edits and move to the next file by typing :wnOmit the w if you've already written the changes back to the first file. To discard changes to the current file and move to the next, type :n!To move back to a previous file, type :wprevOther methods of moving between buffers (open files) include
To quit vim before all buffers have been visited, type :qaTo also discard all changes not currently saved, type :qa!Read FilesFrom within vim, you may load additional files for editing by typing
Tip
Browse DirectoriesYou need not type the full pathname of a file you wish to load. Instead, browse the current directory by typing :edit.This tells vim to open a new window, from which you choose a file to edit. Use the cursor keys to select a file, and press Return. If you choose a directory, vim will list all the files in that directory. To move to the parent directory choose the .. (dot-dot) entry. Open Many WindowsTo view several files at once, you could start several Terminal sessions and invoke vim in each of them. It's not necessary to do this, however. Sometimes, it's easier to use vim's multi-window feature, whereby the main window is split into two or more subwindows. You saw this in action before, when you typed :help. Recall that vim split the current window and loaded the help pages into the top split. In vim terminology, a window is a portion of the Terminal screen where a file is displayed. A buffer, you'll recall, is a copy of a file being edited. There's no hard limit to the number of windows and buffers you can use at any time. Split the ScreenTo open a new window, thus splitting the Terminal screen into two parts, type :splitThe cursor is placed in the new window (the top split), as shown in Figure 4.4. You'll notice that each window now sports a status bar showing a filename. Both windows are editing the same file, enabling you to view one part of the file while editing another. If you wish to edit a different file in the new window, either use :e as described above or give a filename argument to split. Figure 4.4. There's no limit to the number of windows vim can keep open at any time, and its split-window option is great for comparing files.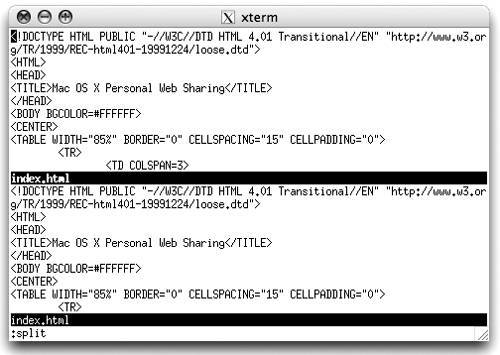 :split filename To flip between two (or more) windows, type one of the following:
vim does not limit you to two windows. You may split any number of times to create more windows. Close a window by typing :closeThe buffer that was displayed in the window is not lost; you can view it again by loading it into this or another window by using the techniques discussed in "Edit Multiple Files" earlier in this project. To open a new, blank window, type :newTip
Change Window SizesWhen you open a new window, vim adjusts the new and existing windows to be of equal size. To override this feature, you may specify a size in lines for the new window. To create a 20-line window, for example, type :20 split new-filenameIt's also possible to adjust the size of existing windows up or down by typing, for example, 7 Control-w + to increase the window size by seven lines and 3 Control-w (that's a minus sign) to decrease the window size by three lines. Tip
Compare FilesIf you wish to compare two files side by side, create a vertical split by typing :vsplit file2Alternatively, get vim to do the all the hard work of comparing files and marking the differences. Type either of the following:
A similar effect can be achieved by invoking vim as vimdiff and giving it the names of two files to compare. $ vimdiff file1 file2MoreThere's a lot more to windows in vim. Type :help windowsfor a detailed description of all the available features and commands. |
EAN: 2147483647
Pages: 153