Chapter 1: Stepping intoPhotoshop
This chapter introduces you to some of Photoshop’s basic capabilities and its user interface. You will learn to open and close Photoshop, to understand its screens and toolbars, and how to set up the program according to your personal needs. You will learn how to use Photoshop’s Help and find additional help and tutorials online. You will get a glimpse into the tools that Photoshop offers and an introduction to working with color and calibration.
Get Acquainted with Photoshop
Getting acquainted with Photoshop involves starting and closing it; setting preferences, such as how to display the pointer; working with the Photoshop workspace and its menus, palettes, and other components; opening and creating images; and using Photoshop’s interface, including navigating, zooming, and working with palettes.
I assume that you already know how to turn on the computer and load Windows and that Photoshop has been installed on your computer. Once Photoshop is installed, you start it as you would any other program. The quickest way to start it is to simply double-click the Photoshop icon on your desktop. However, the most common way is to use the Start menu.
Start and Close Photoshop
You can start Photoshop with a menu, shortcut, or keyboard combination.
Use the Start Menu to Load Photoshop
To load Photoshop using the Start menu on the Windows task pane:
-
Start your computer and log on to Windows, if necessary.
-
Click Start. The Start menu opens.
-
Select All Programs and click Adobe Photoshop CS.
-
The Photoshop window will open, as shown in Figure 1-1.
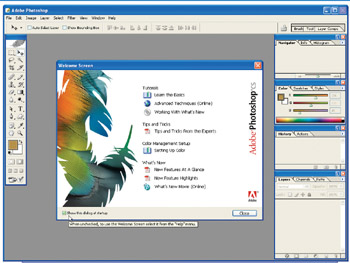
Figure 1-1: By default, the Welcome Screen appears every time you start up Photoshop.
When Photoshop first starts, you are greeted by the Welcome Screen, which provides you with quick access to Tips, Tutorials, and tours of Photoshop’s new features. If you don’t want to see the Welcome screen every time Photoshop starts, deselect the check box labeled Show This Dialog At Startup.
Start Photoshop from the Keyboard
-
Press ctrl+esc, or click the Windows Flag key on your keyboard to open the Start menu.
-
Press p to select the All Programs menu, and press right arrow to open it.
-
Press down arrow until Adobe Photoshop CS is selected. Then press enter to start it.
Tip You can still resize a palette in the Palette Well by dragging its lower-right corner.
Create and Use a Shortcut to Start Photoshop
Another way to start Photoshop is to create and use a shortcut icon on your desktop.
-
Press ctrl+esc, or click the Windows Flag key on your keyboard to open the Start menu.
-
Press p to select the All Programs menu, and press right arrow to open it.
-
Press down arrow until Adobe Photoshop CS is selected.
-
Right-click and select Send To, and click Desktop (Create Shortcut).
-
Double-click the shortcut icon on your desktop to start Photoshop.
Note If you ever encounter a problem in the layout of your workspace—for example, a palette gets pushed off screen where you can’t reach it—click Window | Workspace | Reset Palette Locations to restore the workspace to its original layout.
Create and Use a Keyboard Shortcut for Photoshop
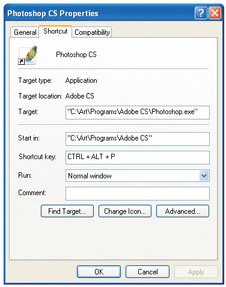
Another way to start Photoshop is first to create a keyboard shortcut.
-
Press ctrl+esc, or click the Windows Flag key on your keyboard to open the Start menu.
-
Press p to select the All Programs menu, and press right arrow to open it.
-
Press down arrow until Adobe Photoshop CS is selected. Right-click; then select Properties.
-
Click within the Shortcut Key box, and type or press any letter, number, or function key. Windows then adds alt+ctrl to these letters and numbers.
-
Click OK to create the keyboard shortcut.
-
From anywhere within Windows, press the key combination you defined (e.g., alt+ctrl+p) to start Photoshop.
Close Photoshop
-
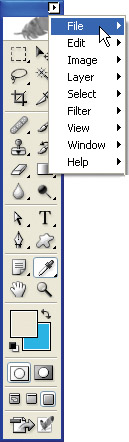
Click File on the menu bar.
-
Click Exit. You will be prompted to save any unsaved work.
Set Photoshop Preferences
You can make changes in the way Photoshop works by setting its Preferences. You can change the look of the tool pointers, the color of guidelines, which units of measure you prefer to work in (e.g., inches, centimeters, or pixels) and much more. When you are first learning Photoshop, it is best to leave the default preferences intact. When you understand the implications, however, this is where you make changes.
-
On the menu bar, click Edit, select Preferences and then General Preferences. The Photoshop Preferences dialog box appears, as shown in Figure 1-2.
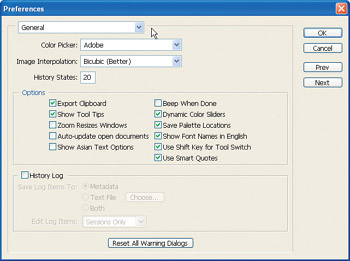
Figure 1-2: The General page is the first of many pages of Photoshop preferences. -
Click Next and Previous to cycle through Photoshop’s nine pages of preferences. You will see these choices:
-
General
-
File Handling
-
Display And Cursors
-
Transparency And Gamut
-
Units And Rulers
-
Guides, Grid And Slices
-
Plug-ins And Scratch disks
-
Memory And Image Cache
-
File Browser
-
All of the Preferences can be left at their defaults for now.
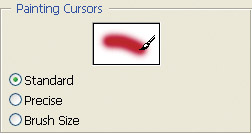
Change Cursor Preferences
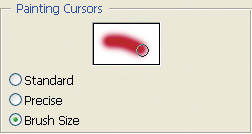
One preference that I do prefer to change is the display of the tool cursors. By default, Photoshop shows each tool cursor as an icon, indicating what tool is active. I prefer to use a cursor that shows the size and shape of the active tool.
-
From the menu, click Edit and select Preferences and then Display And Cursors.
-
Click Next until the Display And Cursors page appears.
-
Under Painting Cursors, click the Brush Size button. This shows an outline of the size and shape of the current brush.
-
Under Other Cursors, click the Precise button.
-
Click OK to close the dialog box.
Use the Photoshop Workspace
The Photoshop workspace appears in Figure 1-3. Yours will look slightly different, depending on what tools, documents, and windows you have open. Any of the items can be closed or moved about on the screen. In Windows, the empty workspace is filled with gray.
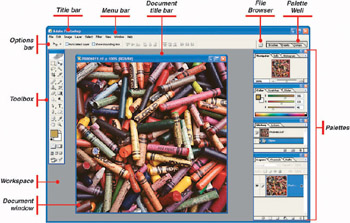
Figure 1-3: The Photoshop workspace looks something like this.
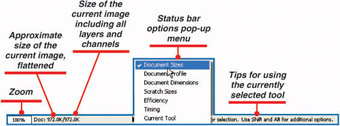
| Tip | The Status bar, shown in Figure 1-4, gives useful information about your currently selected document and tool. If the Status Bar does not appear at the very bottom of your Photoshop workspace, turn it on by choosing Window, and then selecting Status Bar. |
Open and Create Images in Photoshop
Opening a file in Photoshop works the same way as opening a file in almost any Windows program.
Open an Image from the Menu Bar
To open a file in Photoshop from the Menu bar:
-
With Photoshop running and visible, click File and then Open. The Open dialog box is displayed, as shown in Figure 1-5.
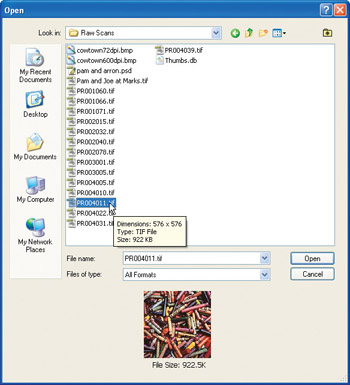
Figure 1-5: The Open dialog box shows a thumbnail of selected files. -
Use standard Windows navigation techniques to find the folder containing your image.
-
Select the file name. A thumbnail of the image appears at the bottom of the dialog box.
-
Click Open or double-click the file’s name to open the file in Photoshop.
Tip If you hover the pointer over a file name in the Open dialog box, a Tool Tip will appear, giving that file’s dimension, size, and type.
Note Press ctrlwhile you click to select multiple files; or press shift while you click to select a range of files; then click Open to open multiple files in Photoshop.
Open an Image with the File Browser
Photoshop’s File Browser is a powerful way to browse, manage, and open your files. To open a file with the File Browser:
-
With Photoshop running and visible, click the File Browser button at the right of the Options bar next to the palette well. The File Browser window opens, as shown in Figure 1-6.
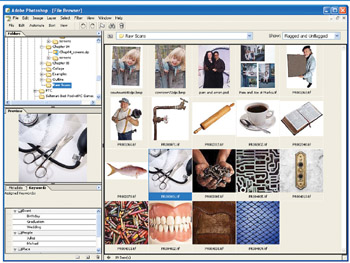
Figure 1-6: The Photoshop File Browser is a powerful tool in finding and opening files. -
Use the Folders pane of the window to navigate to a folder containing images. Thumbnails of all images in the folder will appear in the thumbnails pane.
-
Click any thumbnail to select that file. A preview appears in the preview pane.
-
Double-click a thumbnail to open the file in Photoshop.
You’ll see more about using the File Browser in Chapter 2.
Create a New Image from a Preset
Photoshop allows you to easily create an image from a list of preset sizes and resolutions. To create a new, blank image in Photoshop:
-
From the Menu bar, click File and then New. The New dialog is displayed.
-
Type in a name for the new blank image.
-
Click the Preset drop-down list box, and choose a preset image size, such as 640x480, as shown in Figure 1-7.
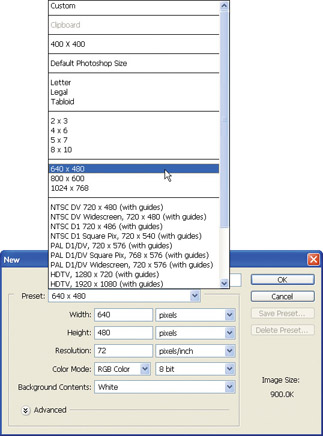
Figure 1-7: You can choose a preset image size. -
Click OK to create a new image.
Specify the Width and Height by typing the values in pixels, inches, centimeter, millimeters, point, picas, or columns.
Likewise, you can type in a resolution. The default for web images is 72 pixels/inch; 300 pixels/inch is the default for print images.
The background can be white, transparent, or set to the current background color.
Leave the color mode in either RGB (for color images) or Grayscale (for black and white images). We’ll examine some of the other color modes in later chapters.
Work with Photoshop’s Interface
Photoshop uses mostly standard interface conventions for opening and closing dialog boxes and windows, entering and changing values, and so forth, but it also offers some unique controls.
Zoom In and Out
Being able to work as close up, or as far away, as you desire is a big advantage. When working on images in Photoshop, you can zoom in until the image is displayed at 16 times its actual size (i.e., 1600 percent larger). At 1600 percent, each pixel in the image is 16 by 16 pixels on the screen. Similarly, you can zoom out until an entire image is only a few pixels wide.
Zoom with the Zoom Tool
-
With an image open and selected in Photoshop, click the Zoom tool in the Toolbox, or press z, to select the Zoom tool.

-
Click repeatedly within the image to zoom in.
-
Press and hold the alt key. The Zoom tool changes from a + to a –.
-
Press altand click repeatedly within the image to zoom out.
Zoom with the Keyboard
-
With an image open and selected in Photoshop, press ctrl++ repeatedly to zoom in.
-
Press ctrl+- repeatedly to zoom out.
-
Press ctrl+0 to zoom the current image to fit on the screen. Press alt+ctrl+0 to zoom the current image to 100 percent.
-
Double-click the Hand tool in the Toolbox to zoom the current image to 100 percent.
Tip You can create a new file with the keyboard shortcut ctrl+n.
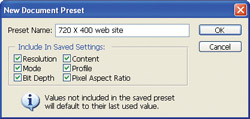
You can create a new preset image size for a frequently created image, such as a 120 pixel x 60 pixel web banner.
-
If the New file dialog box is not open, click File and then New on the Menu bar to open it.
-
Set the size, resolution, color mode, and background color; then click Save Preset.
-
Name the Preset and click OK to create it.
Zoom with the Navigator Palette
-
Open and select an image in Photoshop. If the Navigator palette is not open, click Window and then Navigator. The Navigator palette is shown in Figure 1-8.
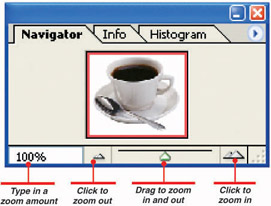
Figure 1-8: You can zoom using the Navigator palette. -
Drag the slider right to zoom in and left to zoom out.
-Or-
Click the large mountains at the right of the slider to zoom in, and click the small mountains at the left of the slider to zoom out.
-Or-
Type a zoom amount in the Navigator’s text box. To display your image at twice its actual size, type 200; for half the image’s actual size, 50.
Zoom via the Status Bar
-
To open the Status bar, if it is not shown, click Window and then Status Bar.
-
Type a zoom amount in the text box at the far left of the Status bar.
Work with Photoshop Controls
You use sliders, drop-down boxes and lists, drop-down controls, fly-out menus, and swatches as controls when working with Photoshop.
| Note | Zooming in and out does not in any way alter the image itself. |
Use Sliders
Many Photoshop controls use sliders to change values. To use a slider control in Photoshop, click the triangle and hold down the pointer to drag the triangle left (to decrease the value) or right (to increase the value).
![]()
| Tip | You can temporarily switch to the Hand Tool at any time by pressing the space bar. |
Use Drop-Down Lists
Drop-down lists, or boxes, in Photoshop and ImageReady are indicated by this little downward-pointing button.

To access a drop-down list:
-
Click the drop-down button.
-
Click your selection in the list.
-Or-
-
Click within the displayed text of the drop-down list.
-
Use the up arrow and down arrow on the keyboard to scroll through the list.
Use Drop-down Controls
To access a drop-down control:
-
Click and hold the drop-down button.
-
Drag on the control.
Use Fly-out Menus
Fly-out menus are indicated in Photoshop and ImageReady by this small arrow in a dialog box or by a small arrow at the corner of a tool in the Toolbox.
![]()
To access a fly-out menu:
-
Click the fly-out button.
-
Click your selection in the menu.
It is important to be able to move around within your image, especially when you are zoomed in for detail work.
Move Around with the Navigator Palette
-
Open an image. If the Navigator palette is not open, open it by clicking Window | Navigator.
-
Drag the slider to the right until your image is much larger than the window it’s displayed in.
-
Locate the red rectangle within the image thumbnail in the Navigator palette. This represents the visible area of your image.
-
Drag the rectangle to move around within your image, as shown in Figure 1-9.
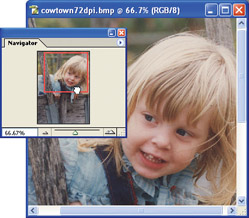
Figure 1-9: Drag the red rectangle in the Navigator to move around within your image.
Move Around with the Hand Tool
-
Open an image. Press ctrl++ several times until your image is larger than the window it’s displayed in.
-
Click the Hand Tool in the Toolbox, or press h to select the Hand Tool.
-
Drag your image to move it around its window.
Use Context Menus
You access context menus, which display additional options, by right-clicking within the canvas, that is, right-clicking the image. To close the pop-up dialog box, either begin using the tool or click anywhere outside of the current canvas.
| Tip | Most controls in Photoshop and ImageReady contain a text box which displays the current value. You can click within this text box and type values manually. |
Use Swatches
Photoshop has several palettes and dialog boxes for picking colors. These include the Swatches palette and the Color palette. Simply click a color to select it.
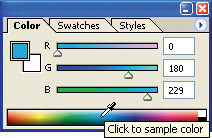
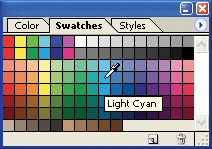
| Tip | If you hover your pointer over a color swatch in the Swatches palette, the color’s name will pop up on a Tool Tip. |
Use Photoshop’s Online Help
Photoshop has a comprehensive online help system available from the menu. To access help:
-
Press f1
-Or-
-
On the Menu bar, click Help and then Photoshop Help.
Photoshop’s help opens in your default web browser, as shown in Figure 1-10. Navigate through the help from the left pane by searching for keywords or by browsing the alphabetical index, site map, or table of contents.
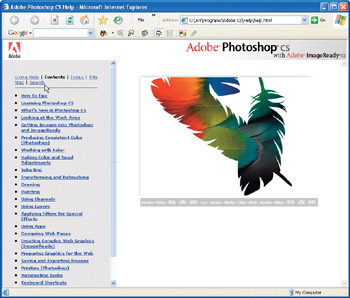
Figure 1-10: Photoshop’s online help displays in your default web browser.
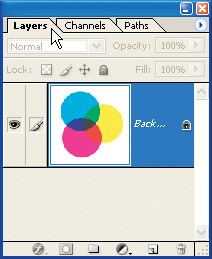
Work with Palettes
Photoshop has a number of small windows called palettes, which allow you to choose colors, set paragraph formatting options, sample the RGB values of pixels in an image, manage paths and layers, and so forth. To open a palette, click Window and select the name of the palette.
| Tip | Click Help to find many great tutorials, such as “How to Create Web Images,” or “How to Customize and Automate.” |
Palettes are grouped together with other related palettes. Each palette has a tab with its name extending from the top. To switch between palettes in a group, click the name tab as shown here:
| Tip | Press the tab key to hide all palettes and give you an uncluttered workspace. Hit tab again to bring them back, in the same positions as before. Press alt+tabto hide all palettes except the Toolbox. |
| Tip | To minimize or restore palettes, click Minimize or Maximize at the top of the palette, or double-click the palette’s bar, at the top. |
Prepare and Save Your Workspace
Photoshop allows you to customize your workspace–decide which palettes are open, what their positions are on the screen, and so forth–and then to save that workspace. You can create one workspace suitable for browsing through large folders or images and another suitable for retouching scanned photos.
-
Close any palettes you don’t want open.
-
Open any additional palettes and windows you do want, and position them where you want them.
-
Click Window | Workspace | Save Workspace. The Save Workspace dialog box appears.
-
Type in a unique name, such as “Retouching,” for your workspace.
-
Click OK.
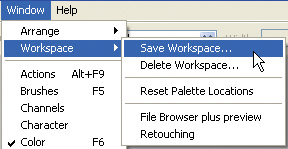
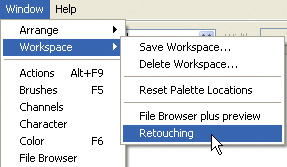
To retrieve a custom workspace, click Window and then Workspace; then select the name of the workspace from the menu.
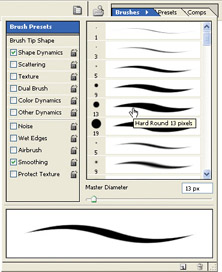
You can dock palettes with the Palette Well at the right of Photoshop’s options bar. By default, you’ll find the Brushes, Tool Presets, and Layer Comp palettes docked in the palette well, but you can replace any or all of these with the palettes you use most frequently.
Use a Palette
To use a palette in the palette well, click the tab and use the palette as you normally would.
Close a Palette
To close a palette, click outside the palette area.
Remove a Palette from the Palette Well
To remove a palette from the palette well, click the palette’s tab, and drag the palette out of the well and into the workspace.
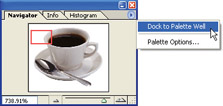
Place a New Palette in the Palette Well
Open the palette you want to place in the palette well. Then:
-
Click the fly-out button near the top right of the palette.
-
Choose Dock To Palette Well from the fly-out menu.
-Or-
-
Click and hold the palette’s tab.
-
Drag the palette tab into the palette well.
-
Release the pointer.

Assign Keyboard Shortcuts
Photoshop allows you to assign keyboard shortcuts for selecting tools, opening palettes, and selecting menu commands. Some keyboard shortcuts are assigned by default: b selects the Brush or Pencil Tool, for example; f5 opens and closes the Brushes palette. However, you can change these defaults and create new shortcuts to suit the way you work.
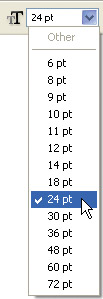
You can operate any text box which displays a numerical value, such as font size, like a slider.
-
Place the cursor over the text box.
-
Press and hold the ctrl key. The cursor changes to a hand with arrows.
-
Move the mouse left to decrease the displayed number; move the mouse right to increase it.
Assign a Keyboard Shortcut to a Menu Command
Use these steps to assign the keyboard shortcut alt+f10 to open and close the Navigator palette. The process is basically the same to create any shortcut.
-
Click Edit, choose Keyboard Shortcuts. The Keyboard Shortcuts dialog box appears, as shown in Figure 1-11.
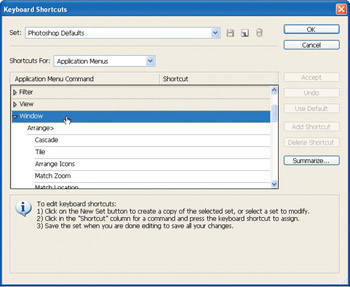
Figure 1-11: Use the Keyboard Shortcuts dialog box to assign new keyboard shortcuts. -
Click the Shortcuts For drop-down button, and click Application Menus from the list.
-
Under Application Menu Command, double-click Window to expand the list of Window menu items.
-
Scroll down and click Navigator to select it. A text box appears to the right of the command name.

-
Press the key combination you want to assign to the Navigator palette, such as alt+f10. Shortcuts must include either a ctrl key, a Function key, or both. Click OK to accept the change.
Pressing your select key combinations will now open and close the Navigator palette.
Photoshop offers three different screen modes.
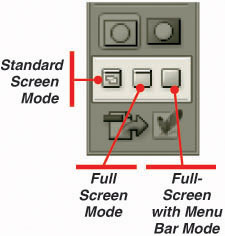
Use the Standard Screen Mode
In Standard screen mode, your image is placed within a window. You can view multiple images at once in Standard screen mode, as shown in Figure 1-12. To select the Standard screen mode:
-
Click the Standard Screen Mode button in the Toolbox.
-Or-
-
Press f repeatedly to cycle through screen modes.
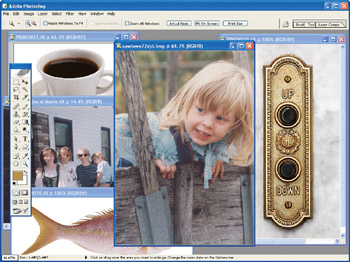
Figure 1-12: Standard screen mode shows all open documents.Select Full-screen Mode
In Full-screen mode, only your currently selected document is visible. All frames, scroll bars, title bars, menus, and so forth are hidden, as shown in Figure 1-13. To select Full-screen mode:
-
Click the Full Screen Mode button in the Toolbox.
-Or-
-
Press f repeatedly to cycle through screen modes.
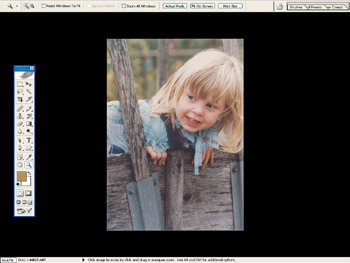
Figure 1-13: Full-screen mode hides all documents but the currently selected one.In Full-screen mode, the main menu is moved to the top of the Toolbox:
Full-screen Mode with Menu Bar
Full-screen mode with Menu bar is the same as Full-screen mode, but it retains the menu at the top of the workspace. To select Full-screen mode with Menu bar:
-
Click the Full Screen Mode With Menu Bar button in the Toolbox.
-Or-
-
Press frepeatedly to cycle through screen modes.
EAN: 2147483647
Pages: 59