Work with Paint
If you have a digital stylus or are adept at drawing with a mouse, you can use the Photoshop brushes to paint inside a document and add artistic splashes of color or perhaps to create a stylized work of art by painting on a separate layer with an underlying image as a template. You can also add color to a document in the form of a gradient (a blend of two or more colors) or a pattern.
| Note | The options vary for each shape. For the Rounded Rectangle Tool, you specify the corner radius; for the Polygon Tool you specify the number of sides; for the Line Tool, you specify the weight (thickness) of the line; and for the Custom Tool, you select a preset shape from the Shape menu. |
Use the Brush Tool
You use brushes in Photoshop for many things: creating selections, specifying the stroke for a path, and so on. You also use the Brush Tool when you want to create an artistic daub of color in a document or to paint stylized strokes of color in a document.
-
Set the Foreground color as outlined previously.
-
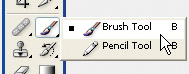
Select the Brush Tool shown next.
-
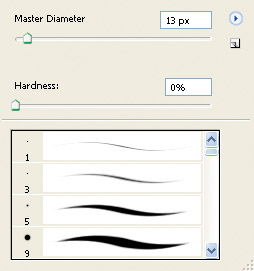
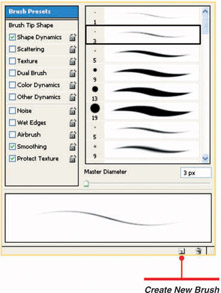
In the Options bar, click the triangle to the right of the current brush tip to reveal the Brush Options menu.
-
Drag the scrollbar to reveal thumbnail images of available brush types. The thumbnail gives you an idea of the type of stroke you can expect to paint with the brush tip.
-
Click a brush tip thumbnail to replace the current tip.
-
Drag the Master Diameter slider to specify the size of the brush tip in pixels.
-
Drag the Hardness slider to specify a value. Choose a low value for a soft-edged brush, a high value for a hard-edged brush.
-
Specify the Mode, Opacity, and Flow.
-
Click the Airbrush Capabilities button to enable airbrush capabilities. Use this option if you’re using a digital airbrush with a tablet.
-
Drag inside the document to create the desired brush strokes. Alternatively, use your digital stylus and tablet to paint the desired brush strokes.
At the bottom of the toolbox are two color swatches. These are the Foreground and Background colors. When you use the Brush Tool or other tools that require color, you can set the Foreground and Background colors to the two colors you’ll use most. Any tool requiring color will use the Foreground color. You can easily switch between the Foreground and Background colors by clicking an icon or pressing a keyboard shortcut.
-
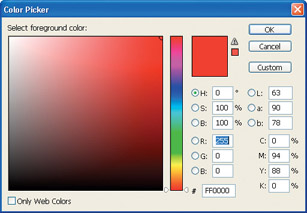
Click the Foreground swatch to reveal the Color Picker.
-
Select the desired color and click OK to close the Color Picker.
-
Click the Background color swatch to reveal the Color Picker.
-
Select the desired color and click OK to close the Color Picker.
Tip Hold down the shift key while dragging to create a rectangle or polygon of equal width and height or to create a circle.
Change Brush Groups
Photoshop has a wide variety of brushes you can use to create calligraphic brush strokes, watercolor brush strokes, and realistic facsimiles of objects like grass. The default brush group is powerful, but if you want more, you need look no further than the Brush Tip Options menu or the Preset Manager.
-
Select the Brush Tool.
-
Click the triangle to the right of the current brush tip to reveal the Brush menu.
-
Click the right-pointing triangle icon in the upper-right corner of the menu, and select a Brush group from the menu.

Tip When you click either color swatch, an Eyedropper appears. Click the Eyedropper anywhere in the workspace to replace the current color in the Color Picker with the sampled color. Click OK to exit the Color Picker and apply the sampled color to the selected color swatch.
Create a Custom Brush
If you like diversity (and who doesn’t?), you can modify a brush preset. You can also create a brush from an image or a portion of an image. After doing either, you can save the brush preset for future use.
-
Open an image that contains an area you want to use for a brush preset.
-
Using one of the Selection tools, select the area of the image you want to define as the brush tip.
-
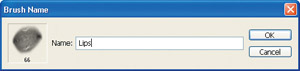
Select Edit | Define Brush Preset to display the Brush Name dialog box.
-
Type a name for the preset.
-
Click OK to add the preset to the Brushes palette using the selection area as the tip size.
Tip You can switch between Foreground and Background colors by clicking the curve-with-two-arrows icon, or by pressing x.
Tip You can restore the default Foreground and Background colors (black and white) by clicking the small icon at the left of the color swatches or by pressing d.
Create a New Dynamic Brush
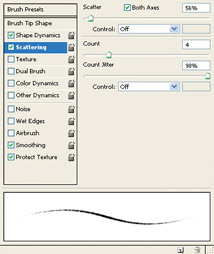
A brush with dynamic elements changes its tip as you paint with it. When you create a dynamic brush, you work with two elements: Jitter and Control. Jitter determines how much an element will vary as you paint with the brush. For example, you can vary the Hue, Saturation, and Opacity of a brush tip. Control options are available if you have a digital tablet, such as one manufactured by Wacom, attached to your system.
-
Create a new document with a white background. This blank canvas will be where you test your new brush.
-
Select the Brush Tool.
-
Select a brush preset.
-
Select Window | Brushes to open the Brushes palette.
-
Click the desired option check box to select an option, and then click the option title to reveal the parameters for that option. This image shows the parameters for the Scattering option.
-
Adjust the parameters as desired.
-
Click the button to the right of the Control field if you’re using a digital tablet, and select one of the options from the drop-down list.
-
Test your new brush by painting on the canvas.
-
Click the Create New Brush button to open the Brush Name dialog box.
-
Type a Name for the brush, and click OK.
Tip To change the brush tip size on the fly, press ] to increase the tip size, [ to decrease the tip size. Hold down the applicable key until the brush is the desired size.
Manage Brush Presets
When you add several custom brushes to a library, the sheer volume of brushes may make finding a specific brush a difficult task. You can save a brush library as a custom library and manage the new library by deleting the presets that are duplicates of another library.
| Tip | To reset the brushes to the default set, select Reset Brushes from the Brush menu drop-down list. |
Save a Brush Library
-
Select the Brush Tool.
-
Click the inverted triangle to the right of the current Brush tip to reveal the Brush menu.
-
Click the right-pointing triangle in the upper-right corner of the menu, and select Save Brushes to open the Save dialog box.
-
Type a File Name for the new brush library.
-
Click OK.
Tip From the Brush menu you can also rename brushes, change the manner in which brushes are displayed, and more.
Load a Brush Library
-
Select the Brush Tool.
-
Click the inverted triangle to the right of the current Brush tip to reveal the Brush menu.
-
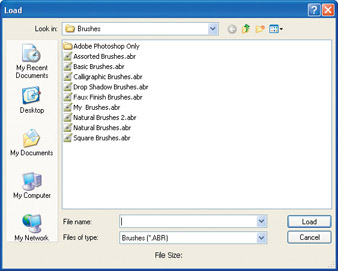
Click the right-pointing triangle in the upper-right corner of the menu, and select Load Brushes to open the Load dialog box.
-
Select the brush library you want to install, and then click Load.
Delete a Brush
-
Select the Brush Tool.
-
Select the thumbnail of the brush you want to delete.
-
Click the right-pointing triangle in the upper-right corner of the menu, and select Delete Brush. The Delete Brush dialog box appears.
-
Click OK to delete the brush.
Erase Pixels
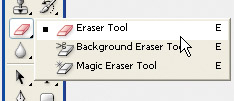
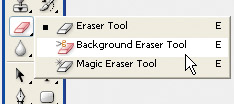
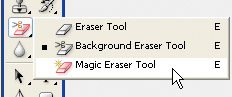
To err is human, which is why every graphics application has an erase tool. Photoshop designers have hedged all bets by giving you a choice of three erase tools: the Eraser Tool to erase unwanted pixels of color; the Background Eraser Tool to erase parts of a layer to transparency while preserving the edges of an object in the foreground; the Magic Eraser Tool to erase pixels similar in color to the background color.
-
Select the Eraser Tool.
-
In the Options bar, click the button to the right of the Mode field, and select Block, Brush, or Pencil. Block mode has no options
-
Specify brush size and tip if you’ve selected Brush or Pencil mode.
-
Specify Opacity if you’ve selected Brush or Pencil mode.
-
Specify Flow if you’ve selected Brush mode.
-
Click the Enable Airbrush Capacities button if you’re using a digital airbrush stylus in Brush mode.
-
Drag inside the document to erase pixels.
Tip To prevent erasing an area such as a silhouette of a building or a line of trees, click the Foreground color swatch, and use the Eyedropper to sample the color you want to protect. Select the Protect Foreground Color option for the Background Eraser Tool prior to dragging the tool along the border of the area you want to preserve.
Use the Background Eraser Tool
-
Select the Background Eraser Tool.
-
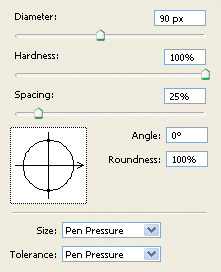
In the Options bar, click the inverted triangle to reveal the Background Eraser settings dialog box.
-
Specify settings for Diameter, Hardness, Spacing, Angle, and Roundness.
-
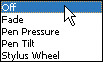
If you’re using a digital stylus, click the button to the right of the Size Tolerance fields, and select Pen Pressure or Stylus Wheel depending on the type of digital stylus you are using. Select Off if you’re not using a digital stylus.
-
Open the Limits drop-down list, and select one of the following options:
-
Discontiguous erases pixels of the sampled color wherever they occur under the brush.
-
Contiguous erases pixels of the sampled color that are connected to each other.
-
Find Edges erases pixels of the sampled color that are connected to each other while preserving the integrity of edges.
-
Type a value in the Tolerance field. Specify a low value to erase areas similar to the sampled color; a high value to erase a broader range of colors.
-
Select the Protect Foreground Color option to prevent the tool from erasing pixels of the Foreground color.
-
Open the Sampling drop-down list, and choose one of the following options:
-
Once erases only areas of the sampled color that you first click.
-
Continuous samples colors under the Eraser continuously as you drag the tool across the document.
-
Background Swatch erases only pixels of the current Background color.
-
-
Drag the tool across the area you want to erase.
-
Use the Magic Eraser Tool
-
Select the Magic Eraser Tool.
-
In the Options bar, type a value in the Tolerance field. Specify a low tolerance to erase pixels similar in color to the first pixels you click with the tool, a high tolerance to erase a wider range of colors.
-
Select the Anti-Aliased option (the default) and Photoshop smoothes the edges of areas you erase.
-
Select the Contiguous option (the default) to erase only areas of contiguous pixels containing the sampled color. Deselect the option to erase all areas of pixels of similar color as you erase.
-
Select the Use All Layers option to erase similar colors on all visible layers in the document.
-
Type a value in the Opacity field. The default value of 100 percent erases pixels completely. Specify a lower value to partially erase pixels.
-
Drag the tool over the area you want to erase.
Note If you are going to save a document as a GIF file, refrain from using the Gradient Tool as gradients in GIF images have a tendency to show bands due to the limited color palette.
Use the Gradient Tool
The Gradient Tool enables you to apply a blend of two or more colors to a background layer or to a selection.
Apply a Gradient Fill
-
Select the layer to which you want to apply the gradient fill. Alternatively, use one of the Selection tools to select the area to which you want to apply the fill.
-
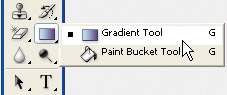
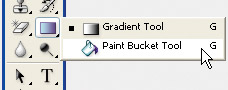
Select the Gradient Tool.
-
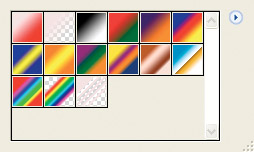
In the Options bar, click the button to the right of the currently selected gradient, and select one of the presets.
-
In the Options bar, click the appropriate button to select one of the following gradient types:
-
Linear creates a fill that blends colors in a straight line from the starting point.
-
Radial creates a circular fill that radiates from the starting point outward.
-
Angle creates an angular fill in a counterclockwise direction from the starting point.
-
Reflected creates symmetrical linear fills on either side of the starting point.
-
Diamond creates a diamond-shaped fill that radiates from the starting point outward.

-
Specify the Mode and Opacity for the fill.
-
Click the Reverse check box to reverse the order in which the gradient colors are applied.
-
Click the Dither check box to create a smoother blend of colors without bands.
-
Click the Transparency check box to create a transparency mask for the fill.
-
Click inside the document to specify the starting point for the fill, and then drag to create the fill.
-
Edit a Gradient
-
Select the Gradient Tool and select a gradient as outlined previously.
-
Double-click the Gradient preview (second button from the right) in the Options bar to open the Gradient Editor.
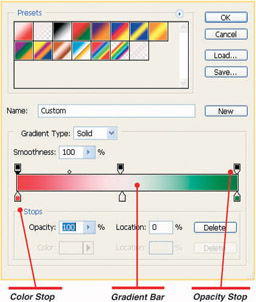
-
Click a spot on the top of the Gradient Bar to add an Opacity Stop.
-
Click a spot on the bottom of the Gradient Bar to add a Color Stop.
-
Click an Opacity Stop and in the Stops section, type an Opacity value in the Opacity text box. Alternatively, you can enter a value for Location for a Color or Opacity stop. The value you type is a percentage. For example, a value of 50 is the midpoint of the Gradient Bar.
-
Click a Color Stop and in the Stops section, click the Color Swatch to specify the stop color from the Color Picker stop. Alternatively, you can double-click the Color Stop to open the Color Picker.
-
Click OK to apply the changes.
Use the Paint Bucket Tool
Use the Paint Bucket Tool to replace areas of color with a different color. You can determine the extent of the color replacement by specifying a Tolerance value.
-
Select a Foreground color.
-
Select the Paint Bucket Tool.
-
In the Options bar, click the button to the right of the Fill field, and select Foreground, to fill the tool with the Foreground color, or Pattern. If you select Pattern, the Pattern field becomes available.
-
Click the inverted triangle to the right of the current pattern preview, and select a preset.
-
Specify Mode and Opacity for the tool.
-
Type a value in the Tolerance field. This value determines how closely pixels must match before they are filled. You can specify a value between 0 and 255. Enter a low value to fill pixels that are similar in color, a high value to fill pixels with a wider color range.
-
Click the Anti-Aliased check box (the default) to ensure smooth blending of adjacent pixels.
-
Click the Contiguous check box (the default) to fill contiguous pixels of similar color. Deselect the option to fill all similar pixels within the image.
-
Click the All Layers check box to apply the fill to pixels of similar color in all layers.
-
Click inside the area you want to fill.
Tip To save a modified gradient, type a name in the Name field, and then click Save.
Create and Manage Patterns
You can create patterns by sampling an area from within an image. After creating a pattern, you can apply it as a fill using the Paint Bucket Tool.
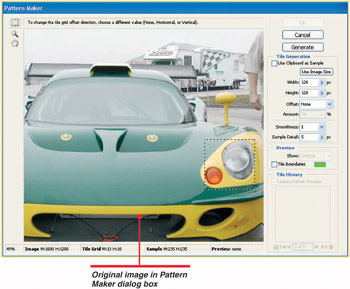
Use the Pattern Maker
The Pattern Maker enables you to create your own patterns by sampling selected areas of an image. You can use the tool to add patterns to the Pattern library. The Pattern Maker is capable of generating up to twenty patterns from a selection. You select the patterns you want to add to the Pattern library and delete the rest.
Create a Pattern
-
Open the desired image.
-
Select the Rectangular Marquee Tool, and select the pixels you want to use as the basis for your pattern. Hold down the shift key while making the selection to constrain the selection bounding box to a square.
-
Select Edit | Copy to copy the selection to the clipboard.
-
Select Filter | Pattern Maker to open the Pattern Maker dialog box.
-
Click the Use Clipboard As Sample check box.
-
Type equal values in the Width and Height fields to create a square pattern. Alternatively, you can click the button to the right of each field, and drag the sliders to set Width and Height.
-
To offset the tiles, click the button to the right of the Offset field, and select Vertical or Horizontal. After you select an offset option, the Amount field becomes available. Type the amount by which you want the tiles offset. This value is a percentage of the dimension in the specified direction.
-
Click the button to the right of the Smoothness field, and choose a value from the drop-down list. Alternatively, you can type a value from 1 to 3 in the field. A higher value produces a more complex pattern, and the pixel transitions are not as smooth.
-
Click the button to the right of the Sample field, and drag the slider to specify the sample size from within the selected area. Small values work better and create more interesting patterns.
-
Click Generate Pattern to create a tiled preview of the pattern in the preview area.

-
Click Generate Again to create additional patterns. You can generate up to twenty patterns. After generating patterns, you preview them and decide which ones you want to add to the Pattern Library.
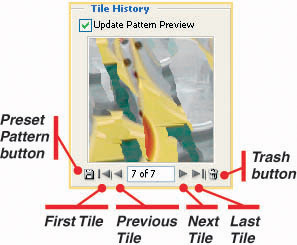
Preview and Save Patterns
-
Click the buttons at the bottom of the preview window in the Tile History section to preview the patterns you’ve generated. Alternatively, you can type the number of the pattern you want to view, and then press enter.
-
Click the Trash button to delete a tile.
-
Click the Preset Pattern button to open the Pattern Name dialog box.
-
Type a name for the pattern, and then click OK. After saving the pattern, it appears in the Pattern Library for future use.
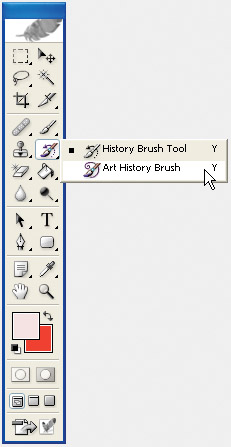
Use the Art History Brush
The Art History Brush makes it possible for you to create stylized artwork by painting into an image using a history state. As a rule, you’ll open an image, apply a filter to the image, and then use that history state as the basis for the Art History Brush.
-
Open the desired image.
-
Apply the desired filters to the image.
-
Select the Art History Brush.
-
In the Options bar, select a brush tip and diameter as outlined previously.
-
Specify the Mode and Opacity.
-
Open the Style drop-down list, and choose an option from the drop-down list. Each option is a description of the type of brush stroke the tool will create.
-
Type a value for Area. This value designates the area covered by a brush stroke with the tool. If you specify a large value, the tool covers a large area and creates numerous brush strokes.
-
Type a value for Tolerance. Specify a low value to paint anywhere in the image, a high value to paint only in areas where the color of the history state varies greatly from the image’s original color.
-
Select Window | History to open the History palette.
-
Click the Open history state. This returns the image to its original state; however, the filter is still applied until you use the Art History Brush.
-
Click the blank square in the Set Source For The History Brush column to the left of the image state that you want the Art History Brush to sample.
-
Drag inside the image to paint with the tool. Figure 5-1 shows an image before and after a makeover with the Art History Brush.
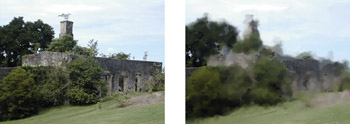
Figure 5-1: You can create stylized artwork by painting inside an image with the Art History Brush.
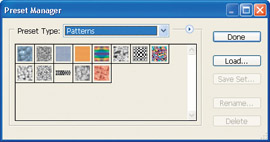
Use the Preset Manager
The Preset Manager enables you to manage presets for every preset library in Photoshop. You use the Preset Manager to rename presets, load preset libraries, save presets, and more.
Select a Preset Type
-
Select Edit | Preset Manager to open the Preset Manager dialog box.
-
Click the button to the right of the Preset Types field, and select the desired type from the drop-down list.
-
Click a preset to select it. After selecting a preset, you can do one of the following:
-
Click Rename to open the Rename dialog box and rename the preset.
-
Click Delete to delete the preset.
-
Click Done to exit the Preset Manager and apply your changes.
-
Create a Preset Group
-
Select Edit | Preset Manager to open the Preset Manager dialog box.
-
Click the button to the right of the Preset Types field, and select the desired type from the drop-down list.
-
Select the presets you want to combine as a group. Click the first preset, and then press ctrl while clicking additional presets you want to add to the group.
-
Click Save Set to open the Save dialog box. The file format will vary depending on the preset group you’re editing. For example, the file format for styles is ASL.
-
Type a name for the preset group, and then click Save.
Load a Preset Group
-
Select Edit | Preset Manager to open the Preset Manager dialog box.
-
Click the button to the right of the Preset Types field, and select the desired type from the drop-down list.
-
Click Load to open the Load dialog box.
-
Select the desired preset group.
-
Click Load to load the desired group.
EAN: 2147483647
Pages: 59