Create and Edit Images
| In Linux, you can do almost every graphics task, from logo creation, complex image editing, and Web site graphics, to simple things such as just playing around with a paint program, taking the red eye out of a photo, and resizing an image. Most of your image work in Linux can be done in a program called the GIMP. However, the playing around and simple things can also be done in more basic programs, such as KPaint, for anyone who prefers to keep things simple. GIMP
The GIMP is the signature graphics program for Linux. It is a powerful program that can take care of most image functions you might have used Adobe Photoshop for on a PC or Mac. Dedicated Photoshop users should not come into the GIMP expecting to find the same program or features. The GIMP is its own program, with its own way of doing things. GIMP is a screen graphics program that deals better in pixels than inches. Print designers looking for CMYK support and Pantone colors might find frustration. New versions of the GIMP include CMYK support, but print graphics are not the GIMP's strong suit. The GIMP is best used for Web graphics, digital photos, and projects that will be mainly viewed onscreen or that do not need high print quality. You probably already have the GIMP installed; it comes with most distributions. New versions come out infrequently but incorporate big changes. If you happen to be using an older distro that came with one of the 1.x versions of the GIMP, close it now and grab a new version, 2.x or later. The usability difference between those version numbers is a vast improvement. The first time you open the GIMP, you see a settings wizard. You can accept the default choices and move through the end of the wizard with no problem. Designers or those of a meticulous nature might want to stop along the way to adjust screen resolution and ruler settings. The Photoshop-to-GIMP Conversion Guide
Using the GIMPThe GIMP is arranged as a group of windows, not one big window, as you see in most applications. The window list on your panel shows all GIMP windows listed almost as if they were different programs. Every image you open appears in its own window. Some might enjoy this feature and find it somehow useful. I have to admit that all those windows are not my favorite GIMP behavior. When I open a whole set of images, I have to just ignore my panel window list. The two default GIMP windows are the toolbox window and the layers window.
The toolbox window has icon buttons for all the tools you can use to perform actions on an image, and it is also the GIMP's main program window. Close this window, and you close the program. Hover your mouse over each toolbox button to see the name of each tool. At the top of the toolbox window are some menus. These are the GIMP's high-level menus, File, Xtns, and Help. More menus are available in the image windows. The Preferences option is in the File menu. You will want to go adjust preferences as you use and learn more about the GIMP. The other interesting option is Dialogs, where you can change which dialog boxes are in view within the program windows, such as brushes and tool options. In the Xtns menu are choices for managing modules, plug-ins, and scripts. These are add-ons you can use with the GIMP. I suggest that you get familiar with using the GIMP before you start looking for add-ons. Those used to other graphics programs such as Photoshop or PaintShop Pro will find a lot of common language and function in the GIMP. You still work with images in layers and still have basic functions such as resizing, cropping, hue and saturation, and brightness and contrast. Those functions are even named similarly in the GIMP as they are in other programs. The GIMP goes its own direction in a few areas, such as filters, access to tools and menus, and a custom scripting ability called Script-Fu.
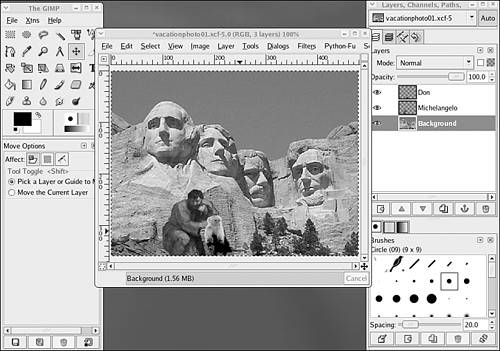
The GIMP can open, save, and edit numerous file types, including .gif, .jpg, .png, .tif, and .bmp files (see Figure 9.4). You can even open and edit .psd files with layers from Photoshop. The GIMP's own file format is .xcf. This is the format you should save your work in to preserve the layers. You get a prompt when saving multilayered images in other formats that cannot save multiple layers, asking if you want to export the file and warning you that information will be lost. It is a good practice to keep a copy of your work saved as an .xcf file with all of the layer information. Having that original work saved is handy if you want to edit the image later. Figure 9.4. The GIMP with an image open.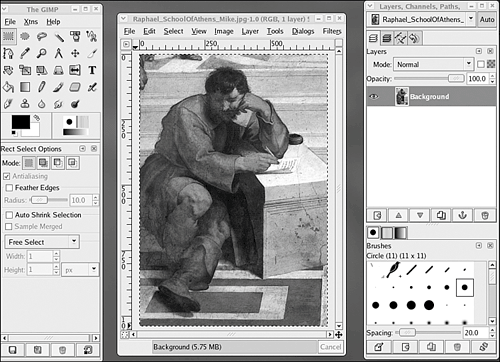 There are two types of menu bars in the GIMP. You know about the high-level menus in the toolbox window, File, Xtns, and Help. The other set of menus shows up in each image window. These menus run along the top of the image window and can also be accessed by right-clicking anywhere in your image. FileThis menu has the usual New, Open, and Save choices. Note that the save options in the image window save only that image. The File menu in the toolbox window does not work for anything on the individual image. EditOptions in this menu that are different include Paste Into, which acts like Paste unless there is a selection made at the time. Paste as New pastes the Clipboard image as a new image. Buffer is a shared clipboard for all open images in the GIMP. The Stroke choices are for outlining selections. SelectChoices are here for selecting and transforming parts of the image. ViewMost of these options are for toggling different parts and tools of the GIMP into and out of view. The handy choices on this menu are in View > Zoom to zoom in for close work or zoom out to "step back" from your work. The Shrink Wrap option is also great for getting your window sizes under control. ImageThis is where you go to scale the image and Clipboard, change the mode, and crop images. This will be one of your most used menus. You can also use the choices under Transform to flip and turn an image. LayerMost of the choices in this menu are better used in the layers window. However, the Colors submenu has all the choices for HueSaturation, BrightnessContrast, and Desaturation. There is also the Transparency submenu for alpha choices. ToolsHere you can switch to a few of the basic tools, but using the toolbox window is better. DialogsThese choices are sort of a subset of the Views menu, enabling you to open different dialog boxes and palettes such as brush choices. FiltersThis menu is comparable to the Filter menu in PhotoShop. Here you will find all the effects for images, as well as a few run-of-the-mill image enhancements such as Sharpen. Open an image and play with applying some of the filters, to get familiar with what they do. Python-Fu and Script-FuThis is the GIMP's scripting language. Script-Fu is like a more powerful version of the macros that are used in some Windows programs. A few popular scripts, such as drop shadow, are built into the default installation of the GIMP, but new scripts can be written or found online to use in the GIMP. There is also now a Python-Fu menu in the image window. Python-Fu is just like Script-Fu, but for developers who want to write their scripts using the Python language. Saving files in the GIMP gives you opportunities to make some decisions about the final output image. Unlike other programs, you do not use a drop-down menu in the Save dialog box to choose the file type to save your image as; this is determined from how you name the file. If you call your image MichelangeloAtMountRushmore.jpg, it will be saved as a .jpg image. For image types such as .gif, .png, and .jpg, you get the opportunity to optimize the image during the save process, with the final optimized image previewed in the image window itself.
All the features in the GIMP might be overwhelming to you if you just want to quickly crop or edit one of your own photos. Use as much or as little of the power in the GIMP as you like. Most of the time, I open the program to simply resize and crop an image. KPaint
Sometimes you need to play. Sometimes you need to doodle. Sometimes you need to give the kids something to do for a while. Sometimes you need to open a picture of a politician you don't like and draw on a funny moustache and devil horns (see Figure 9.8). You could do all of those things in the GIMP, but sometimes you want to stay simple. KPaint is the simple solution. The program is comparable to Paint in Windows. Everything in KPaint is basic. As must be obvious to you now, the K means that it is a KDE program. Figure 9.8. Using KPaint to abuse James K. Polk.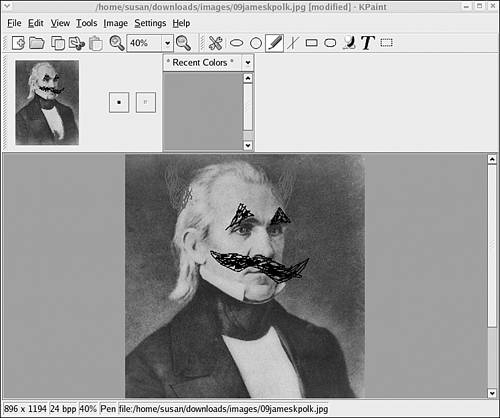 If you have ever used Microsoft Paint, you have pretty much used KPaint. The two programs are similar in function. There are simple tools, such as a paintbrush or line tool, and a plain white palette to draw or paint on. If you are frightened by all the options in the GIMP, you can do simple resizing of images in KPaint, but you will lose the option of controlling the quality of image that you save. |
EAN: 2147483647
Pages: 141