Bouncing Off the Walls
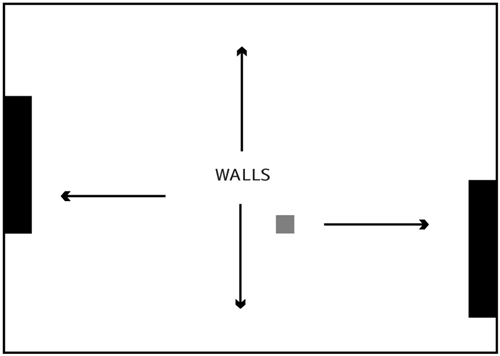
| A wall is any object that cannot move as a result of a collision, but that can be collided with. For instance, if you throw a tennis ball at a wall, the wall does not move, but it certainly gets hit! By this definition, even the paddles in a simple game of Pong are considered walls. In that case, they are walls that can move, but their movement is not the result of a collision. In this section we'll look at collisions with walls, and collisions with lines of any angle, which are often used as walls. (Later in this chapter we'll work with the less stationary objects.) Object-Wall Reactions
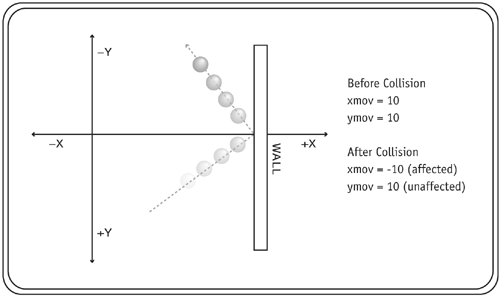
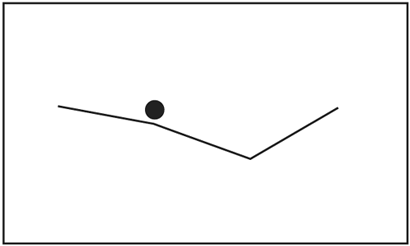
An object-wall collision (affectionately called ball-wall) is the easiest type of collision to program a reaction for. Think of the tennis-ball example again. When the tennis ball bounces off the wall, it rebounds at the same speed at which it struck the wall. (Since this is an elastic collision more on that later there's no energy lost in the collision, and therefore no loss in speed.) This is good news for us, because it means that when we detect a collision with a wall, we can just reverse the object's speed. Note that we would only reverse the speed component that is perpendicular to the wall, as shown in the image below.
We are not going to discuss most of the ActionScript in this file. Rather, we are going to focus on the areas where collision reactions are used. If you have read through the previous chapters on collision detection and physics, then you are familiar with just about all of the ActionScript in this file. What may be new to you are two things:
In this particular file, collision reaction is implemented in every place where a collision-detection script sits. We check for collisions in the methods game.checkForWalls() and game.checkPaddleCollisions(). Here is the ActionScript for the game.checkForWalls() method: 1 game.checkForWalls = function() { 2 if (this.ball.tempy<0) { 3 //hit top wall 4 this.ball.tempy = 0; 5 this.ball.ymov *= -1; 6 } else if (this.ball.tempy+this.ball.radius>this.height) { 7 //this bottom wall 8 this.ball.tempy = this.height-this.ball.radius; 9 this.ball.ymov *= -1; 10 } 11 }; If you remember from the previous chapters, we usually create a temporary position in memory describing where an object will be, tempx and tempy. We use this temporary position to check for collisions. The upper boundary of the game board is 0; the lower boundary is game.height. In line 2 of the ActionScript above, we check to see if ball.tempy is less than 0. If it is, then a collision is occurring with the top wall, and the if statement is entered. Line 4 sets ball.tempy = 0, which positions the ball right up against the top wall. This is a necessary step. Due to the frame-based nature of Flash MX, ball.tempy could be substantially less than 0, and if we did not set it right up against the boundary and we only reversed the speed when a collision occurred, then it would look as if the ball went into the wall rather than bouncing off the wall. In line 5 we finally perform the very simple collision reaction: We reverse the y speed of the ball. The else if piece of the conditional statement, in line 6, checks to see if the y position of the ball's bottom edge is greater than the y position of the game's lower boundary. (The bottommost part of the ball is its y position plus its height.) You may recall that the value for the y position of the game's bottom boundary was set earlier in the frame as game.height. Since the checkForWalls() method belongs to the game object, then we can access this property by using this.height, which we do in line 6. If this condition is satisfied, then we know the ball is colliding with the bottom wall, and we enter this piece of the if statement (lines 7 9). In line 8 we set the position of the ball so that it sits right up against the bottom wall. We do this for the same reason as we did it for the top wall so the ball doesn't look as if it has gone through the wall. In line 9 we reverse the ball's y speed; this is our collision reaction. Now let's look at the game.checkPaddleCollisions() method: 1 game.checkPaddleCollisions = function() { 2 if (this.ball.tempx In this ActionScript, the if statements look complicated, but the concept here is one that you have already used in the Collision Detection chapter, when we talked about rectangle-rectangle collision detection. They are each simply checking for a collision between two rectangles the ball and a paddle. We saw how to perform rectangle-rectangle collision detections in the previous chapter. Here, we check for the following conditions:
If all four of the above conditions are met, then a collision has occurred between the ball and the paddle. This check is done in exactly the same way in lines 2 and 7: once for the left paddle and once for the right paddle. If the condition in line 2 is met, then the ball is colliding with the paddle, and lines 4 and 5 are executed. Line 5 positions the ball so that it is just barely touching the paddle on the right side. Line 5 reverses the ball's x speed. Likewise, if the condition in line 7 is met, then the ball is placed so that it is just barely touching the paddle on the right, and its speed is reversed.
1 function ballFloorDetection() { 2 if (ball.tempy+ball.radius>floorY) { 3 ball.tempy = floorY-ball.radius; 4 ball.ymov *= -1*decay; 5 } 6 } If a collision is happening, then the ball's speed is reversed and multiplied by the variable decay. Decay is a way to have the ball bounce less high on each successive bounce; it lowers the magnitude of the speed by a percentage each time a collision happens. All decay values are between 0 and 1. For instance, in this file we are using a decay of .6 (set at the top of the frame, not shown here). That means each successive bounce will rebound with only 60 percent of the speed with which it collided in the first place. The possible values for decay are all positive numbers (including zero), but the realistic range is between 0 and 1. If decay is set to 0, then the ball will stick to the ground. If decay is set to 1, then the ball will bounce to the same height forever. If the decay is set to a value greater than 1, the ball will bounce higher on each successive bounce (which is no longer a decay). When you generate a SWF from this file, you'll see that the ball will bounce a few times and then stop. This mimics the behavior of a regular old basketball. The goal of this chapter is to show you how to program realistic reactions. Adding a decay factor is one easy way to add realism to your floor or wall collision reactions. Circle-Line ReactionsCircle-line, or ball-line, reactions occur when a ball collides with a line at any angle (such as the angled walls in a game of pinball). There are three steps to finding the resultant x and y velocities of a ball after a collision with a line:
When two objects collide, the momentum affected is the component that lies along the line of action the imaginary line that runs perpendicular to the tangent line that goes through the point of collision.
Project xmov and ymov onto line of action and the line.
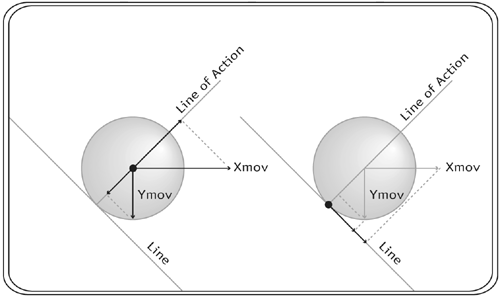
Now that you've seen the quick overview of how to find those velocities, we'll jump in and go through it step by step. Let's call the x velocity of the ball vxi (v for "velocity," x for "x direction," i for "initial") and the y velocity of the ball vyi. The projection of vxi and vyi onto the line of action is vyip (p stands for "prime"): vyip = vyi*cos(alpha)-vxi*sin(alpha) The projection of vxi and vyi onto the line itself is vxip. vxip = vxi*cos(alpha)+vyi*sin(alpha) Now that step 1 is complete, we move on to step 2 and reverse vyip (remember that f stands for "final"). vyfp = -vyip vxfp = vxip Notice that the final velocity along the line (vxfp) is unchanged. Now we move on to step 3 to project vyfp and vxfp back to the x and y axes to arrive at the final velocities, vxf and vyf. vxf = vxfp*cos(alpha)-vyfp*sin(alpha) vyf = vyfp*cos(alpha)+vxfp*sin(alpha)
1 function ballLineReaction(tempLine, point, x, y) { 2 var lineDecay = tempLine.lineDecay; 3 var alpha = tempLine.angle; 4 var cosAlpha = math.cos(alpha); 5 var sinAlpha = math.sin(alpha); 6 //get the x and y velocities of the ball 7 var vyi = point.ymov; 8 var vxi = point.xmov; 9 //project the x and y velocities onto the line of action 10 var vyip = vyi*cosAlpha-vxi*sinAlpha; 11 //project the x and y velocities onto the line 12 var vxip = vxi*cosAlpha+vyi*sinAlpha; 13 //reverse the velocity along the line of action 14 var vyfp = -vyip*lineDecay; 15 var vxfp = vxip; 16 //translate back to Flash's x and y axes 17 var vyf = vyfp*cosAlpha+vxfp*sinAlpha; 18 var vxf = vxfp*cosAlpha-vyfp*sinAlpha; 19 //set the velocities of the ball based from the results 20 point.xmov = vxf; 21 point.ymov = vyf; 22 point.tempx = point.x+point.xmov; 23 point.tempy = point.y+point.ymov; 24 } This function is called from the getFrames() function when a collision has been detected. A reference to the line object is passed in as tempLine, and a reference to the object that represents the ball is passed in as point. The x and y positions of the ball at the point of contact are also passed into this function. Line 2 sets a variable called lineDecay. This is a value between 0 and 1 that reduces the rebound velocity. (The concept of decay was introduced earlier in this chapter. If decay has a value of 1, then there is no decay.) Next we set variables to store the cosine and sine of the line angle (lines 4 and 5). We store these values because they are needed more than once throughout the ActionScript, and as you've already seen, it is quicker for Flash to reuse the variables than to calculate the sine and cosine repeatedly. To match variable names with what we worked out in this section, we set two variables, vyi and vxi, from the y and x velocities of the ball (lines 7 and 8). In line 10 we project vyi and vxi onto the line of action, and in line 12 we project vxi and vyi onto the line. We then reverse the velocity along the line of action, vyip, and multiply it by lineDecay. The act of reversing this velocity is the reaction to the collision. Next, in lines 17 and 18, we project back onto the x and y axes. In lines 20 and 21 we update xmov and ymov on the ball object with the new velocities. Finally, we update tempx and tempy on the ball object (lines 22 and 23).
Generate a SWF from this file to see it in action. You will note that three lines are created. The ball falls under gravity onto a line and bounces around a bit. Eventually the ball comes to a rest in a small dip. |
 <this.leftPaddle.x+this.leftPaddle.width
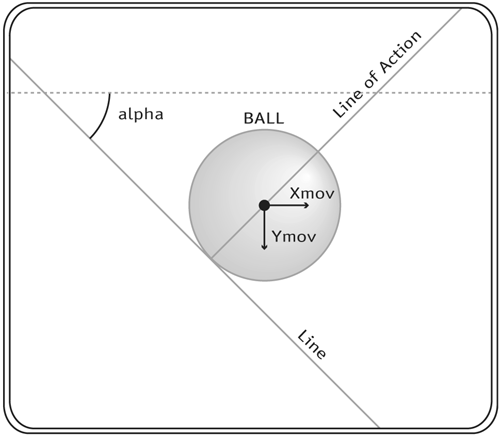
EAN: N/A
Pages: 163