| Before you use a function, you must create or define it. You can do this by using one of two possible syntaxes. Syntax 1 This code describes the first syntax: function myFunction (parameter1:DataType,parameter2:DataType,etc.) { //actions go here; }
The code represents the most common way of creating a function, as well as the syntax we'll use most frequently in this lesson. You'll see that the function declaration begins with the word function, followed by the name of the function (which can be anything you choose, as long as it follows typical naming conventions). Following the function name is an area enclosed by parentheses. You can leave this area blank or you can fill it with information (parameter data) that the function can use. By leaving the area within the parentheses blank, you create a "generic" functionthat is, one that performs the same way whenever it's called (used). If your function contains parameters, it will perform in a unique way each time it's called based on the parameter information it receives. Giving the function information in this way is called passing in arguments or passing in parameters. You can use as many parameters as you want. We'll tell you how to use parameter data a bit later in this lesson. Following the optional parameter area is an open curly brace, followed by a carriage return and then some actions before the curly brace that concludes the function. In the space between the curly braces, you write the actions that you want your function to perform. These actions can also make use of any parameter information passed to the function (as you will see soon). Syntax 2 This code represents the second syntax for creating functions: myFunction = function (parameter1:DataType,parameter2:DataType,etc.) {/* actions go here */ };
You would use this syntax to create a function dynamically or to define your own custom method of an object (which we'll discuss in Lesson 6, "Custom Classes"). The only difference between this syntax and Syntax 1 is in the way the function name is assigned: The function name appears first, and the syntax for defining how the function will work follows the = assignment operator. Now that you understand the basic syntax for creating/defining a function, let's look at how a function is used, or called. If a function contains no parameters, it can be called using the following syntax: myFunction();
When you call a function, you're telling Flash to execute all the actions within that function. If myFunction() contained 20 actions, they all could be executed by using this single line of script. If a function has been defined to accept parameter data, you can use the following syntax to call it: myFunction(parameter1, parameter2);
If parameter1 had a value of cat and parameter2 had a value of 36, those two values would be sent to the function for use by the actions within the function definition. At a later time, the same function could be called, but different parameter values sent. This would result in the same function working in a slightly different way from the first example because the actions within the function would be making use of different parameter values. The foregoing examples assume that the function and function call reside on the same Timeline. Just as each Timeline contains its own variables and objects, each Timeline also contains any functions you've defined there. To call a function on a specific Timeline, you need to place the target path to that Timeline in front of the function call like this: _root.clip1.clip2.myFunction();
In this exercise, you'll create a Power button on a television remote control. With this button, the Flash TV can be toggled on and off using a function. Note A function can be called dynamically based on a valuefor instance, _root[aVariableName]();. Thus, if aVariableName had a value of "sayHello", the function call would actually look like _root.sayHello();.
1. | Open television1.fla in the Lesson02/Start folder.
The movie's structure has already been created. The Actions layer is where you will include all of the ActionScript for this exercise. On the TV layer, a movie clip instance named tv_mc has three layers on its Timeline: the bottom layer (Television) is a graphic, and the layer above that (Screen) contains a movie clip instance called screen_mc (which is then masked by the layer above that). The screen_mc movie clip instance, which includes two layers and two frames, contains graphical content that represents the various "programs" seen when changing channels on the TV.
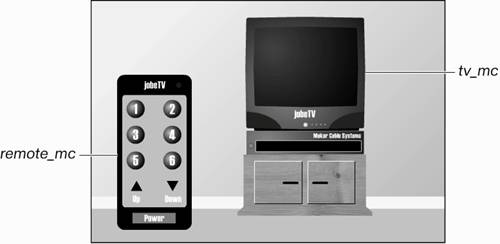 On the main Timeline, a layer named Remote contains a movie clip instance named remote_mc. Inside remote_mc, you'll find a layer that contains most of the remote control graphics, including a movie clip with an instance name of light_mc, as well as another layer that contains the buttons for the remote. The numbered buttons have instance names of channel1_btn through channel6_btn. Under the numbered buttons are the Up and Down channel buttons whose instance names are up_btn and down_btn, respectively. The bottom button, Power, has an instance name of power_btn. On the main Timeline, a layer named Remote contains a movie clip instance named remote_mc. Inside remote_mc, you'll find a layer that contains most of the remote control graphics, including a movie clip with an instance name of light_mc, as well as another layer that contains the buttons for the remote. The numbered buttons have instance names of channel1_btn through channel6_btn. Under the numbered buttons are the Up and Down channel buttons whose instance names are up_btn and down_btn, respectively. The bottom button, Power, has an instance name of power_btn.
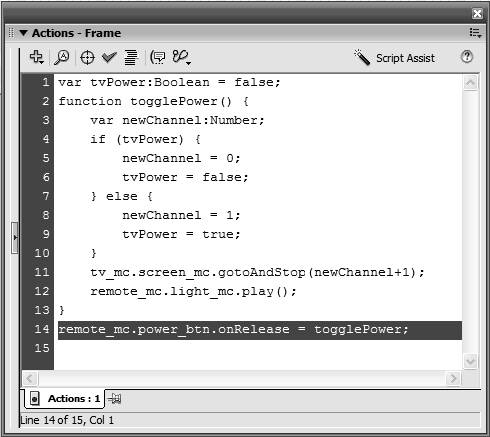
| 2. | Select Frame 1 of the Actions layer on the main Timeline. With the Actions panel open, add the following script:
var tvPower:Boolean = false; function togglePower() { var newChannel:Number; if (tvPower) { newChannel = 0; tvPower = false; } else { newChannel = 1; tvPower = true; } tv_mc.screen_mc.gotoAndStop(newChannel+1); remote_mc.light_mc.play(); }
The first line of this script creates a variable named tvPower, which is used to track the current state of the TV. A value of true means the television is on; false means the television is off. The television will appear off initially, so tvPower is set to false.
The next 11 lines represent a function definition for togglePower(). When called, this function will toggle the television power on and off. No parameters are passed into this function. Because this script exists on Frame 1, our togglePower() function is defined, and a variable called tvPower is set to false as soon as the frame is loaded (that is, when the movie begins to play).
Note Because functions must be defined before they can be called, it is common practice to define all functions on an early frame in your movie so that they can be called at any time after that. The first part of the function uses an if statement to analyze the current value of tvPower. If tvPower is true (TV is on) when the function is called, the actions in the function change it to false (off) and set the value of the newChannel variable to 0; otherwise (else), tvPower is set to true and newChannel to 1. Using the if statement in this manner causes the value of tvPower to be set to its opposite each time the function is called, thus toggling the value of newChannel. By the time this statement is finished, newChannel has a value of 0 or 1.
Note We use if statementsconditional logicin a few places throughout this lesson. They are not formally covered until Lesson 4, "Arrays and Loops." For now, it is enough to know that they are used to determine whether a certain condition is met. If that condition is met, extra code will be executed. The function then sends the screen_mc movie clip instance (which is inside the tv_mc movie clip instance) to a frame based on the current value of newChannel + 1. You must add 1 to the value of newChannel to prevent the Timeline from being sent to Frame 0 (newChannel sometimes contains a value of 0, and there's no such thing as Frame 0 in a Flash movie Timeline). In the end, this part of the function will send the screen_mc movie clip instance to Frame 1 (showing a blank TV screen) or Frame 2 (showing Channel 1).
The function finishes by telling the light on the remote control to play, which causes it to blink, providing a visual indication that a button has been pressed.
There is now a function on Frame 1 of the main, or root, Timeline. Although this function contains several actions, none of them is executed until the function is called.
| 3. | With the Actions panel still open, add this script to the end of the current actions (after the function definition):
remote_mc.power_btn.onRelease = togglePower;
 The Power button for the remote control has an instance name of power_btn (and it exists inside the remote_mc movie clip instance). This line of ActionScript assigns an onRelease event handler to the Power button: our togglePower function. Every time the Power button is clicked, the togglePower() function is called, causing the actions within the function to be executed.
| 4. | Choose Control > Test Movie. Then click the Power button several times to view the TV on/off functionality you created.
Every time you press the Power button, the togglePower() function is called so that all the actions within that function are performed. As mentioned, the actions within the function toggle the state of the TV.
| 5. | Close the test movie and save your work as television2.fla.
You have now created and used a function! In the next section, we'll build on this idea to create a more powerful and versatile function.
|
|