| It's time to start using some XML! Nearly everything you do with XML in Flash involves the XML class and falls into one of the following categories: formatting XML, parsing XML (extracting the information), loading XML, or sending XML. With the XML class, you can load XML from an external source such as a static file or a server-side script. After an XML document is loaded, you can access its information using the methods and properties of the XML class. You can also use the methods and properties of the XML class to create your own XML document. After this document is created, you can use it in a Flash movie or send it out to a server-side script. This section covers the ActionScript you need to accomplish these goals. Formatting XML The XML class in Flash has several methods, most of which you can use to create and format XML documents. The truth is, though, you're unlikely to employ them because they're difficult to useand there's a better way. We'll show you how to create a string and then convert it into an XML class instance, a much easier (and more common) way of formatting XML. To create an XML instance in Flash, you must use the XML class constructor. Here's how you would create an empty XML instance: var myXML:XML = new XML();
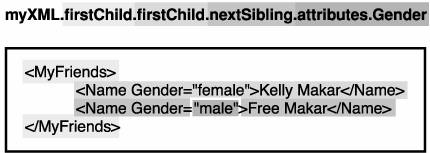
To populate the instance with XML-formatted data when it's created, you can pass (inside the parentheses of the constructor) the name of a variable that holds an XML-formatted string or another XML instance. Suppose you want to create the following XML document in Flash: <MyFriends> <Name Gender="female">Kelly Makar</Name> <Name Gender="male">Free Makar</Name> </MyFriends>
You would do two things: 1. | Create the document as a string.
| 2. | Convert the string to an XML instance by using the XML class constructor new XML().
|
Here's an example: var myString:String = "<MyFriends> ¬ <Name Gender=\"female\">Kelly Makar</Name> ¬ <Name Gender=\"male\">Free Makar</Name></MyFriends>"; var myXML:XML = new XML(myString);
This code creates the XML document as a string and converts it to an XML instance called myXML. This instance can then be sent to the server using the send-related methods described later in this section of the lesson. Parsing XML The word parse simply means to analyze something or break it down into its parts. When someone speaks of writing a script to parse an XML document, they're talking about writing a script that extracts information from that XML document. The XML class has many properties to help you do this. We'll use the XML instance just discussed, myXML, to illustrate the use of a few of the most common properties. firstChild: This property points to the first node in the tree structure. For example, myXML.firstChild.firstChild returns: <Name Gender="female">Kelly Makar</Name>
The first child node of the XML document is the root node (MyFriends), and the root node's first child is Name, as shown. childNodes: This property returns an array of the child nodes at any given point in the tree structure. For example: var myArray:Array = myXML.firstChild.childNodes
Here, myArray contains two elements whose values are the same as those of the two Name nodes. nextSibling: This property points to the next node in the same level of the tree structure. Thus, myXML.firstChild.firstChild.nextSibling returns: <Name Gender="male">Free Makar</Name>
attributes: This property returns an associative array of attribute names. For example: myXML.firstChild.firstChild.nextSibling.attributes.Gender returns: "male"
 These examples represent the most commonly used properties of the XML class; others work in the same way, referencing different parts of the tree structure. Loading XML Typically, you'll only work with XML in Flash when you're loading or sending out the XML. To load XML from a remote source, do the following: 1. | Create an XML instance.
| 2. | Use the load() method of the XML class to load XML-formatted data from an external source. For example:
|
var myXML:XML = new XML(); myXML.load("http://somedomain.com/info.xml");
Although in this example the document being loaded is a static XML file, it doesn't have to be. You can also point to an ASP page (or another scripted page) whose result is an XML document. To determine when the XML has finished loading into an instance, you use the onLoad event available to the XML instance. You can define this event to call a function when the document is finished loading. Consider the following example: function init () { //parse script here } var myXML:XML = new XML(); myXML.onLoad = init; myXML.load("http://somedomain.com/info.xml");
As the next-to-last line shows, when the XML document is finished loading, the init() function will be called. In the init() function, you write special code to interpret the XML. For example, if you're expecting an XML-formatted address book, you write some special code to walk the XML nodes, pulling out the data within them. We'll show some simple parsing examples later in this lesson. Sending XML The XML class allows you to send XML to a URL. It also enables you to send XML and load the resulting document simultaneously. To send XML to a URL, use the send() method and specify a destination URL: var myXML:XML = new XML("<Message><Text>Hi!</Text></Message>"); myXML.send("http://somedomain.com/somedestination.asp");
To send XML and receive a response, all in one shot, use the sendAndLoad() method of the XML class. With this method, you must specify an XML instance whose contents you want to send, a URL in which to send the XML document, and an XML instance in which to receive the response. As with the load() example described earlier, you must define an onLoad event to handle the loaded XML. Here's an example: var URL:String = "http://www.myDomain.com/UserLogin.asp"; function init () { trace(objToReceive); } var xmlToSend:String = ¬ "<Login><Username>Jobem</Username><Password>hayes</Password></Login>"; var objToSend:XML = new XML(xmlToSend); var objToReceive:XML = new XML(); objToReceive.onLoad = init; objToSend.sendAndLoad(URL, objToReceive);
This ActionScript creates an XML instance (objToSend) containing login information and then sends that information to a URL, where it waits for a response from the destination. When the response is fully loaded into the receiving XML instance (objToReceive), the init() function is called.  Now that you know a little bit about the XML format and the XML class, it's time to put that knowledge to use. In the following exercise, you'll format a few simple XML documents, perform some easy parsing, and use sendAndLoad() to create a simple Flash application that acts as a registration/login screen. The Flash file used in this section communicates with ASP pages. To fully build and test this file, you'll need access to a server in which you can run ASP scripts (this usually means a Windows server). To test the files in this exercise, you'll need to upload two ASP files (AddUser.asp and UserLogin.asp) and one Microsoft Access database file (XMLExample.mdb) to the same directory on a Windows server. These files can be found in the Lesson14/Assets folder. Note The ASP pages used in this lesson read and write to the database file. On most Windows servers, the permissions settings allow this exchange to take place. If you're having trouble getting the ASP files to perform correctly, ask your administrator or ISP to change the permissions settings to allow your ASP pages to access the database. We understand that not everyone reading this book has access to a Windows server. Because there are so many different server languages, it would be impossible to create supporting files for all of them. We chose ASP because of its ease of use and universality. Lack of a Windows server shouldn't diminish the value of the instructions that follow, however, because everything is explained in detail anyway.
The AddUser.asp page accepts an XML document structured as follows: <Register> <Username>jobem</Username> <Email>jobe@electrotank.com</Email> <Password>secret</Password> </Register>
If the user was registered properly, this page (AddUser.asp) returns the following result: <Register> <Message>User Inserted</Message> </Register>
If a user of the same name already exists, the ASP page returns this result instead: <Register> <Message>User Exists</Message> </Register>
The UserLogin.asp page accepts an XML document structured as follows: <Login> <Username>jobem</Username> <Password>secretword</Password> </Login>
If the information provided was correct, this page returns the following result: <Login> <Message>Login Correct</Message> </Login>
If the information provided was incorrect, the page returns this result instead: <Login> <Message>Login Incorrect</Message> </Login>
1. | Open loginRegister1.fla in the Lesson14/Start directory.
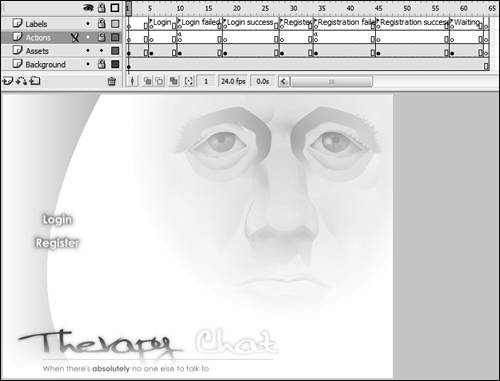
This file already includes all the frames, text fields, and buttons needed for this example. The file contains four layers: the Labels layer contains the frame labels we need; the Actions layer is where we'll write all the ActionScript; the Assets layer contains text fields (in the form of TextInput component instances) and buttons; and the Background layer contains the interface graphics.
 | 2. | With the Actions panel open, select Frame 1 of the Actions layer and add a stop() action.
By placing a stop() action here, we prevent the movie from playing automatically.
| 3. | Add the following script to the frame:
login_btn.onRelease = function() { _root.gotoAndStop("Login"); };
There is a button on the Assets layer on Frame 1 that has an instance name of login_btn. The script in this step assigns a function to the onRelease event handler for that button. The user clicks this button to go to the login frame, where he or she can log in.
| 4. | After the login_btn event handler, add the following script:
register_btn.onRelease = function() { _root.gotoAndStop("Register"); };
This script adds an onRelease event handler to the register_btn button instance. The user clicks this button to go to the register frame to register a new account.
| 5. | Move the playhead to the frame labeled Login. At this label are two TextInput component instances (username_ti and password_ti) and a button instance called submit_btn on the stage. With the Actions panel open, select the frame on the Actions layer at that label and add the following line of script:
var loginURL:String = "http://www.yourdomain.com/UserLogin.asp";
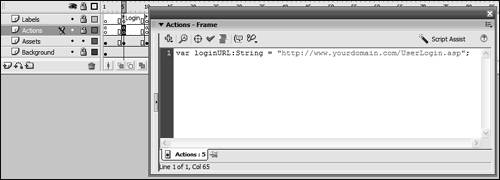 The variable loginURL points to the ASP page that accepts the login XML document (located at the domain where you uploaded it). The ASP page parses the document that you send and returns an answer to let you know whether the user provided the correct information. This URL should include the full path to the UserLogin.asp file that you uploaded. The variable loginURL points to the ASP page that accepts the login XML document (located at the domain where you uploaded it). The ASP page parses the document that you send and returns an answer to let you know whether the user provided the correct information. This URL should include the full path to the UserLogin.asp file that you uploaded.
| 6. | With the same frame still selected, add the following script:
var objToReceive:XML; submit_btn.onRelease = function() { var xmlToSend:String = "<Login><Username>" + ¬ username_ti.text + "</Username><Password>" + password_ti.text ¬ + "</Password></Login>"; var objToSend:XML = new XML(xmlToSend); objToReceive = new XML(); objToReceive.onLoad = loginResponse; objToSend.sendAndLoad(loginURL, objToReceive); _root.gotoAndStop("Waiting"); };
The first line of this script creates a variable named objToReceive, which will eventually hold an XML instance. Next, a function is defined. This function is called when the user clicks the Submit button, with an instance name of submit_btn. The function begins by using the values entered in the username_ti and password_ti TextInput component instances to format the XML that we're sending to the ASP page and then places that formatted data into a string variable named xmlToSend.
Next, we create a new XML instance named objToSend and pass it the XML-formatted string we just created. The reason for doing this is that the sendAndLoad() method only works with XML instanceswe can't apply it to a string.
Next, we create a new instance named objToReceive. This is the XML instance into which the ASP page's response is loaded. Using the onLoad event, we tell the objToReceive instance to call the loginResponse() function after the XML data has been loaded into it. We'll create the loginResponse() function in the next step.
The next action in the function invokes the sendAndLoad() method by specifying the instance to send, the destination URL, and the instance in which to load the response. Finally, the last action sends the Timeline to a frame named Waiting. This frame informs the user that the information was sent, but no response has been returned. The movie stops on this frame until it receives a response from the server.
You may wonder why objToReceive (which is used to receive incoming XML) was created outside the function definition, but objToSend (used to hold and then send outgoing XML) is created within the function definition because any variables or instances created within the function itself (using the var keyword) are considered local to the function, and thus are deleted from memory as soon as the function has finished executing, which takes only a split second. Although the sending of XML can be accomplished within the timeframe of the function's execution, it might take several seconds for the resulting XML to load into objToReceive, which is why that instance must exist after the function has finished executing. If it was deleted when the function was finished executing, there would be no instance into which to load the resulting XML.
| 7. | Add the following function definition after the one you added in Step 6:
function loginResponse() { var response:String = objToReceive.firstChild.firstChild.firstChild.nodeValue; if (response == "Login Correct") { _root.gotoAndStop("Login Success"); } else if (response == "Login Incorrect") { _root.gotoAndStop("Login Failed"); } }
The function in this step is called as soon as the last byte of XML is loaded into the XML instance called objToReceive, as described in Step 6. The function in Step 7 parses the XML response from the server. The loginResponse() function creates a variable named response and sets its value based on the data extracted from the returned XML document. Remember that the response of the UserLogin.asp page is in this format:
<Login> <Message>Login Correct|Login Incorrect</Message> </Login>
As a result, response will have a value of either Login Correct or Login Incorrect, depending on what's extracted from this XML document. An if statement then uses this value to send the Timeline to the frame labeled either Login Success or Login Failed. This action moves from the Waiting frame, which is used as an interim location while waiting for a response from the server.
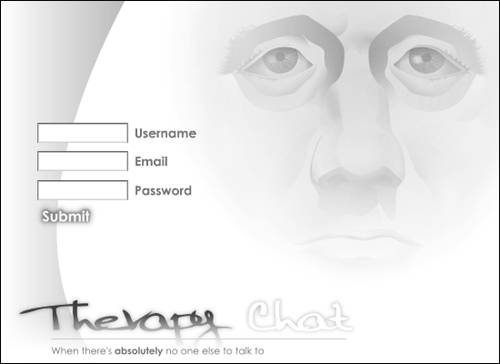
| 8. | Move the playhead to the frame labeled Register. At this label are three TextInput component instances (username_ti, email_ti, and password_ti) and a button with an instance name of submit_btn on the stage. With the Actions panel open, select the frame on the Actions layer at that label and add the following line of script:
var registrationURL:String = "http://www.yourDomain.com/AddUser.asp";
 This is the ASP page that accepts the registration XML-formatted document. It will process the information and return a result. Be sure to enter the correct path to the file that you uploaded. This is the ASP page that accepts the registration XML-formatted document. It will process the information and return a result. Be sure to enter the correct path to the file that you uploaded.
| 9. | With the same frame still selected, add the following script:
var objToReceive:XML; submit_btn.onRelease = function() { var XMLtoSend:String = "<Register><UserName>" + username_ti.text ¬ + "</UserName><Email>" + email_ti.text + "</Email><Password>" ¬ + password_ti.text + "</Password></Register>"; var objToSend:XML = new XML(XMLtoSend); objToReceive = new XML(); objToReceive.onLoad = registrationResponse; objToSend.sendAndLoad(registrationURL, objToReceive); _root.gotoAndStop("Waiting"); };
The ActionScript in this step is similar to that used in the Login frame label defined in Step 6the only differences are in the format of the XML and some reference names. Notice that the XML document here contains three pieces of user information: username_ti.text, email_ti.text, and password_ti.text. This is the information entered into the TextInput instances by the user. The destination script will parse this document and extract the information.
When the user clicks the Submit button, the contents of the three text fields are used to format an XML document. That XML document is then sent to the AddUser.asp page to be parsed, and the relevant content is added to the database. The ASP page returns a response, which is captured by the function added in Step 10.
| 10. | Add the following function definition after the one you added in Step 9:
function registrationResponse() { var response:String = objToReceive.firstChild.firstChild.firstChild.nodeValue; if (response == "User Inserted") { _root.gotoAndStop("Registration Success"); } else if (response == "User Exists") { _root.gotoAndStop("Registration Failed"); } }
The function in this step is called when the last byte of information is loaded into objToReceive. This function is similar to the loginResponse() function defined in Step 7. Remember that the AddUser.asp page returns a document of this format:
<Register> <Message>User Inserted|User Exists</Message> </Register>
As a result, response will have a value of either User Inserted or User Exists, depending on what is extracted from this XML document. An if statement then uses this value to send the Timeline to the frame labeled Registration Success or the frame labeled Registration Failed.
| 11. | Choose Control > Test Movie to test your work. Click the Register button and submit some information. Reopen the movie and then try to log in.
You have just created a simple application that illustrates some uses of the XML class. Test it a few times to make sure that you're comfortable with the ActionScript.
| 12. | Close the test movie and save your work as loginRegister2.fla.
Now you're ready to start creating some advanced data-driven applications.
|
|